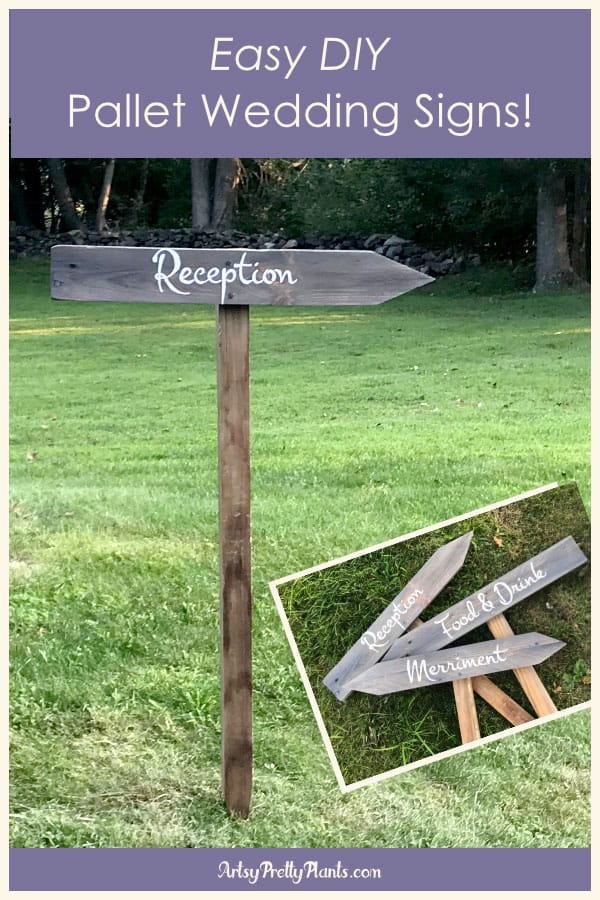
Wedding Pallet Signs (Easy DIY)
How to make easy rustic wedding pallet signs for your wedding, using a repurposed wood pallet.
This ended up being one of the things I enjoyed making the most for the wedding.
For our wedding, my then fiancé (now husband), and I used pallet wood to make our rustic wedding pallet signs.

They came out great and added another fun element to the reception.
You can find wood pallets just about anywhere -from grocery stores, big box stores, nurseries, appliance stores, warehouses, and others.
Most stores are happy to unload them, just make sure to get permission first. You can also check on Craigslist, which is how we found ours.
There was a warehouse that listed free pallets and we had a choice from 100’s of them, we made our choice and loaded up the car. Easy.
We made so many other things for the wedding, if you’d like to check my favorite tutorial, then hop on over to the and the Wine Cork Succulent Planters.
Some of the links on this page have been provided as a convenience for finding materials. These links may also be affiliate links. As an Amazon Associate I earn from qualifying purchases, at no extra cost to you.
I only recommend products I’ve used and loved, unless otherwise stated. Click here to read my full disclosure policy.
DIY Difficulty Level | Easy
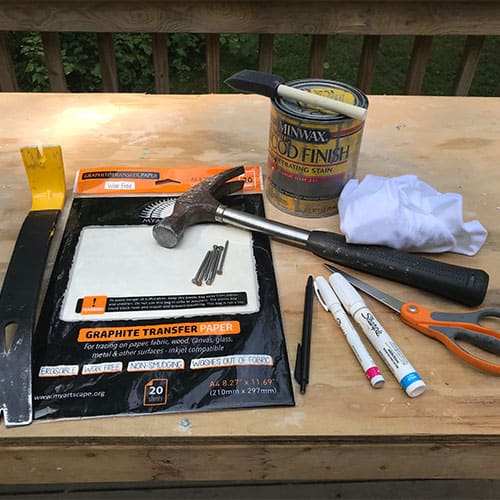
Materials For Making DIY Wedding Pallet Signs
- Wood pallet
- Minwax water based stain- Exterior water based in Classic Grey
- Rags
- 2″ Foam staining brush
- Graphite transfer paper- White-if you have it
- Free font- Montez or Download my free printables
- Sharpie Oil markers in White, Medium and Fine points
- 80 and 220 grit sandpaper for a random orbit sander
- Nails
- Pack of wooden garden stakes, or cut your own
Circular saw - Miter saw
- Random orbit sander
- Hammer
DIY Wedding Pallet Signs Tutorial Steps
Step 1. Cut The Horizontal Pallet Pieces
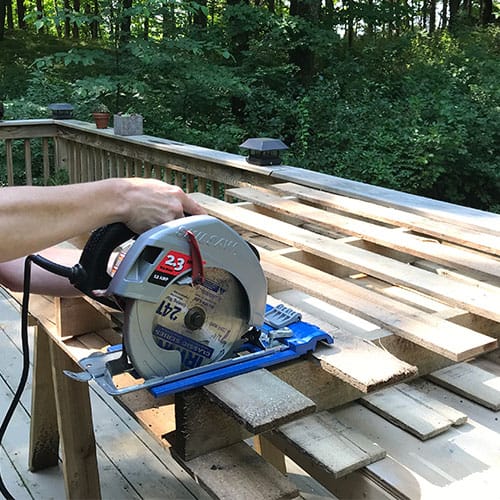
Break down the pallet. Lay the pallet on a flat surface. Using the circular saw, line it up on the inside of the inner crossbar.
You are going to trim the wood at each end of the outside stringers. You will be wasting a little bit of wood, but as I mentioned above, this is the easiest method.
Cut along the inside line, all the way.
Repeat on the inside of the stringer on the other end.
Step 2. Pry The Pallet Pieces from the Vertical Bar

Now you should be left with the wood attached by the center bar.
Press on each end and wiggle it back and forth a bit to loosen it make it easier to get the pry bar underneath.
Push the bar between the wood and center cross piece, lift up back and forth to pull it away. You may need to use a hammer to get the bar in deep enough.
Consider putting the pallet on its side and work at it that way if you have a particularly stubborn pallet.
Step 3. Repeat On The Other Side
Repeat each step on the reverse side of the pallet.
Step 4. Flatten The Nails
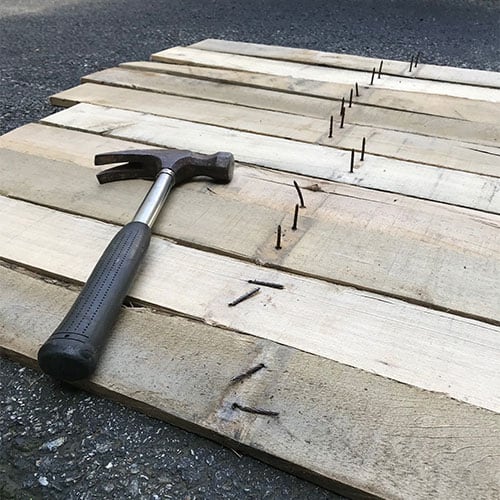
All your boards should be removed now. Lay them all on a flat, hard surface with the nails facing up.
Hammer the nails so they are flat against the boards. You can remove them if you want, but I prefer the look of the signs with the nails in them, rather than holes.
Try to get the nails into the wood as much as you can. This will be safer and make it easier for drawing on and painting the letters.
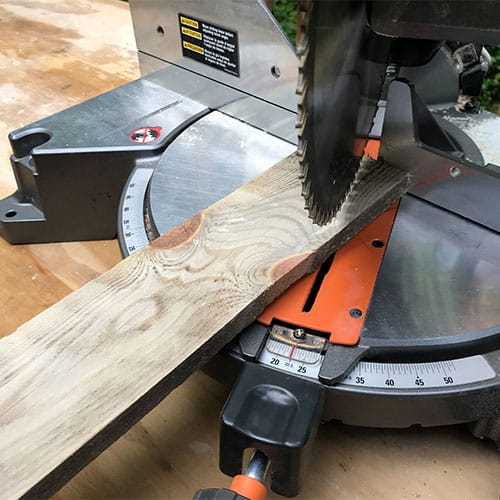
Step 5. Cut The Pallet Boards to Size
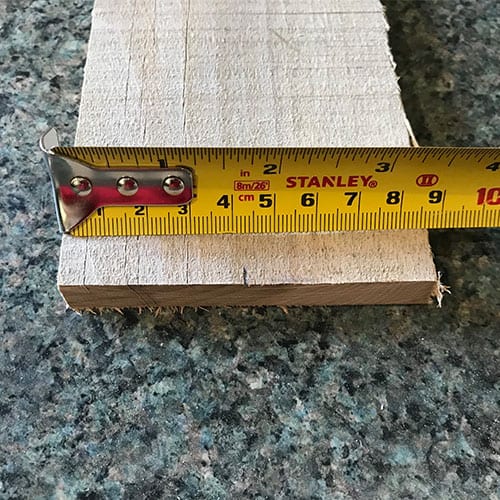
Trim the boards to 20″, then mark the center point of one end on the top side, and then the same end, but the bottom side.
Set the miter saw to a 22.5 degree angle. Place the board in with the end you marked so that it’s facing the blade, not perpendicular.
Trim the right edge at the set angle, then flip the board over and trim the left edge.
Step 6. Sand The Boards
Use the random orbit sander to sand the boards. Start with the lower grit paper, then to the finer grit.
Step 7. Stain The wedding Pallet Signs

Now the boards can be stained. Use the foam brush to stain the board.
Your boards may already have a nice look without the stain, but the main reason for staining these is so you can get enough contrast for the white lettering.
The Classic Gray color I chose was pretty similar to the color the wood had aged naturally, but the stain just made it a little darker and more uniform.
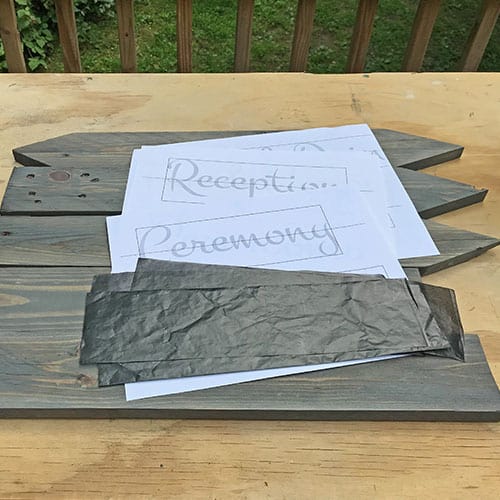
Step 8. Prep The Signage Artwork
Download my free printables. The printables have each word centered with rule lines to make it easier for you to center on your signs.
If you need sign words that aren’t in the printable, then you’ll need to download the font called Montez.
It has a free license, so use it any way you’d like. You can find it on several free font websites. 1001freefonts.com (not an affiliate link) is one of them.
Install the font and open up Microsoft Word or any graphics program.
Set the document up in landscape view (8 ½” x 11″) to have narrow margins so the sign words fit on the page width-wise.
You can fit two words per page. At a 200 point font size, type the first sign’s word.
Center the word on the page and then type the second word below that and print.
Note:
You may need to make the font smaller, depending on the height of the pallet wood.
Also, if your signage word is too long for the 8 ½” x 11″ size paper and you don’t have an 11×17 printer, just fit half of the word on one page and the other half on another page.
You can just tape them together, taking care to line them up.
Step 9. Transfer The Signage Words
Before taping the words to the signs, make sure you pre-plan the direction your sign needs to face.
In other words, if your ceremony will be taking place to the left, then make sure you have your board’s arrow pointing left for the word Ceremony.
Once you know which words go what direction, take the printed paper and cut it so that one word fits on the wood.
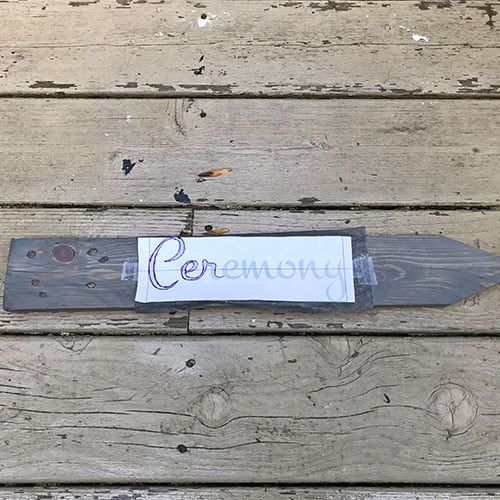
Then cut a piece of transfer paper to fit the same size. Tape the transfer paper to the wood, and then tape the paper on top of that.
Now use a pen to carefully trace over the outside edge of the word. If you are using white transfer paper, the lines should be easy to see, but test it to make sure.
Step 10. Remove The Tracing Paper
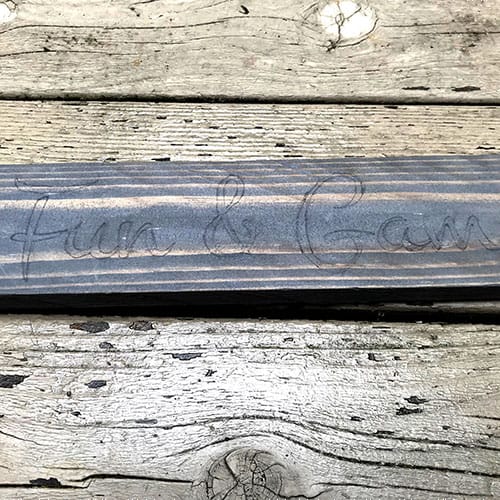
After tracing, remove both papers. You should have a nice clean outline of your signage wording on the pallet wood.
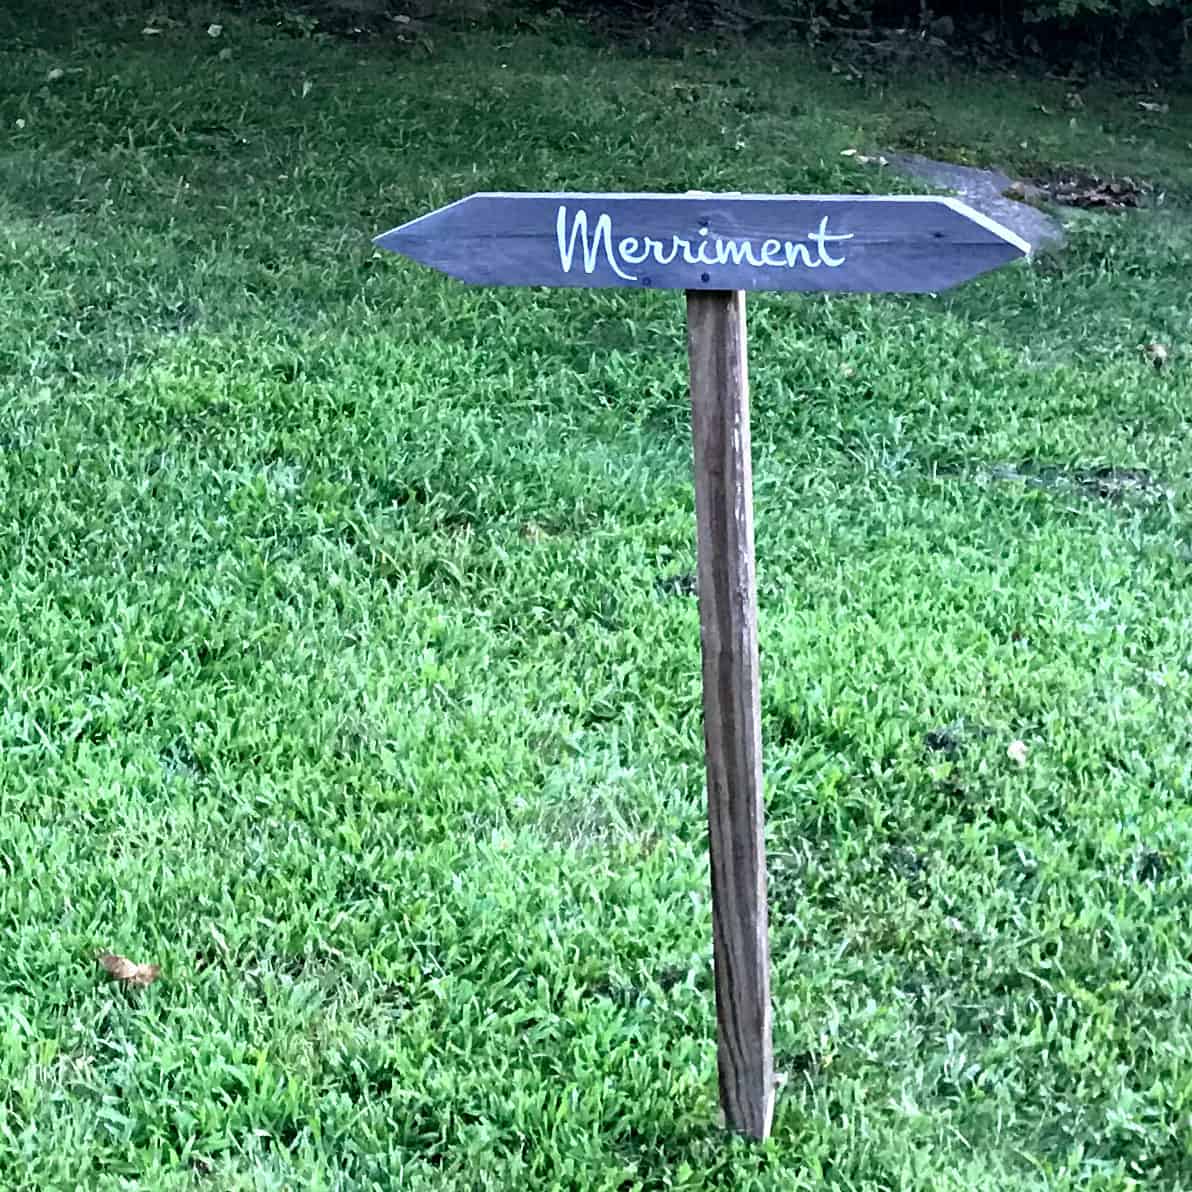
And now for the funnest part, go ahead and fill in your signage lettering, using the Sharpie oil markers.
step 11. Fasten The Signs To Stakes
Nail each sign to a stake, then set up for your wedding!

How To Make A Pallet Sign For A Wedding
Make rustic wood signage for your wedding by repurposing pallet wood.
Materials
- Wood pallet
- Minwax water based stain- Exterior water based in Classic Grey
- Rags
- 2″ Foam staining brush
- Graphite transfer paper- White-if you have it
- Free font- Montez or Download my free printables
- Sharpie Oil markers in White, Medium and Fine points
- 80 and 220 grit sandpaper for a random orbit sander
- Nails
- Pack of wooden garden stakes, or cut your own
Tools
- Circular saw
- Miter saw
- Random orbit sander
- Hammer
Instructions
Tutorial Steps For Making DIY Wedding Pallet Signage
- Cut The Horizontal Pallet Pieces
Break down the pallet. Lay the pallet on a flat surface. Using the circular saw, line it up on the inside of the inner crossbar.
You are going to trim the wood at each end of the outside stringers. You will be wasting a little bit of wood, but as I mentioned above, this is the easiest method.
Cut along the inside line, all the way.
Repeat on the inside of the stringer on the other end. - Pry The Pallet Pieces From The Vertical Bar
Now you should be left with the wood attached by the center bar.
Press on each end and wiggle it back and forth a bit to loosen it make it easier to get the pry bar underneath.
Push the bar between the wood and center cross piece, lift up back and forth to pull it away. You may need to use a hammer to get the bar in deep enough.
Consider putting the pallet on its side and work at it that way if you have a particularly stubborn pallet. - STEP | Repeat On The Other Side
Repeat each step on the reverse side of the pallet.
- Flatten The Nails
All your boards should be removed now. Lay them all on a flat, hard surface with the nails facing up.
Hammer the nails so they are flat against the boards. You can remove them if you want, but I prefer the look of the signs with the nails in them, rather than holes.
Try to get the nails into the wood as much as you can. This will be safer and make it easier for drawing on and painting the letters. - STEP | Cut The Pallet Boards To Size
Trim the boards to 20″, then mark the center point of one end on the top side, and then the same end, but the bottom side.
Set the miter saw to a 22.5 degree angle. Place the board in with the end you marked so that it’s facing the blade, not perpendicular.
Trim the right edge at the set angle, then flip the board over and trim the left edge. - Sand The Boards
Use the random orbit sander to sand the boards. Start with the lower grit paper, then to the finer grit. - Stain The Wedding Pallet Signs
Now the boards can be stained. Use the foam brush to stain the board.
Your boards may already have a nice look without the stain, but the main reason for staining these is so you can get enough contrast for the white lettering.
The Classic Gray color I chose was pretty similar to the color the wood had aged naturally, but the stain just made it a little darker and more uniform. - Prep The Signage Artwork
Download my free printables. The printables have each word centered with rule lines to make it easier for you to center on your signs.
If you need sign words that aren’t in the printable, then you’ll need to download the font called Montez.
It has a free license, so use it any way you’d like. You can find it on several free font websites. 1001freefonts.com (not an affiliate link) is one of them.
Install the font and open up Microsoft Word or any graphics program.
Set the document up in landscape view (8 ½” x 11″) to have narrow margins so the sign words fit on the page width-wise.
You can fit two words per page. At a 200 point font size, type the first sign’s word.
Center the word on the page and then type the second word below that and print.
Note:
You may need to make the font smaller, depending on the height of the pallet wood.
Also, if your signage word is too long for the 8 ½” x 11″ size paper and you don’t have an 11×17 printer, just fit half of the word on one page and the other half on another page.
You can just tape them together, taking care to line them up. - Transfer The Signage Words
Before taping the words to the signs, make sure you pre-plan the direction your sign needs to face.
In other words, if your ceremony will be taking place to the left, then make sure you have your board’s arrow pointing left for the word Ceremony.
Once you know which words go what direction, take the printed paper and cut it so that one word fits on the wood.
Then cut a piece of transfer paper to fit the same size. Tape the transfer paper to the wood, and then tape the paper on top of that.
Now use a pen to carefully trace over the outside edge of the word. If you are using white transfer paper, the lines should be easy to see, but test it to make sure. - Remove The Tracing Paper
After tracing, remove both papers. You should have a nice clean outline of your signage wording on the pallet wood.
And now for the funnest part, go ahead and fill in your signage lettering, using the Sharpie oil markers. - Fasten The Signs To Stakes
Nail each sign to a stake, then set up for your wedding!


Wonderful tutorial, I have been wanting to make some signs for the veges in my garden but being on a tight budget I think that pallets will be the best thing to use… but haven’t known where to start! Didn’t realize they get treated in different ways but having checked mine just now and found a HT then they should be safe, thanks again…
Awesome! Glad it helped.