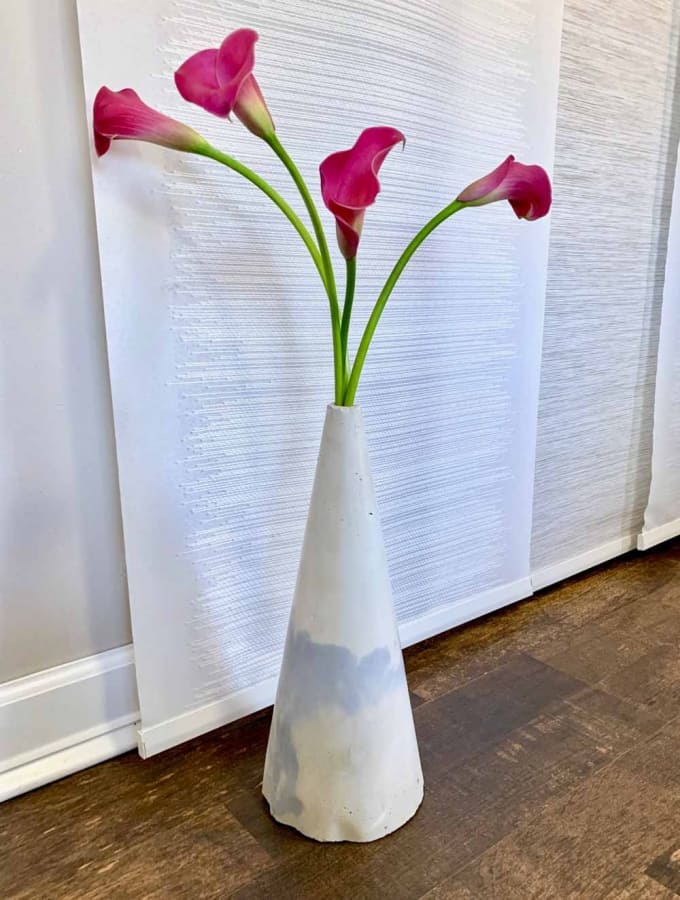
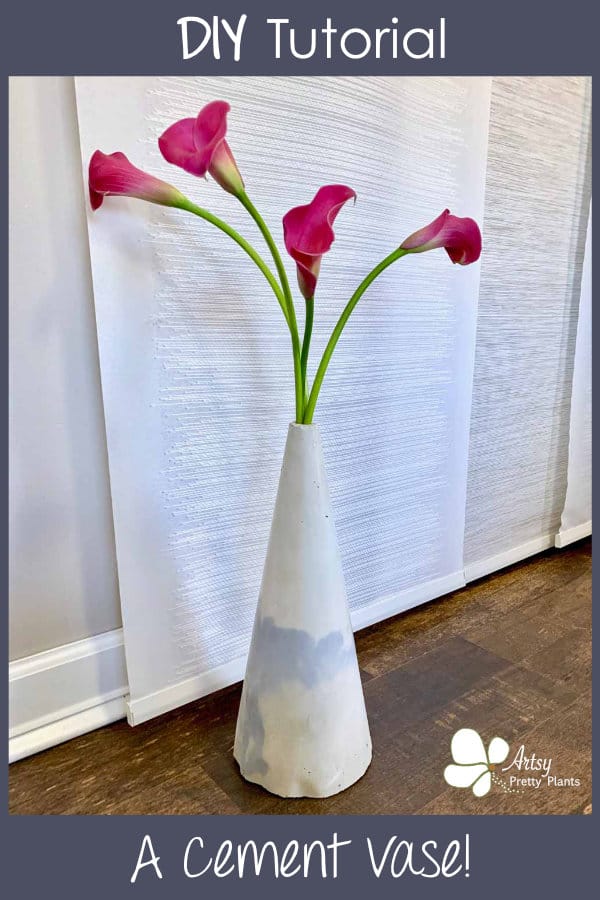
How to Make Cone-shaped Floor Vase (with cement)
A tutorial for a DIY cement vase shaped like a cone. Use this vase year round and decorate seasonally.
Why a DIY cement cone vase? Well, day after day I had been staring at my baren fireplace and was trying to figure out what to put there to jazz it up.
I felt like it needed some sort of tall floral accent.
I’d rather not go out and buy anything for this purpose, so when I was decorating for Christmas, I pulled out some boxed up holiday decor and unwrapped a small cone-shaped holiday tree.
Placed next to the fireplace, it looked so nice and was just the right height.
A cone-shape though? Surely that would be a challenge. I have seen DIY cement cone-shaped items before, but they were all pretty small so I knew I might have a challenge.
I remembered seeing cone-shaped cardboard for crafts that people used to make Christmas trees, which could be used as a cone mold.
However, cement likes to stick to cardboard so I had to figure out a way to overcome that.
I know that smooth sheeting like Mylar or acetate film is nice and smooth and glossy and will achieve the same texture as cement.
Ah-ha, this might be doable.
Some of the links on this page have been provided as a convenience for finding materials. These links may also be affiliate links. As an Amazon Associate I earn from qualifying purchases, at no extra cost to you.
I only recommend products I’ve used and loved, unless otherwise stated. Click here to read my full disclosure policy.
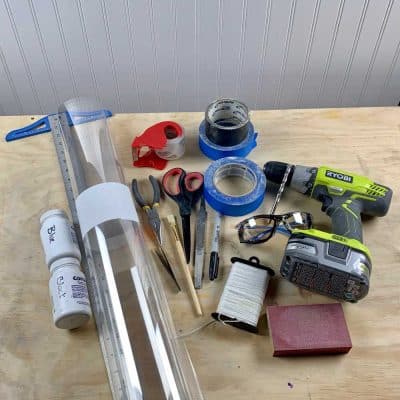
Materials For Making A DIY Cement Cone Vase
DIY Difficulty Level | Easy/Moderate
- Cement All, Rapid Set
- White pigment– optional- white
- Blue pigment– optional- blue
- Grey pigment– optional- grey
- Disposable cup
- Disposable bowl (you will need 2 or 3 of these if you are adding pigment)
- Plastic grocery bag
- Durable nitrile gloves
- Safety glasses
- 220 grit sanding sponge
- Metal file- optional
- Acetate sheet in .005 or .003 thickness; glossy *see note below
- Scissors
- T-square or ruler
- Packing tape
- Blue tape
- Misc. rolls of tape *See note below
- Permanent marker
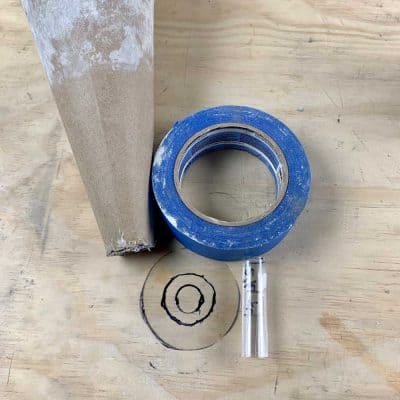
- Large cardboard cone- 13 ¾” (Amazon & Hobby Lobby carry different sizes of these)
- Small cardboard cone- 10.6” (Michaels & Hobby Lobby carry different sizes of these)
- Needle-nose pliers
- String
- Tweezers
- Paintbrush- approx 1”, disposable
- Masonry bit (approx ⅜”) and power drill- may or may not be needed
** My cement cone vase is 15 ½” tall but was a bit difficult to handle.
I wanted to have the vase sit by my fireplace which is why it was so tall, so it would be to scale.
I made the tutorial based on a 13 ¾” height instead.
Since your vase needs an opening, you’ll need to trim the first 3″ of the cone to have an opening wide enough to fit flower stems.
Keep in mind, your overall vase will be 3″ shorter than your cone. Adjust the materials and measurements as necessary if you go larger or smaller with your vase.

Before starting the tutorial, it may be helpful to read my article comparing the different concrete mixes and sealers– Cement & Concrete Crafts Tests!
Another important article is Making Cement Crafts Techniques & Tips with info on cement materials, mixture consistencies, demolding, safety and clean up!
DIY Cement Cone Vase Tutorial Steps
Step 1. Trim The Cardboard Cone

Trim the first 3″ of the larger cone using a hack or coping saw.
Try to get the opening level by holding the bottom- wider part of the cone out parallel with your work surface and then cut.
There’s probably some clever woodworking trick here for making a square cut on a cone shape.
But since my woodworking skills are slow to evolve, I just winged it by sticking the sanding sponge underneath to level the cone while cutting.
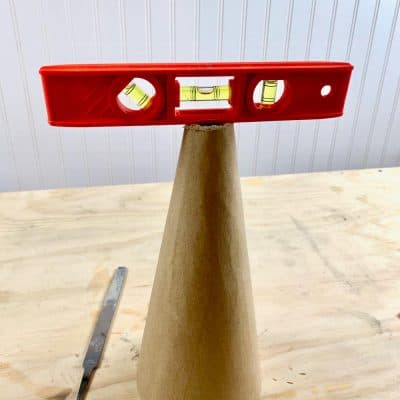
Use a metal file or sanding sponge to even it up. Not too bad though, right?
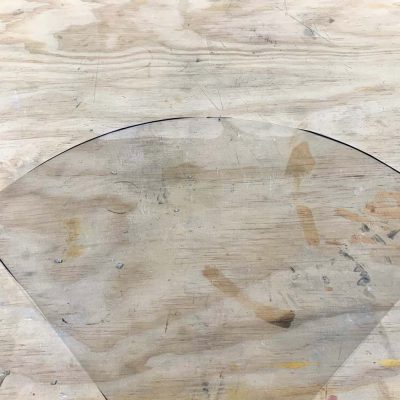
Step 2. Create The Acetate Cones

Since your vase will be 10 ¾” high, you’ll need to create a mold insert for the DIY cement cone with the acetate sheet that is 13 ¾”.
The acetate will keep the cement vase smooth and make it easy to demold.
First cut off a piece of string that is a few inches longer than 13 ¾”.
Then wrap it around the bottom of the marker and tie it or tape it. Trim it so your overall length is 13 ¾”.

Measure the halfway point and draw a line up from there, bisecting the half circle.
Place the end of the string at the bottom in the center and tape it or tack it into place and draw a half circle.
Set one of the quarters aside for now, as well as the remaining scrap pieces of acetate. You’ll want to save these for upcoming steps.
Next, wrap the acetate into the shape of a cone and fit it into the larger cardboard.
Then fit it so the cardboard and acetate line up evenly at the bottom and are flush. Secure the acetate cone temporarily with blue tape, for the moment.

Now trace a line around the point where the acetate sticks up beyond the cardboard at the top, and then remove the acetate cone.
Remove the tape and trim it at the line you traced. Then set it back inside and secure it together.
Repeat for the shorter cone with the left over quarter from the half circle and secure it the same as the larger cone, but this time to the outside.
This acetate cone will end up being longer than the cardboard cone, which is good because it helps make the mold easier to work with when pouring the cement and also demolding.
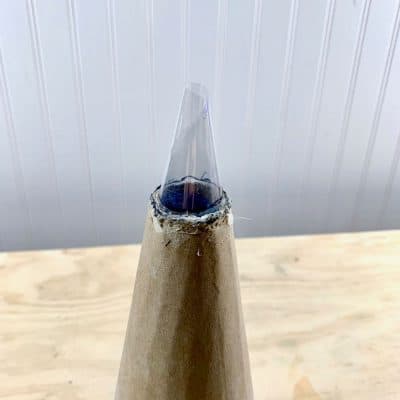
Step 3. Create The Tubes For The Opening

You need to give the vase an opening at the neck that you will be able to place your stems in.
From the scrap piece of acetate, cut a piece that is 3″ x 4″ and also a piece that is 2 ¾” x 4″.
Take the 3″ piece and roll it up around your finger so that the opening is ¾”. Now tape it together.
Make sure the tube is tubular (straight, like a cylinder) and not tapered like the cone.

Next, make a slightly narrower tube with the 2 3/4″ piece so that it fits inside the larger tube and then tape it together.
Then tape the smaller tube to the top point of the smaller cone.
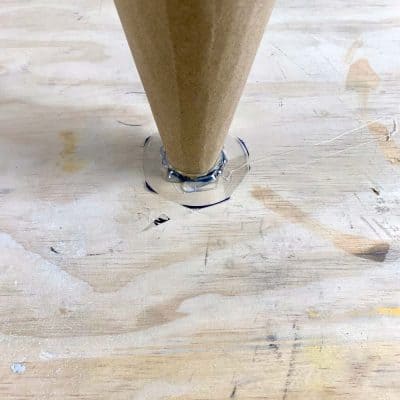
Step 4. Create Centerpoints For The Cone Mold
Now you’ll need to create a bulls-eye to help keep the cement vase mold centered.
Cut off a piece of acetate about 3 x 3″ and then take one of the rolls of blue tape and trace a circle around the inside ring.
Then take the larger cone, turn it upside down with the more narrow opening on the acetate, center it in the middle of the blue tape line and trace a circle around it.
Now take the shorter 2 ¾” high tube and center it within the vase opening circle and trace a circle around that.
Step 5. Glue The Centerpoints For The Cone Vase

Heat up the glue gun to a low temp and then glue the inner (shorter) tube to the inside bullseye.
Place the glue dabs inside the tube to be sure the glue stays inside so that you have a clean opening at the top after you demold the vase.
Next, glue the larger cone to the mark you drew for the middle bullseye and then stack the rolls of tape.
Now insert the bulls-eye with glued mold pieces inside the stacked rolls of blue tape.
Step 6. Mix The Cement

I needed about 10 cups of cement for my large 15” vase, so for one that is 10” high, you’ll only need about 6 cups.
Since the Cement All sets so quickly, I recommend doing this in 2 batches.
However, if you are adding pigment and making it like mine where you have 3 sections of color, then you will need to make 3 batches.
Use your safety glasses for dealing with the dry cement mix.
The way to do this is by planning out your proportions of pigment to dry mix and keep track in case you have to make another batch and want to match the same color.
I used about 5 rounded tablespoons to 2 cups of dry cement. Then I mixed in the dry cement mix with the pigment first in 2 different mixing bowls.
Use ice cold water to help you extend the working time. Start with your first pre-dry mixed color and add the cold water and mix it well.
The consistency should be a little thicker than a thick milkshake.

*The blue color in the photo above is the right consistency, but not the white, so I ended up adding a little water to the white.
Step 7. Add Cement To The DIY Cone Vase Mold

Scoop up the colored cement and smush it in between the 2 cones.
If you are having trouble with the cones tipping while adding the cement, then angle the top piece of tape so that it shims itself in to better stabilize the cones.
** Hint: Make sure your inner cone stays down, holding it as you go.
Be sure to tap and shake the molds so that all the cement fills in the space.
Ugh, so I didn’t realize my inner cone raised up until after the concrete had already started to set.
I needed to use a drill with a masonry bit to open the vase back up after it cured. If this happens, don’t panic. With a masonry bit, this isn’t difficult to do.**
Continue adding the cement until you have used all of your first color, then move on to the next color. As you add two different colored batches of cement to the vase mold, it will create the marbled ombre effect.
FYI- My third color was just another batch that I had to make separately because I underestimated the amount I would need.
I made the mix white, but then combined a tiny bit of the blue/gray to which is why the base is a little darker than the top.
Once you have reached the top, shake and tap the mold a few more times.
Take the cheap paintbrush to smooth out the top (what will be the bottom of the vase) so that it is level.
Dip the brush into a touch of water if you need to, in order to help it get the cement smooth. Now let it cure for 2-3 hours.
Step 8. Demold The Cement Cone

Once the cone-shaped vase has cured, start demolding it.
First, put your safety glasses back on because little bits of pieces will fly off. Place a towel underneath the cement cone vase to help protect it while demolding.
Start with the inner cone, and remove the tape and it should pull right out.
Then continue removing the tape from everything and both the cardboard cone and acetate should come right off.
*Hint: After removing the bulls-eye, you may be left with the glue from the acetate cylinder like I was.
I used the drill to penetrate the glue slightly. Then I was able to grab it and pull it out easily with tweezers.
If parts of the acetate tubes get stuck (that you made to create the vase opening), then use the pliers or tweezers to pull these out as well.
*Hint: If you did have trouble keeping the inner cone down while adding the cement to the cone mold and your opening is blocked, then do what I mentioned previously and use a drill with a masonry bit to drill through the blocked opening.
The cement vase is really strong due to the thickness but still take care drilling, especially around the top of the vase opening where it is most vulnerable.
Step 9. Finishing Steps For The Cement Cone Vase

Go ahead and sand any rough spots. You will have a seam along one side where the acetate sheet met together, which you can sand if you’d like.
I left my seam there since it would always be facing the fireplace or a wall and not be seen.
Now set up the cone vase and display it with plant or flower stems.
My intended use for this cone vase was to use artificial stems with it, but if you want to use live plants, just place a small cup with water inside of it!

Don’t forget to Pin it for later!


Wow it’s really stunning
Thanks Arlene!