Make A DIY Gravel Garden: Low Maintenance!
If you have an outdoor space with a sunny spot, then you may have the perfect environment for having low maintenance garden. In this tutorial, I’ll show you how to make A DIY gravel garden
DIY DIFFICULTY LEVEL | Easy (but physical)
Even if you have a gravel patio that needs a makeover? It can also be a gravel garden bed.
Gravel beds are a great way to reduce the amount of time you spend maintaining a garden.
That’s right, these spectacular gardens are very low maintenance. And once established, gravel gardening truly requires very little effort.
Let me show you why I decided to create a gravel garden bed.

This was the first summer at our new house. We had only lived there a few months and had to concentrate on some important remodeling needs inside.
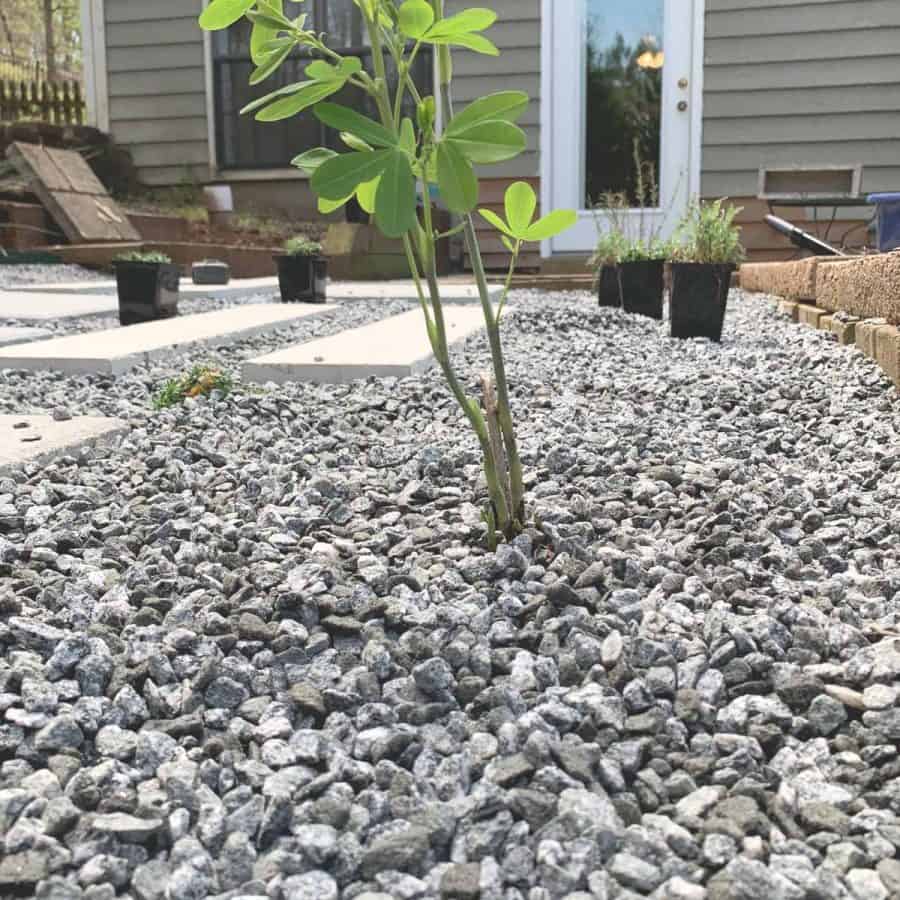
As you can see, the situation got pretty desperate. 85% of what you see in the main pathway are weeds. And the surrounding trees and shrubs were all dying due to soil erosion.
Last summer I put in a new concrete paver patio which became a priority because the existing one was caving in.
That patio adjoins this weedy flagstone path area. Fortunately, waiting almost a year to deal with it gave me time to find such a great solution!
Get Started Making A Gravel Garden
What is the best type of gravel to use?
Pea gravel or somewhat rounded smaller gravel ¼”-½” is best for making a gravel garden.
You don’t want the gravel to be different sizes because this will make the gravel more compact, which will crush the plant roots.
What plants can grow in a gravel garden?
The right plants will be drought-tolerant. Look for plants that thrive in rock or dry gardens.
The care instructions may state that the plants do well in dry soils.
How much gravel will I need?
To figure out how much gravel you’ll need, measure the length by the width of your garden. This gives you the square feet.
For the sized gravel needed for a gravel garden, most will fill 100 sq ft at 2” deep. This should be a ton. Factor in at least four inches.
Most landscape supply companies will deliver by the ton, sometimes a half-ton.
The company I used had a 3 ton minimum delivery requirement and I used about 2 tons worth. I’ll use the rest in another garden bed.
Types of Edging to Use
- Metal edging
- Stone borders with larger stones
- Retaining wall blocks
- A house foundation
- Pavers
- Concrete edging
This is just one way to use rocks as part of your landscape design. Here are 21 more ideas on how to use rocks in your landscape.
Some of the links on this page have been provided as a convenience for finding materials. These links may also be affiliate links. As an Amazon Associate I earn from qualifying purchases, at no extra cost to you.
I only recommend products I’ve used and loved, unless otherwise stated. Click here to read my full disclosure policy.
Gravel Garden List of Materials
- Gravel* (small relatively rounded gravel, ¼-½”)
- Square point shovel
- Bow rake
- Edging
- Wood stakes* (at least 1’ high)
- Rubber mallet
- Blue tape 2” wide
- Wheelbarrow
- Level
- Plants* (in 3 ½” – 4 ½” pots)
- Handheld compact blower
Materials Notes*
-I used paint sticks instead of actual stakes because my ground was soft enough
-In the region I live in, the gravel I used is called #89
-While not recommended, you can plant larger plants –see the end of Step 5
Tutorial Steps for Making A Gravel Garden

Step 1. Create The Garden Design
The first step is to create a focal point or multiple focal points. This can be a tree, group of shrubs, large boulders, garden art or even a water feature.
Next is to consider a pathway of some sort. Your garden bed may be small and not need a path, but a larger one may be focused around a path.
Make a gravel path that follows a natural shape using pavers or stepping stones and weave plants in between. For pathway inspiration, here are 15 ideas for garden paths!
Once you’ve established a path, you can plan the placement of the vegetation. Take sunlight and shade into consideration.
If you have large trees that cover a portion of the garden, you’ll want to plan for part shade plants in that area.
My method of planning was to first draw the garden. It’s an odd shape and I needed to start some of the planning before the larger tree and giant shrub were removed.
Once I had the shape on paper and measured the size, I was able to order the gravel and have it delivered.
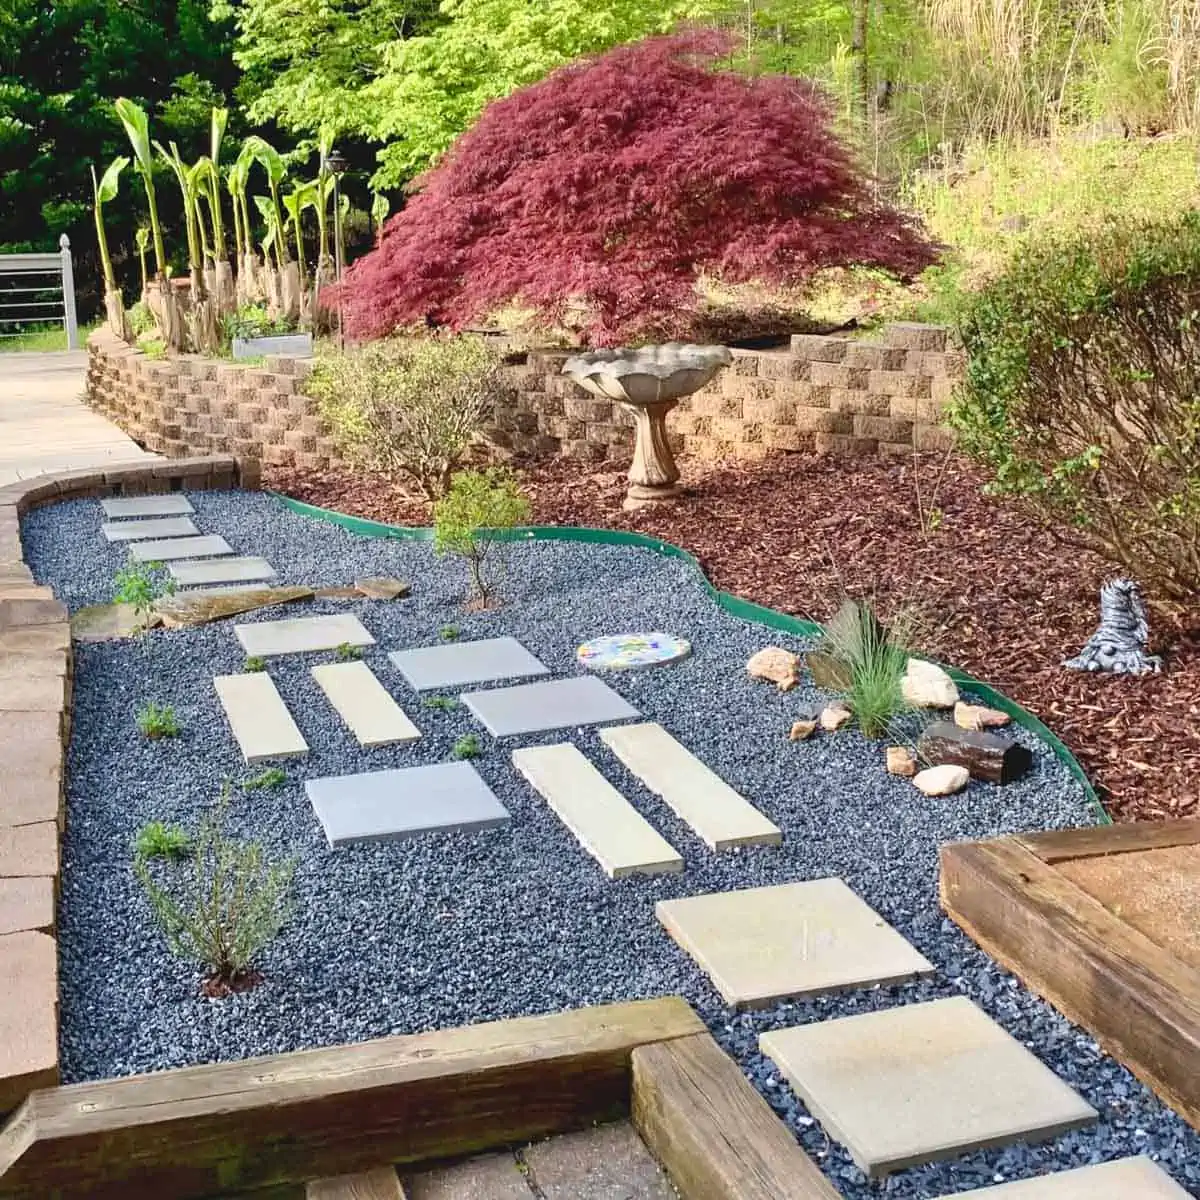
The space I have to work with has three levels and is on a slope. I have a permanent border all the way around which is glued landscaping blocks that create a retaining wall.
I already knew what tree was going in the garden, which is a wax myrtle tree.
It is an evergreen tree and that was key because in the winter I want to be able to look out from my desk and be able to have something green to look at.
That spot is in the full sun, so a tree that could provide some shade but wouldn’t overwhelm the space was important. A wax myrtle won’t get taller than 12-20 feet.
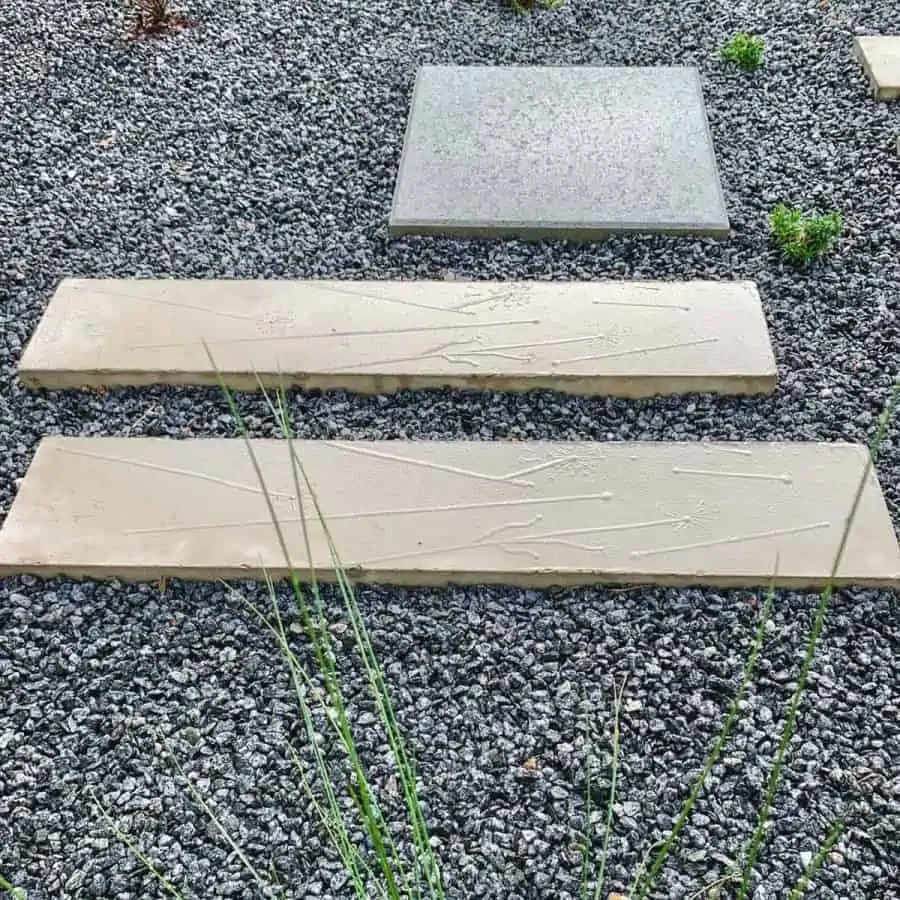
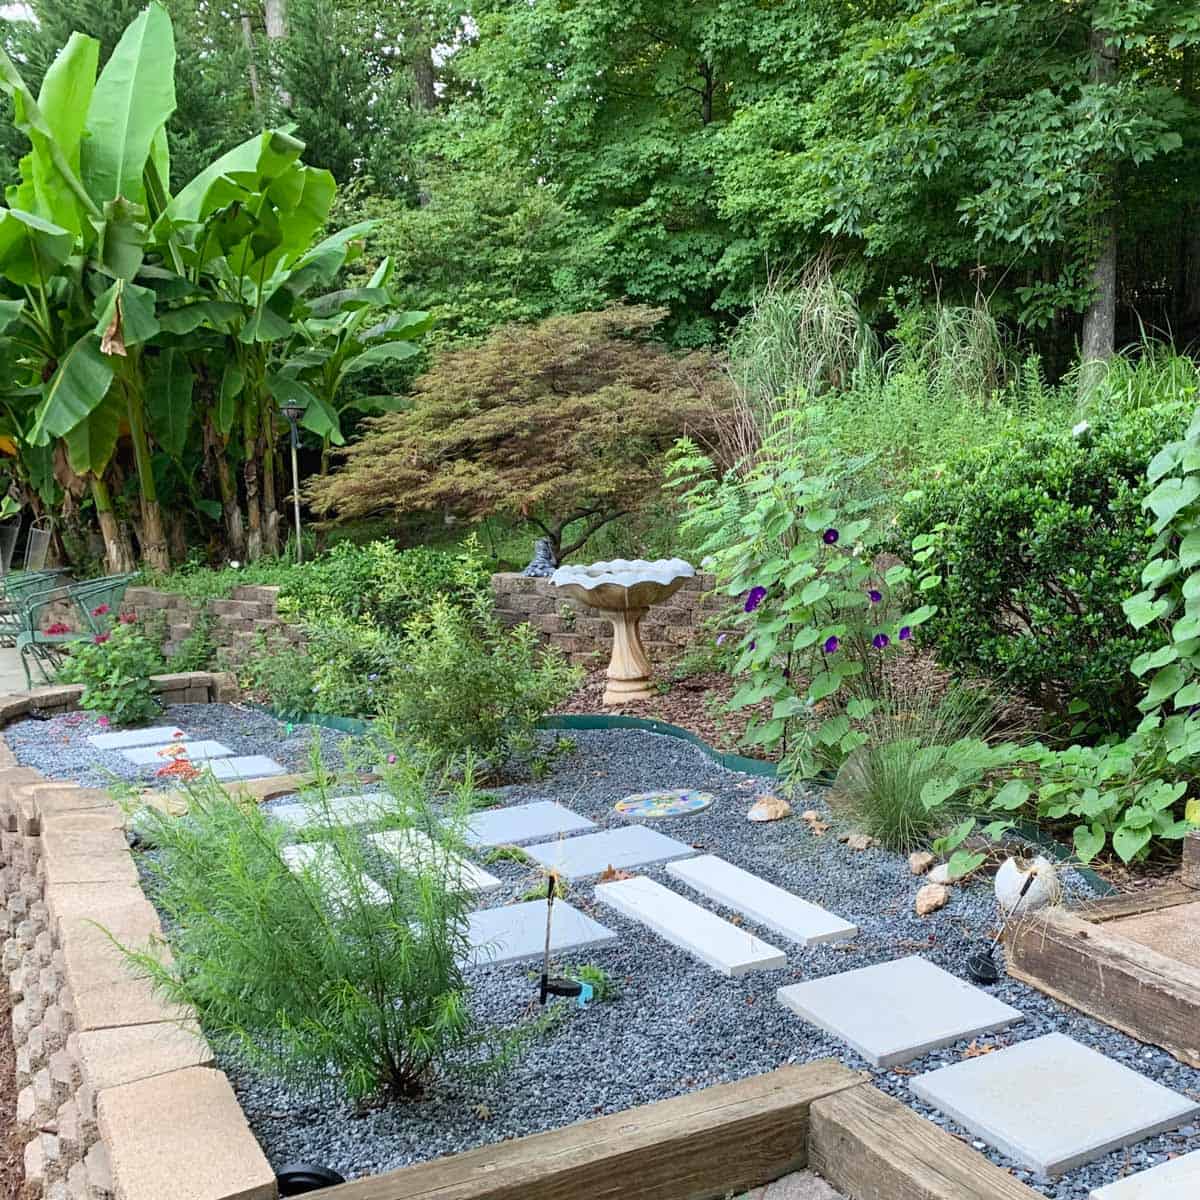
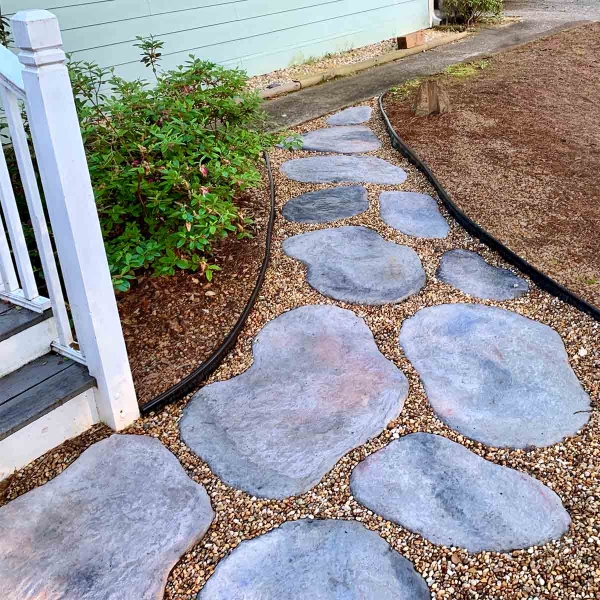
Next, I planned the path. Since I knew I would be making concrete pavers as part of this project, I spent time drawing out which shapes would go where.
I used some of the same leftover square concrete pavers with the adjoining paver patio I built last year for continuity.
And I had an extra unique garden path idea, I made my own stamped concrete pavers to mix in. The link will take you to that tutorial.
Garden Planner!
Printable PDF Download
$2.99
Everything you need to plan your garden.


This will subscribe you to my newsletter where you’ll get updated when I have a new post, or tips and tricks. You are free unsubscribe at anytime.
This is not a formal garden, so I designed the path with the square pavers staggered, to go alongside the longer stamped concrete pavers.
I wanted vegetation to grow in between to allow for enough space for ground cover growth, and also close enough to be a walking pace distance apart.
The adjoining paver patio and a couple of leftover pavers were off-white but the new ones were more grey.
I was happy to have a mix of the grey and off-white because they lend themselves to the informality of the garden and contrasted better with my off-white concrete stamped pavers.
The last step was deciding on the rest of the plants.
The creeping phlox was the only other plant I had decided on, so I still needed an ornamental grass, a perennial, a shrub, and one extra shorter-sized ground cover/border type.
I made a trip to my local native plant nursery, North Georgia Native Plant Nursery, making sure to bring my design drawing with me, showing the max mature heights and widths that could fit the space.
I was provided with great suggestions for drought-tolerant plants that fit my criteria and I brought them home.
Other Gravel Garden Ideas
- Use a mix of small and larger rocks to create a rock garden
- Use different heights of ornamental grasses
- Add creeping ground covers of varying colors, or line with mosses -which you can even transplant
- Line the outer edges with varying heights of shorter hedges
- Place solar lights hidden among the vegetation. I just finished a tutorial for concrete rocks that conceal solar ground lights. They create ambiance along the path and the vegetation!
Here is the list of plants I chose for the upper level of my gravel garden:
Update July 2023: I plan to relocate some of these plants. A year and half later, it turns out they have spread more than I wanted or grown too tall. I prefer the minimal look of fewer plants and shorter ones.
- Southern wax myrtle tree ( Morella cerifera)- evergreen with dark green waxy leaves
- Baptisia alba (white wild indigo)- perennial
- Hypericum densiflorum (bushy St. John’s wort)- semi-evergreen
- Yarrow- perennial
- Creeping phlox- evergreen
- Pink muhly grass- perennial
Step 2. Prep The Area For The Gravel Garden Bed

Good soil preparation is the first step. To start, you’ll need to remove all the weeds and vegetation.
You can leave some trees or plants if you push away the soil at the crown.
Don’t be tempted to use landscape fabric, because the roots of the new plants need to be able to reach the soil.
Remember, the idea behind the 4-5 inches of gravel is that this depth is sufficient enough to suppress weeds, but you do need to do your due diligence in removing the existing weeds.
Use a hoe to scrape away the top layer of weeds and then rake out the weeds, leaves, other debris, as well as the loose soil.
Try to prevent soil or other organic matter from building up on top of or in the gravel.
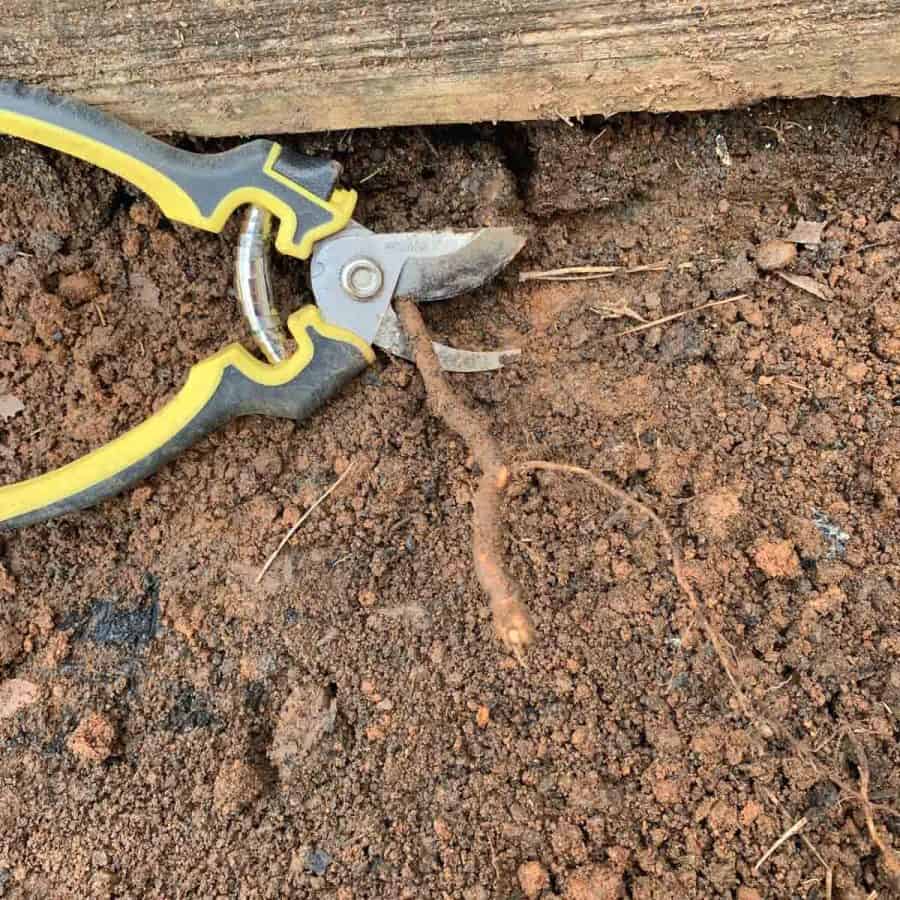
If you have roots protruding from the ground, then I recommend pulling what you can or using clippers to get them flush with the soil.
The garden area should be fairly level. If the gravel garden area isn’t level, you should at least even out the soil to eliminate dips or peaks.
My entire bed area is on a slope and leveling the soil wasn’t an option.
This would have to be done with gravel and compensated by going a couple of inches deeper on the low side and a couple of inches shallower on the high side.
However, I did have areas with big dips and extreme high spots, which I filled in mostly using the soil from the high spots.
And since I had leftover crushed granite from the patio paver, I used that top pack at the top.
This area has very bad drainage and I didn’t want to take any risks.
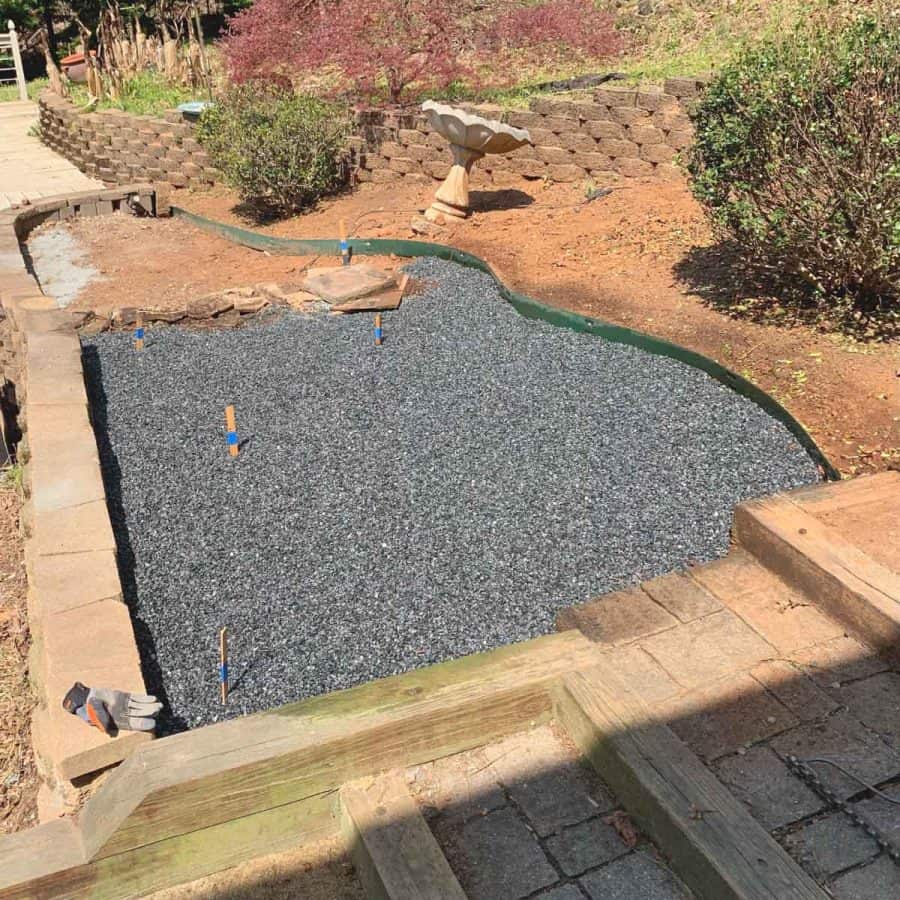
My whole garden area has three levels. The path area has an upper and lower level, with flagstone steps leading to the lower level. This is all gravel.
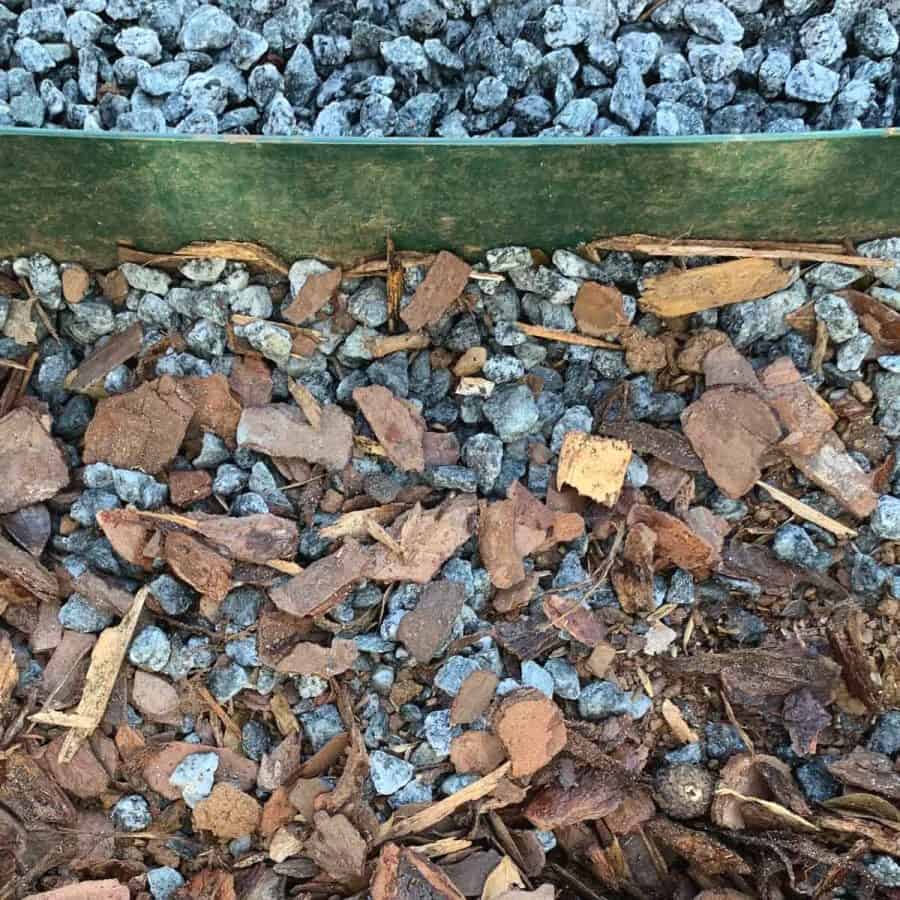
The upper bed area is mulched instead of gravel. It is more sloped than the gravel area, so I was concerned that soil would slide down into the gravel.
So to help prevent soil erosion and keep it from overflowing into the gravel area, I placed gravel against the edging on the mulched side.
It was 1-2” thick and in a strip anywhere from 2-5” wide depending on how sloped it was along the edge.
Step 3. Add the Gravel
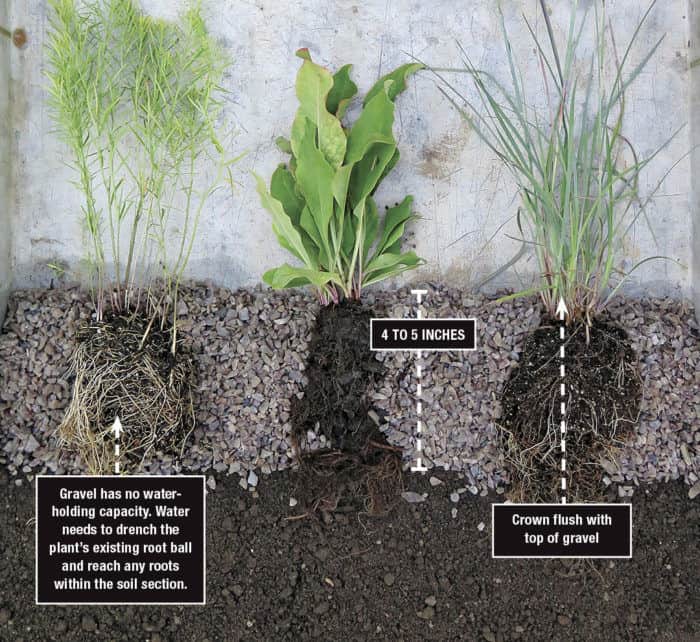
The garden will need 4-5 inches of gravel.
Again, aside from preventing weeds, the reason for this particular depth is that it is the perfect depth for planting plants while they can establish themselves easily and root in the ground.
First, add the stakes to the garden or gravel path area. I used 6 stakes.
Stick them into the ground. You may need to use a rubber mallet if your ground is hard.
Measure from the ground up to 4” and wrap a piece of blue tape around the stake with the bottom of the tape at the 4” mark.
Since the tape is just about 2” thick, the top is just under 6” so you will need to fill the gravel at least to the bottom of the blue tape, but not higher than the top of the tape.
Use a wheelbarrow to dump the gravel onto the garden area.
Or, if you can’t access the area via dumping, like with mine, then use a shovel to scoop it onto the soil.
Use the bow rake to level the gravel. Once you’ve raked it a couple of times, you’ll have a better sense of how many more wheelbarrow loads you’ll need before you reach your 4-5” mark.
The gravel is supposed to be washed gravel. If you don’t know if your gravel has been prewashed, then after each inch of gravel has been laid, use your garden hose to wash the gravel.
Just spray the water over all the gravel.
You should see the dustiness go away. You’ll also be grateful for this if you’re working on a windy day.
Once you’ve reached that 4-5” depth, use the rake to even the gravel.
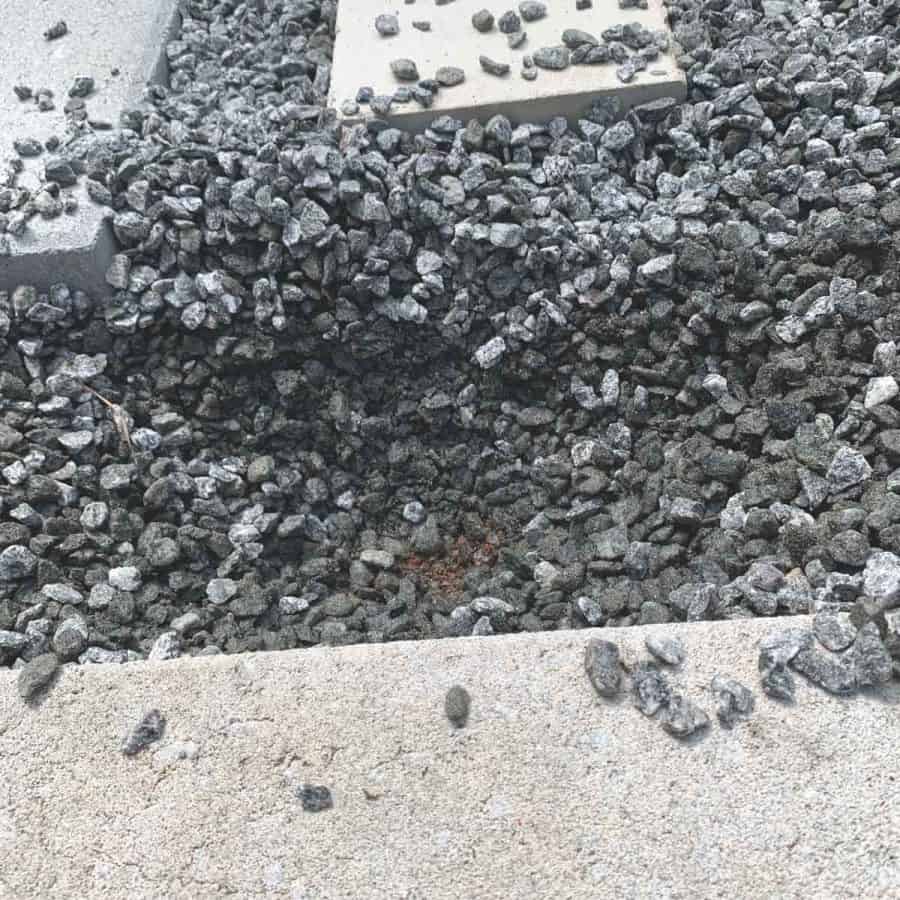
Step 4. Add the Concrete Pavers or Stepping Stones

Lay the pavers in your planned locations and shimmy them into the gravel so that they are about halfway covered with gravel on each side.
Use a level to make sure they are even. These may settle a little over time.
Step 5. Add the Vegetation

Set the plants onto the spots where they will be planted and double-check that you feel good about your planned design.
Start with the first plant and create an opening in the gravel by spreading the gravel away from that area.
Don’t dig into the soil. You are planting in the gravel as if the gravel is the soil.
Before adding the plant, you’ll need to loosen most of the soil from the roots. The reason for doing this is that there are likely to be weed seeds hidden in the soil which will end up in the gravel, ultimately growing there.
Dusting off the soil from the root balls reduces this chance.
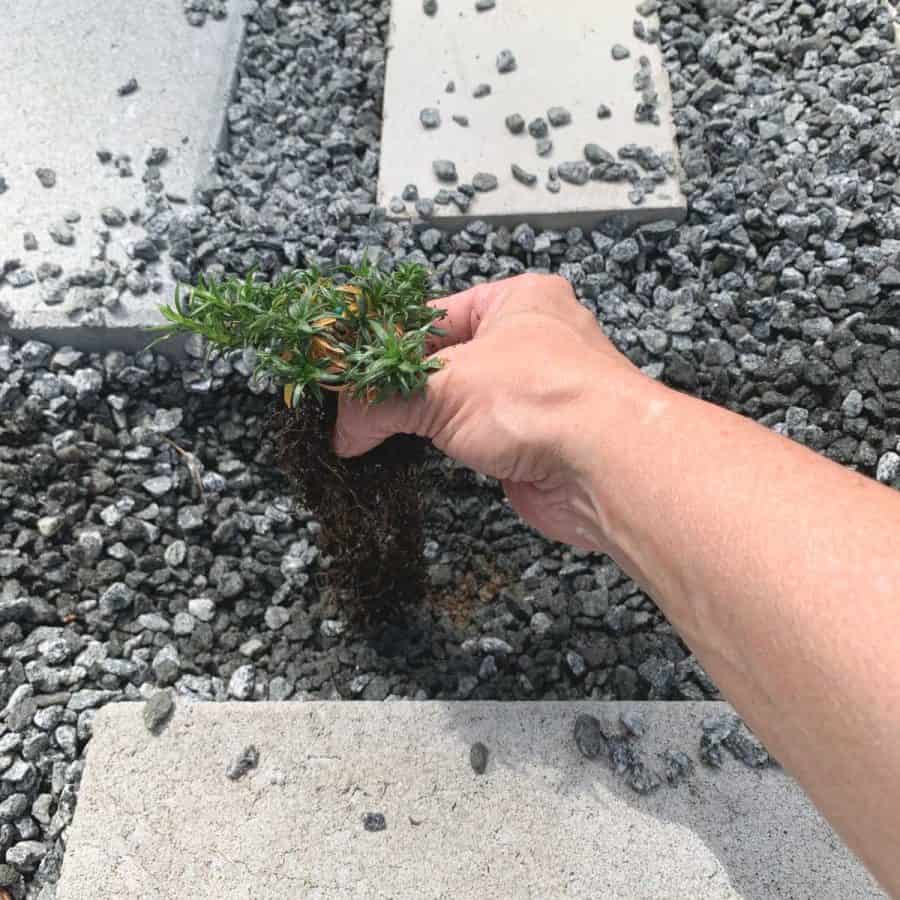
To do this, hold the plant over something away from the gravel, and into an empty pot or a piece of cardboard. Then gently untangle the roots and shake lightly.
To help the soil loosen further, I found that holding the top of the plant’s root ball in my hands and rolling it gently back and forth helped a lot without damaging the roots.
The motion is as if you were warming up your hands.
Now hold the plant in one hand and place it in the opening and then gently push the gravel back toward the roots until the plant is standing upright. Take care not to crush the roots.

The crown should be flush with the gravel surface.
Continue planting each plant the same way.

If you have any plants that you need to plant, but their root balls are too deep to be planted in the gravel, you can plant them in the soil.
It does defeat the purpose and opens you up to getting weeds.
I did have my one shrub come in a container too large for gravel planting and so I had to make the sacrifice.
For this, I just pushed the gravel away and then dug down a couple of extra inches.
I still shook off some of the soil, but I left the crown portion of the soil. I’m not sure if this was correct. I probably could have removed the soil from the crown as well.
That’s it, it really is a simple process!
Upcoming Additions to the Garden:
Of course, some of these additions will be gradual because I will want to see how the vegetation fills in as time goes by.
- Using large stones as a border around the wax myrtle tree
- Planting succulents like Sedum ternatum (woodland stonecrop) to creep over the rock garden area
- Adding plants to the lower level gravel garden area
- More creeping ground cover near the first pavers
- Add small DIY outdoor seating, maybe a smaller version of this cinder block bench
Also, here are some ideas on good ground cover plants, but for shade.
Establishing Plants in a Gravel Garden

A gravel garden is low maintenance, but it’s going to be very important in the first few weeks to make sure you water the new plants often.
They should be watered every day if it is sunny and hot or at least every other day.
Keep an eye out for any wilting. They will do a good job of telling you that they need water.
Frequent watering will need to occur until the roots have established themselves in the soil. This might take about three weeks.
To water these, I used a garden hose set on the shower spray mode and watered the plants from the higher side of the slope for about 15-30 seconds each, depending on the size of the plant.
Overwatering shouldn’t be much of a concern since the stone base provides such good drainage.
You’ll have to practice a little patience this first season since a gravel garden requires starting with smaller-sized plants than you may normally start with, in a soil garden.
But next year, you should see a good improvement in size, spread and satisfaction!
*UPDATE 3 1/2 months later
Everything grew so much quicker than I expected that I wanted to post an updated photo.
By the way, see that monster morning glory vine taking over the gardenia? I’ll be moving it and building a trellis in the future to deal with that.
If you are in the market for a trellis and are looking for ideas on what are good plants for one, I have an article with the best climbing plants to go on a trellis, or even fences and walls.
Maintenance for a Gravel Garden
Each year in the late winter or early spring you’ll want to trim or prune any perennials, shrubs or trees that you would normally trim or prune.
Then use a leaf blower to blow whatever debris from the fall has settled on the gravel.
Update July 2023:
A year and a half later– I recommend to not locate your gravel garden directly under an oak tree. Between the acorns and seedlings, I do have trouble keeping the debris off of it. I bought a very lightweight hand blower just for this purpose. Regular tree and leaf debris is no problem with a standard leaf blower though.
During the first couple of years, it’s normal to encounter a few weeds that try to push through, which you will need to hand pull.
After that, you’ll be enjoying your low-maintenance garden bed.
And for tips on how to get get the best blooms in the spring, check out this article on what to do with your perennials in the fall.
Don’t forget to Pin it for later!

Don’t forget to Pin it for later!

Create a Gravel Garden
How to make a gravel garden! This easy to make garden is very low maintenance and gorgeous. This is an excellent way to add tons of curb appeal to your home.
Materials
- Small, relatively round gravel ¼-½”
- Square point shovel
- Bow rake
- Edging
Tools
- Please see the full materials list above the tutorial for details and links.
Instructions
- Create The Gravel Garden Design Starting With Focal Points
- Prep The Area For The Gravel Garden By Removing The Vegetation and Loose Soil
- Add the Gravel Up to 4-6" Deep
- Add the Concrete Pavers or Stepping Stones By Nestling Them Into the Gravel
- Add the Vegetation By Pushing Back The Gravel And Burying The Roots In The Gravel Only
- Establishing The Plants For A Gravel Garden By Watering Daily At First
- Maintenance For A Gravel Garden Will Be Very Low After A Couple Of Years
Love your work and ideas. Great garden!
Hi Norma,
Thank you! ?
Looks great! The plants have really taken off. I love easy care gardening.
Thanks Nancy! I agree. I love that it’s by far the easiest of my gardens to take care of.
Thank you for your detailed instructions and good work. I didn’t get how you got to the cream color concrete pavers?
Hi Sonia,
The concrete I used is a cream color naturally. It’s not grey. It is called Cement All. It’s sold in the US at Home Depot.