Homemade Cement Bird Bath (Step by Step)
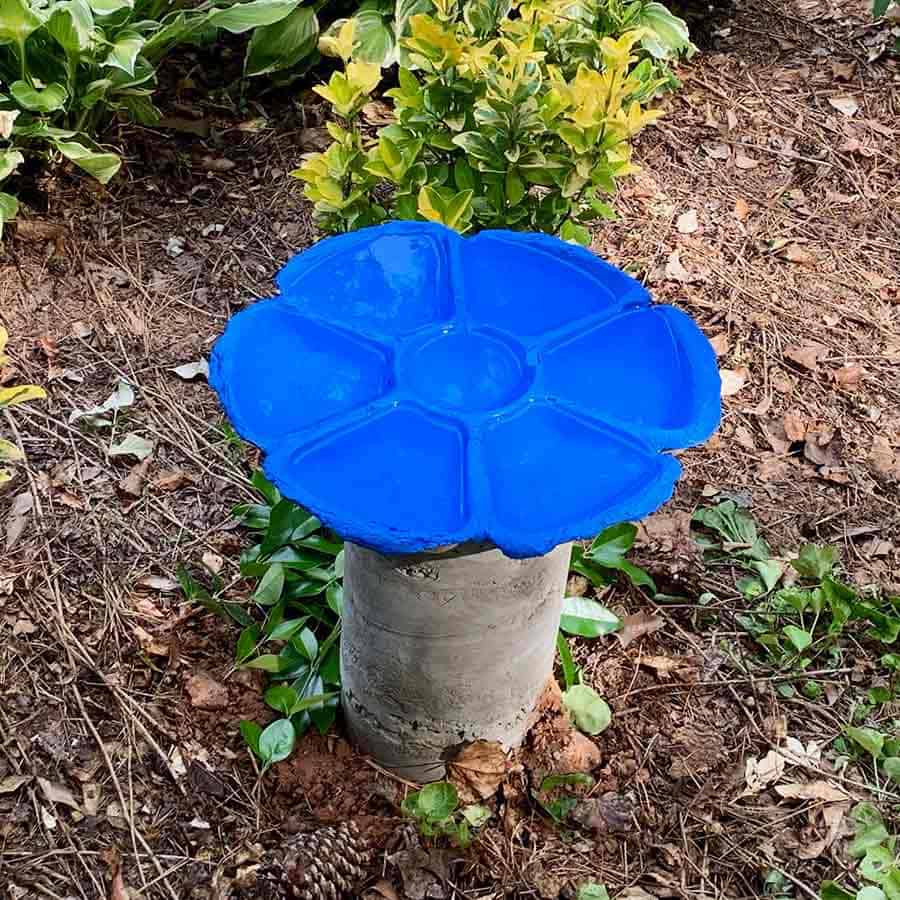
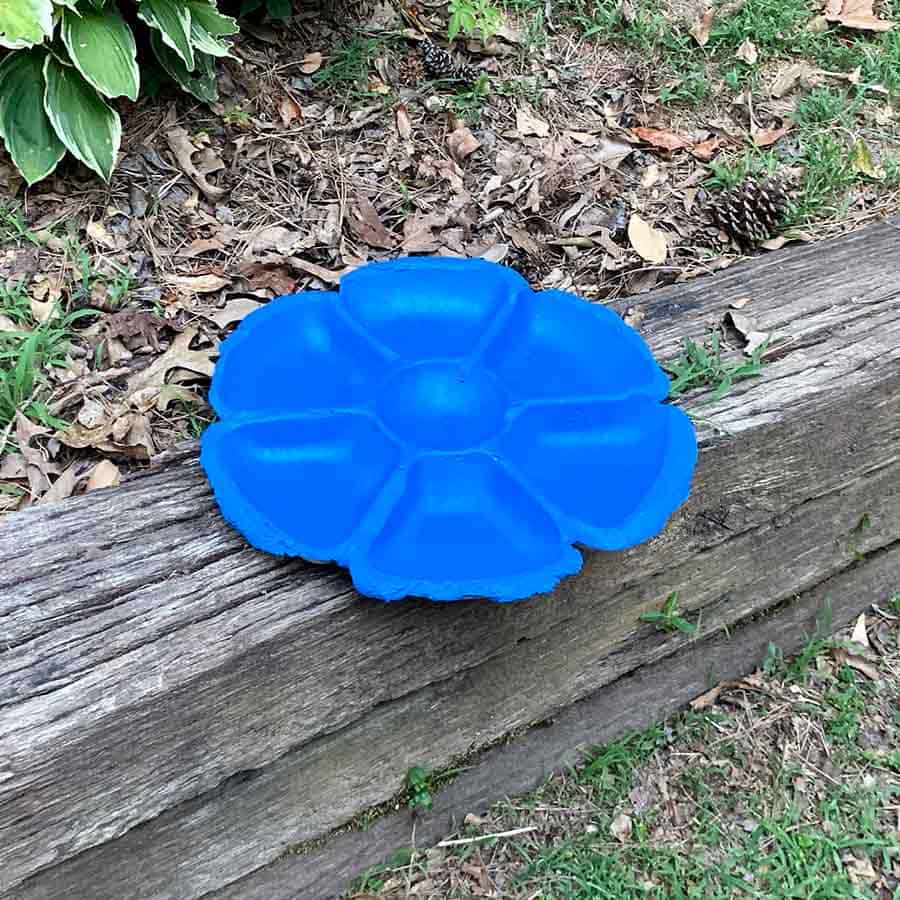
Use a Dollar Store bowl to make a brightly colored homemade cement bird bath.
DIY DIFFICULTY LEVEL | Easy
I’ve mentioned before, I’m a birder (bird watcher)and I was feeling like something was missing, a bird bath!
A colleague at work was talking about how she watches the owls and hawks splash around in the creek in her backyard and I felt a little envious.
Well, I probably won’t get birds as big as owls or hawks in this bird feeder, but I think the little ones will appreciate it.
So how to make a homemade cement bird bath?
I kept envisioning a bright orange or yellow tulip for some reason when I started brainstorming on this bird bath and I thought maybe somewhere I could find a big plastic, flat flower that could work as a mold.
So I stopped in at the local Dollar Tree store and didn’t find an actual flower.
But I did find a cool petal shaped chip and dip bowl that had the perfect depth for a bird bath and mimicked the shape I had envisioned.
I even ventured a little out of my norm here and painted this cement bird bath, because not only is it painted, but I actually followed through with a bright color, but I made it blue instead of orange or yellow.
I did also design this awesome 100% squirrel proof bird feeder, you may want to check out after.
And if in addition to birds, you want to attract butterflies to your yard, then take a look at my DIY concrete butterfly puddler tutorial. Plus how we designed a native plant garden to benefit both butterflies and birds!
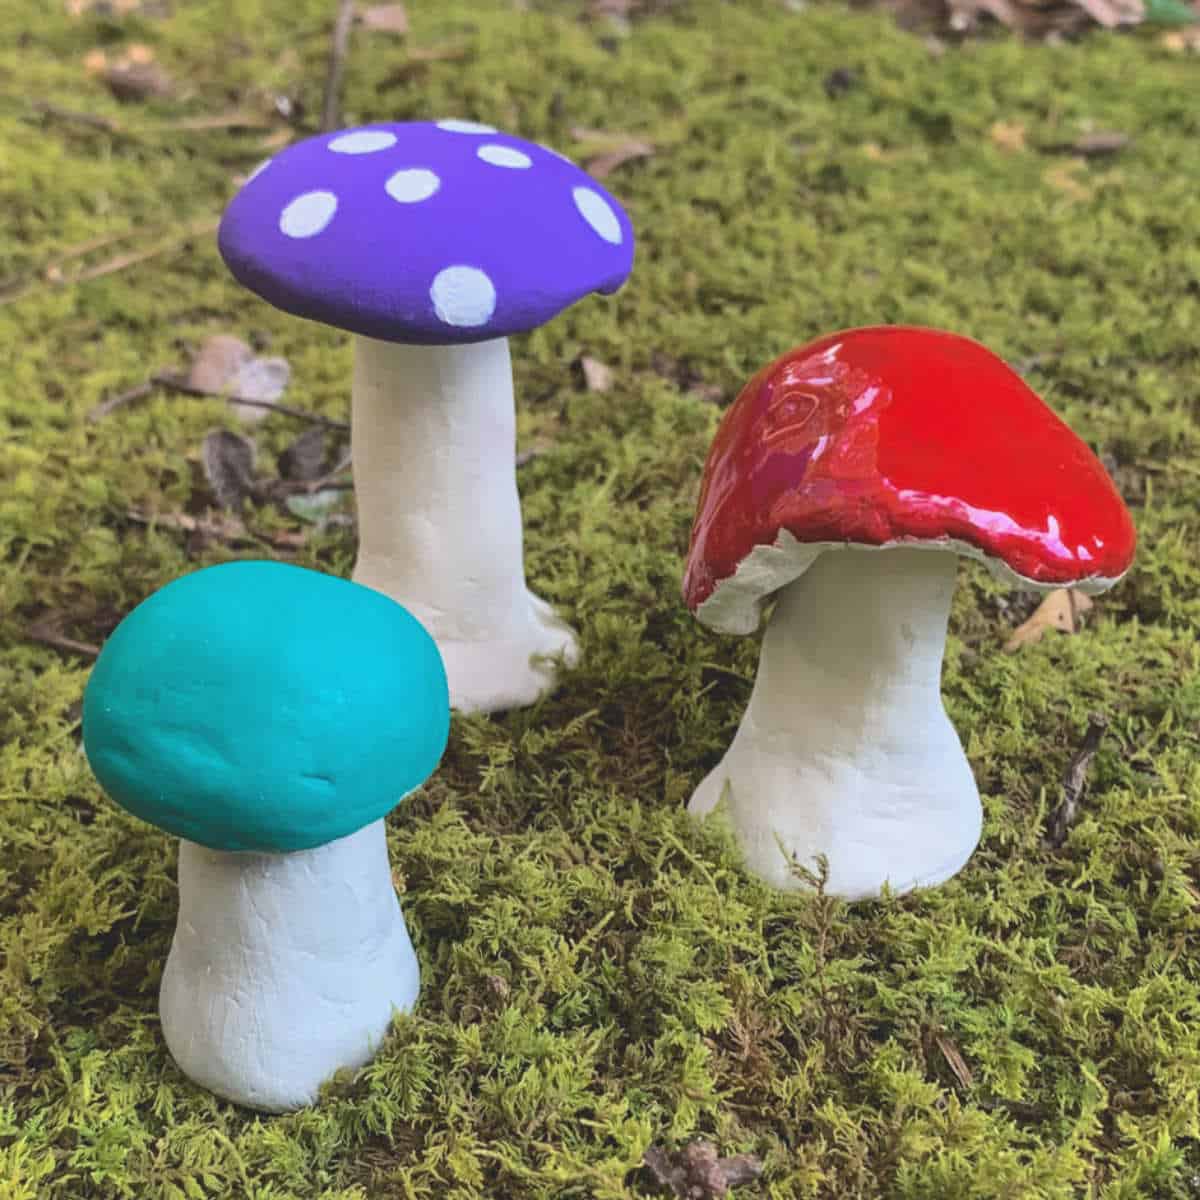
And these three garden decor tutorials- concrete owl, a large mushroom, and an adorable concrete garden gnome.
Wow, I went out on limb with this one. ;0} I hope you enjoy this little Dollar Tree DIY.
Watch the Homemade Cement Bird Bath Video Tutorial
Please click the button to subscribe to my YouTube channel and be notified when I have a new video tutorial!
Some of the links on this page have been provided as a convenience for finding materials. These links may also be affiliate links. As an Amazon Associate I earn from qualifying purchases, at no extra cost to you.
I only recommend products I’ve used and loved, unless otherwise stated. Click here to read my full disclosure policy.
Materials For Making A Homemade Cement Bird Bath
- Cement All, Rapid Set
- (2)
Petal shaped plastic molds (chip dip bowl)**- from Dollar Tree - Disposable plastic bowl
- Plastic cup
- Disposable measuring cup
- Durable nitrile gloves
- Paint sticks for mixing cement- if you wish (I use my hands)
- Acrylic paint- Blue
- Soft nylon paintbrush
- Foam brush or cotton pads
- Concrete sealer
- Acrylic top-coat**
- Chisel or metal file
- Sanding block
** Update: July 2023
Chip dish molds: I don’t recommend using these particular dishes for molds. The compartments make the water dry up too quickly. The overall width is good, but a dish with one compartment will be much better. Also, try to find a dish that is just slightly deeper. This will be more practical and require less filling of water. All the steps will be the same, including the way you make the drainage holes.
Acrylic Top Coat: I also added an acrylic top coat for a sealer to the paint. See Step 8.
Pedestal Materials: (It’s not necessary to make a pedestal, you can choose not to make a base and just set the bird bath on top of something else. *Please note the curing time for this pedestal will be a minimum of 24 hours.)
- 8″ Concrete form tube
- Hack saw
- Plastic wrap
- Fast setting concrete
- 5 Gallon bucket
- Something to mix it with- like extra large paint sticks, a trowel or spade shovel
- Plastic trash bag


Before starting the tutorial, it may be helpful to read my article comparing the different concrete mixes and sealers– Cement & Concrete Crafts Tests!
Another important article is Making Cement Crafts Techniques & Tips with info on cement materials, mixture consistencies, demolding, safety and clean up!
Homemade Cement Bird Bath Tutorial Steps
Step 1. Mix Cement

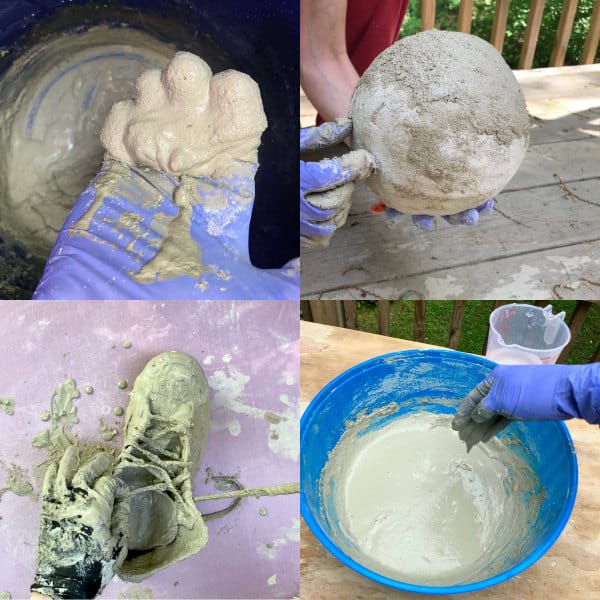
The first step in making this homemade cement bird bath is to mix the cement. In a disposable bowl, use the disposable cup and measuring cup to add cement and water.
Next, you’ll need about 6 cups full of cement (my cup holds 16oz.), but do this in batches to make it easier to get smooth. If you have lumps, it will add air bubbles.
You want this to be the consistency of a thick shake. It should be pourable.
Step 2. Add Mix To Mold
Pour the cement mix into the mold. If you are using this same chip dip- petal shaped mould, then make sure to pour enough to cover the inner rims.
*This is very important, you must make sure you fill the mold as high as it will go. Now gently tap and shake the mold until the air bubbles release and it looks very smooth.
Pop any air bubbles that don’t release on their own.
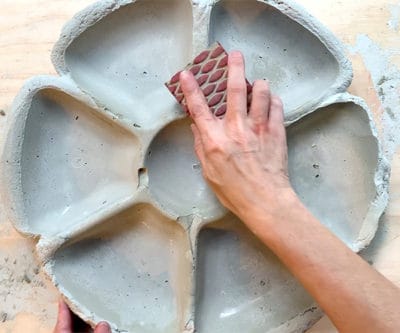
Step 3. Cap The Mold
Take the other mold and place it on top of the cement so that you create a sunken impression.
Press firmly and evenly, and while doing this, the petal edges will spill over. Be sure to remove the excess around the rim so you can avoid under cuts, which make it difficult to remove the mould.
I wanted the look of the overflowing petals, and thought I took care of the under-cuts, but didn’t get them all and spent an extra 15 minutes chiselling the cement when de-molding.
Step 4. De-mold The Homemade Bird Bath

Remove the top piece of the plastic mold and place the second mould that has the cement in it on something soft like a towel and turn it upside down.
Now gently shake the mold a little and pry up the plastic. If you don’t have undercuts, then cement will de-mold easily.
Step 5. Sand The Cement

Flip the bird bath back over and use the sanding block to sand away any sharp edges or lines you have.
If some are especially sharp, use the file or chisel. Then use a wet paper towel to wipe out any cement dust to prepare it for painting.
Garden Planner!
Printable PDF Download
$2.99
Everything you need to plan your garden.


This will subscribe you to my newsletter where you’ll get updated when I have a new post, or tips and tricks. You are free unsubscribe at anytime.
Step 6. Seal The Cement
Pour a little bit of sealer into the plastic cup. Next take a cotton ball or pad, or foam brush and just dab the sealer on and wipe to make it even. You only need to seal the areas you have painted, the cement doesn’t need to be sealed.
If you have chosen not to paint your homemade bird bath, then I still recommend you seal it. This will make it a little easier to clean.
Step 7. Paint The Cement

Take the paint brush and apply the acrylic paint to the bird bath. I painted only the top and the edges of the petal lips.

Step 8. Protect The Bird Bath’s Paint Finish
Follow The manufacturer’s instructions to apply the top coat of spray sealer to the the painted bird bath. I recommend you do two coats.
Part Two: The Pedestal Base
You can choose to not make a base and just set the bird bath on top of something else.
Step 9. Cut The Form
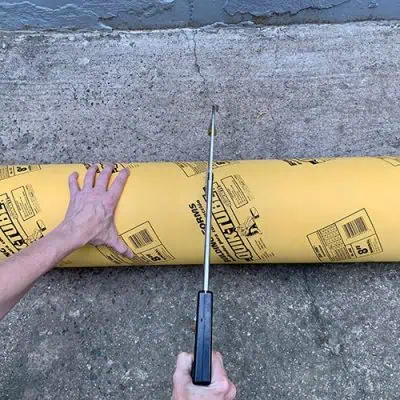
Using a hack saw, you’ll be trimming the form to the size you need. I made mine 18″ high.
Now mark your cutting line and take a hack saw and trim the tube.
Step 10. Mix The Concrete

I did this right inside the tube and it worked fine, but I recommend mixing it in a bucket first because I didn’t have a good way to mix it and I think some areas ended up being less strong than others.
So first place a piece of plastic wrap underneath the tube so it doesn’t leak out from the bottom.
Now add the dry concrete mix into the bucket. If you are making your base 18″ high, I estimate, in a 5 gallon bucket, you will end needing to have the mixed concrete about 2/3 or 3/4″ full.
It will be easier if you don’t try to mix it all at once. You should mix a 4:1 ratio of concrete to water. Next, use a hoe, spade or extra large paint sticks to mix the concrete.
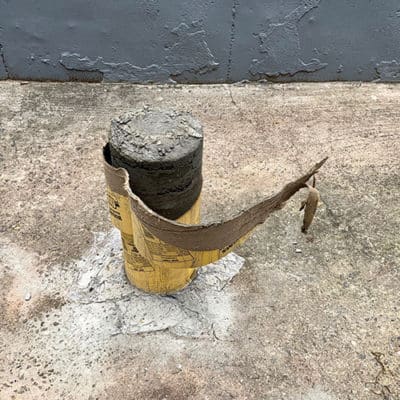
Step 11. Pour The Concrete

Pour the concrete into the tube- it helps to have an extra set of hands. One set to hold the tube in place and the other to hold it to the ground. This will prevent the cement from seeping out.
*Alternatively, you could also place the tube in the location of the bird bath. That way you will be pouring on site and won’t have to carry it to the location after.
If you are mixing the concrete directly in the tube, make sure to pour enough concrete that it comes above the tube. Take care it doesn’t spill over.
Leave a little bit of the cement piled up a bit in the tube. This will provide a little extra room, because in the next step, you will create an indent for the bird bath to sit.
So once you have a little bump, tear off another piece of plastic and place it over the top of the cement.
Step 12. Make A Platform Mold

Take your finished bird bath and place it on the bump so that it sits evenly and is level.
Push it down a little so that it feels secure, if it does, then you can take it off. It should have left a perfect indentation.
Wrap the whole thing with a trash bag to help with the curing process. It will likely take a minimum of 24 hours to cure.
Mine took at least 48, but that may be because I didn’t wrap it with the trash bag during the first 24 hours, and also possibly because I mixed it in the tube.
Step 13. De-mold The Pedestal
Check that it is fully cured. If you touch it and if it feels warm, then you know it is still curing, but if there’s no heat coming off of it then it should be safe to de-mold.
Take off the plastic and tear the cardboard tube off of the pedestal and move it to its permanent location and place the cement bird bath on top.
Then twist it so that it sits perfectly into the molded shape, that it created on top of the pedestal.
Finally, fill the bath with water so you can enjoy watching the birds in your new homemade cement bird bath!
Here’s two more great yard projects- DIY cinder block wall planters and DIY stepping stones that look like natural stone.
And there’s so many others things you can make with Dollar Tree supplies. Here are 90+ Christmas crafts made with dollar store items. And this post has 70+ Fall DIY crafts made with Dollar Tree items.
Don’t forget to Pin it for later!

Don’t forget to Pin it for later!


Yes love it
In making pestidall add rocks of good size then pour the rest of the cement in and let cure. Cheaper way you don’t need as much cement.
Good idea!
Any chance the picture of stacked bowls constructed from different cement types can be enlarged/printed? No luck on my end. Would like to keep it as reference with pocket guide. Thank you for making cement crafting look easy