Lighted DIY Grinch String Art Decoration on Plywood


Add some extra light to your holiday decor and make a lit Grinch, using string and LED lights.
Do you love How The Grinch Stole Christmas by Dr. Seuss? It’s such a great story. It’s one of my favorite Christmas movies if not my favorite.
Lately, I’ve been inspired by string art. And since it’s that time of year, I have been thinking about Christmas decorations.
So, I thought a great option might be to utilize fairy lights with string art to put a bright twist to the craft popularized in the ’60s. String art is also called thread art.
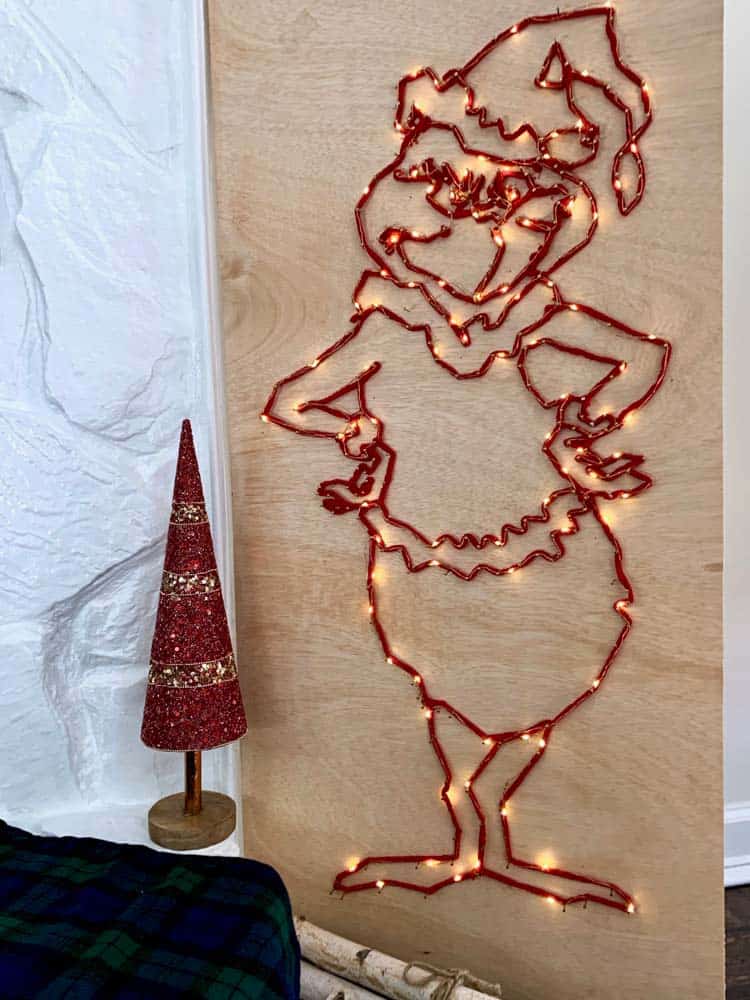
What a fun way to celebrate the love of the Grinch. With this Grinch decoration sitting by our fireplace each Christmas, we get to feel our little Grinch hearts grow three sizes each year. :0}
I used plywood for this string art project, but you can use any material- as long as it’s soft enough to take a nail yet firm enough to hold it.
But, don’t let this project deter you because of the plywood. If you don’t own the tools to cut your plywood, most big box home improvement stores will cut it to size for you at no charge!
For more Grinch-obsessed art ideas, here is a Grinch Christmas wall decor tutorial using cement and resin and a Grinch ornament made from clay.
If you like coloring, here are 43 free coloring sheets from The Grinch!
Some of the links on this page have been provided as a convenience for finding materials. These links may also be affiliate links. As an Amazon Associate I earn from qualifying purchases, at no extra cost to you.
I only recommend products I’ve used and loved, unless otherwise stated. Click here to read my full disclosure policy.
DIY Difficulty Level | Easy
Supplies Needed For Making DIY Grinch String Art
- 1/2″ Plywood (have store cut to size @ 22 x 48″)
- *220 grit sandpaper
- Led fairy string lights-33ft
- 1″ Escutcheon pins or shade bracket nails (head should be 15 or 16 mm)
- Thick red yarn
- Tape
- Scissors
- Pencil
- Hammer
- Power drill*
- 1/16″ bit*
- Printer*
*Not shown in photo

The Grinch String Art With Lights Tutorial Steps
For extra help on making string art, see the FAQ below the tutorial.
Step 1. Prep The Plywood
For the first step, sand the edges of the plywood smooth. They only need to be smooth enough that you remove the splinters.
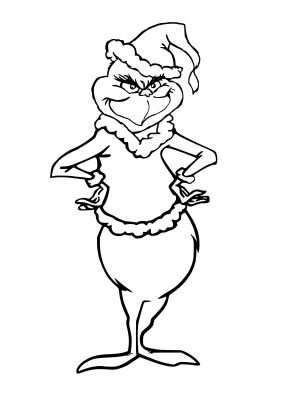
Step 2. Print The Grinch String Art Outline
Print out the Grinch using my free downloadable image. Your printer may require 15 sheets of paper.
To get the download, enter your name and email in the form below the image. This will give you access to each of my design downloads.
Get The Grinch Design Download
Step 3. Layout The DIY Grinch Artwork

Keep the sheets in order when they come off the printer. Number them and then lay them out on the plywood.
Now, carefully tape the sheets together so the Grinch outlines line up.
You can trim the edge of each top sheet that overlaps to make it perfect.
After taping the image together, use the frame I drew in the printable to help center the image on the plywood.
You may need to trim the outside edges of the paper if it overlaps the plywood.
Step 4. Hammer The Nails

Now, follow the outlines and start hammering in the nails. Go deep enough that they don’t fall out, but they don’t need to be too deep. Mine were about 1/3 of the way in.
I was more detailed for the upper parts of the body, and I put quite a few nails close together.
Use this image below as your guide on where to place the nails.
Step 5. Drill The Hole For Threading The Grinch Lights

Drill a hole for the lights and string at the bottom of the Grinch where his feet meet.
Get it started by pulling the non-plugged end through the hole, and then tape it to the paper to keep it in place. You’ll thread the lights later in Step 7.
**Please note: I adjusted the way I did this. The following photos show I removed the printed paper. Leave your paper attached; it will make it much easier.
Step 6. Remove The Paper

Gently remove the paper by pulling it from the edge. It took a little bit of work where the nails were close together.
Step 7. String The Yarn And Then Lights

Next, start stringing the yarn. First, tie the yarn to the nail in the middle of the feet.
Do this where the lights are threaded through. Then, work the yarn around the nails, but don’t let the yarn overlap.
You may get to an area where you must backtrack, which will overlap.
And if that happens, tie it off, trim the end, and start with a new piece.
You may notice that I ended up with some random nails that didn’t seem to be in the right place for some reason.
So, I didn’t wrap yarn around them and pulled them out afterward.
The Grinch face is the trickiest to do, so use the image above as your template if you’d like.
After you finish threading the yarn, string the lights.
Hint: Be judicious with the placement of the lights because there’s just enough strand length to complete the Grinch.
Avoid overlaps as much as possible, and can’t cut the lights.
After the lights are strung, plug in your cheeky Grinch string art and let me know what you think. Merry Christmas!
The Grinch String Art FAQ Help
What kind of string is used for string art?
Many people like embroidery floss because it can provide excellent detail and is easy to work with. However, you can use any string.
I didn’t want the string to get lost behind the LED Christmas lights of this large Grinch thread art, so I used yarn because it was more substantial than string.
Another idea is to leave the yarn off and stain the wood. That way, you could use it as a lawn yard art Christmas decoration.
Many times, you’ll see string art that’s filled in. This is where the thread will wind back and forth across the shape and fill it in.
Again, for this one, I wanted to keep it simple. I mean, the Grinch is a complicated soul. Why complicate him more? :0}
What nails are best to use for string art?
I recommend the escutcheon pins I have linked below or something similar.
They have the right-sized head that will hold onto the string but aren’t too intrusive.
Do you want more Christmas craft inspiration? Check out the 39 Dollar Tree DIY Christmas Crafts & Decor.
Don’t forget to Pin it for later!
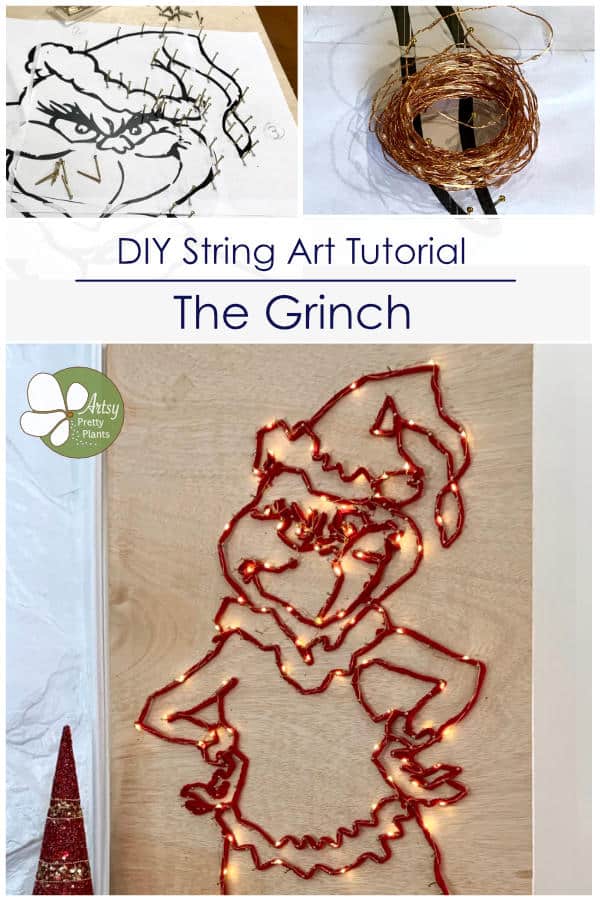

Grinch String Art
Make an amazing DIY string art project of The Grinch. A wonderful way to decorate your home for Christmas and such a a fun tytpe of craft to do!
Materials
- Eschutcheon pins
- Plywood
- Yarn
- LED string lights
Tools
- --See the complete materials list, with links above the tutorial--
Instructions
- Prep The Plywood For The String Art
- Print The DIY Grinch String Art Outline
- Layout The DIY Grinch String Art Artwork
- Hammer The Nails Into The Plywood, Following The Pattern
- Drill The Hole For Threading The Grinch String Art Lights
- String The Yarn And Lights Around The Nails
- Remove The Paper


Love it !!
Thanks Arlene!
A lot of work but looks marvelous!
Hi Mary,
Thanks!
Yeah, the nailing of the string lights took longer than I would have liked, but I love looking at it a night when it’s lit. It’s kind of hypnotizing.
Hi. I love this idea and your version of the Grinch,, but when I click on your image above, nothing happens. Do you still have the template available for printing? Thanks!
Thank you Kelly!
Thanks for letting me know about it not downloading. It’s working now.
Is the Grinch still available to print?
Yes, just fill out the form where it says Design Download in Step 2. Be sure to confirm your email when you receive my email. You’ll get a password to the design library. It’s there.