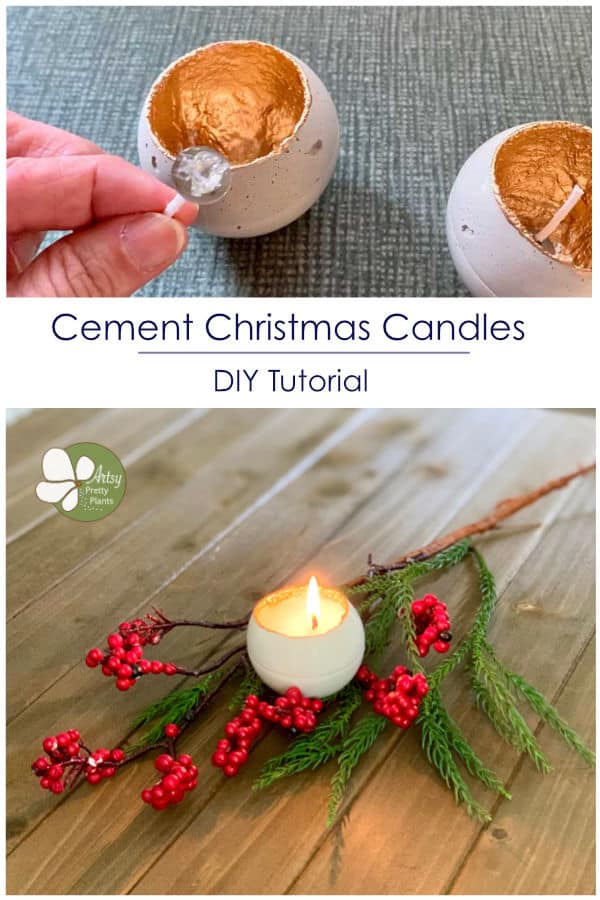
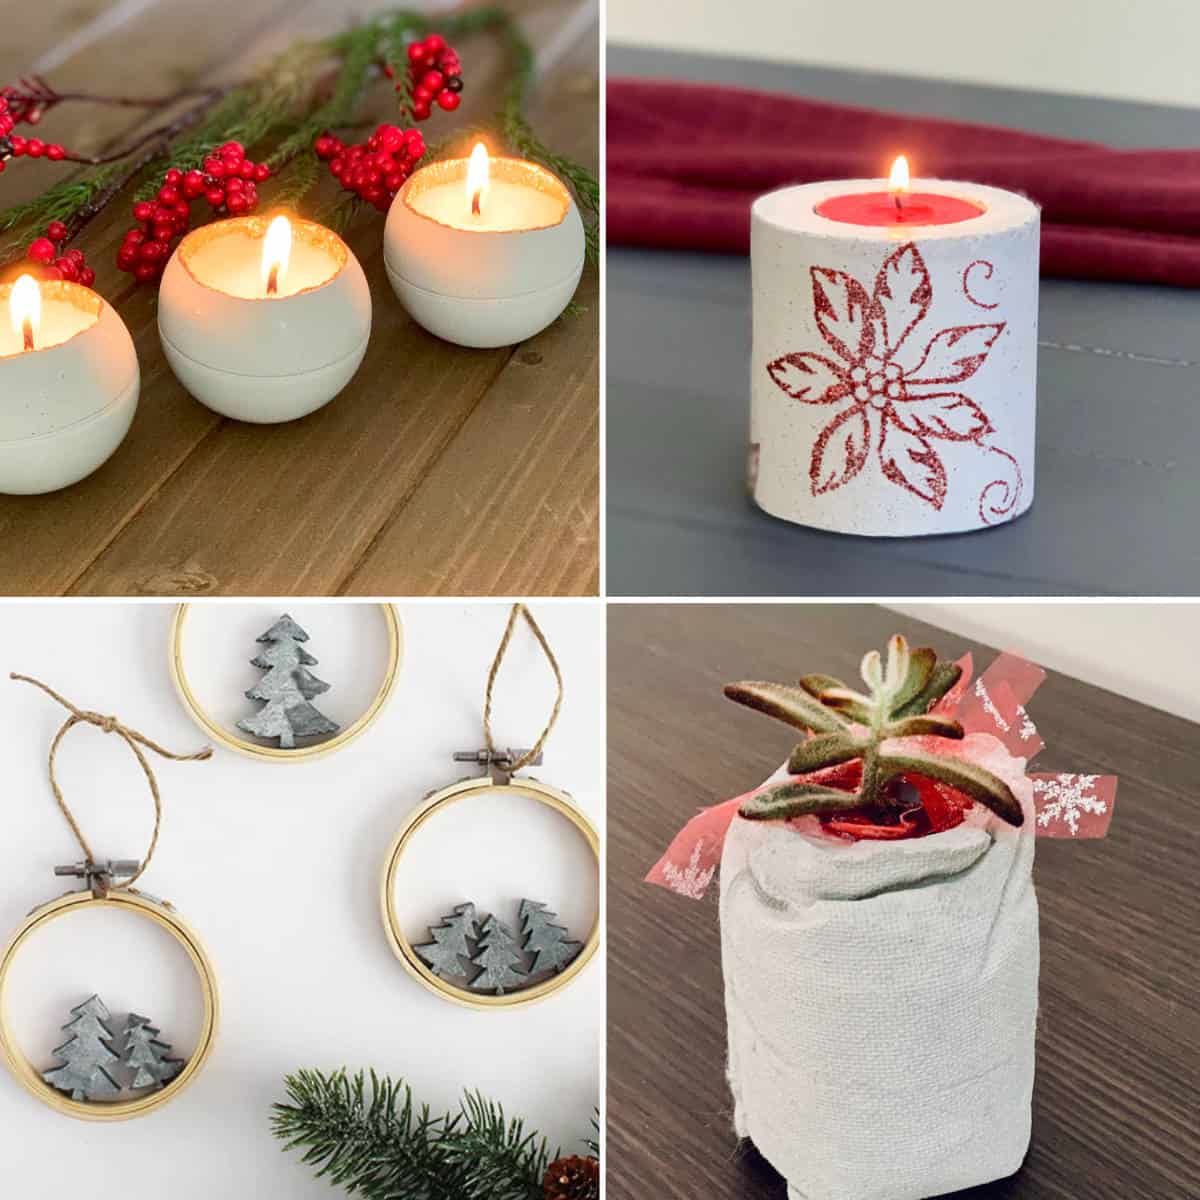
Round Cement Christmas Candle (Easy DIY)
Here’s a Christmas decor tutorial for how to se a plastic ball to make round cement Christmas candle!
This project started out as something different which I will show you in an upcoming tutorial.
As I was working on that project, lots of different ideas came to me on what else I could make with cement and these plastic bouncy balls.

Since we are coming upon the Holiday season, I thought I could make cement Christmas candles using these balls.
There’s a whole bunch of materials needed for this, but considering the number of materials, these were incredibly easy to do. So much fun!
Here are two other Christmas candle holder tutorials- clay candle holder and a white concrete one.
For a non-cement cool Christmas tutorial, check out these wine cork planter ornaments.
Some of the links on this page have been provided as a convenience for finding materials. These links may also be affiliate links. As an Amazon Associate I earn from qualifying purchases, at no extra cost to you.
I only recommend products I’ve used and loved, unless otherwise stated. Click here to read my full disclosure policy.
DIY Difficulty Level | Easy
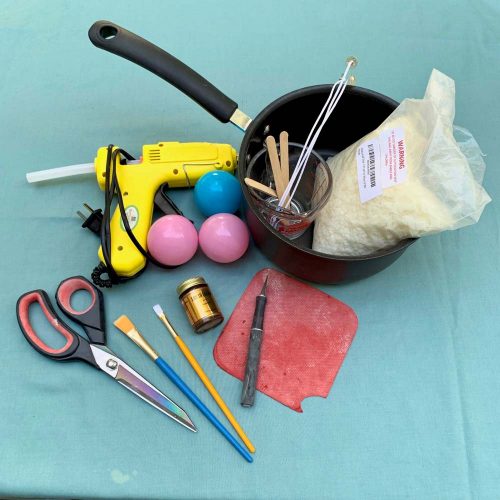
Materials for Making Round Cement Christmas Candles
- Cement All, Rapid Set
- Latex/nitrile gloves– lots of them
- Plastic cup (for scooping cement)
- Disposable measuring cup
- Disposable mixing bowl
- Paper towels or rags
- Plastic Balls (3) 2 1/8″
- Iridescent paint in Gold
- Foam paintbrush
- X-acto blade
- Scissors
- Hot glue gun
- Soy candle wax
- Candle wicks for soy candles
- Saucepan
- Pyrex measuring cup
- Craft sticks
- Sealer

Cement Christmas Candle Tutorial Steps
Step 1. Prepare Your Cement Mold
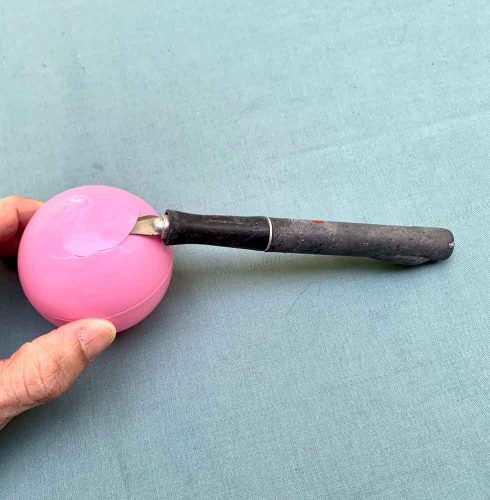
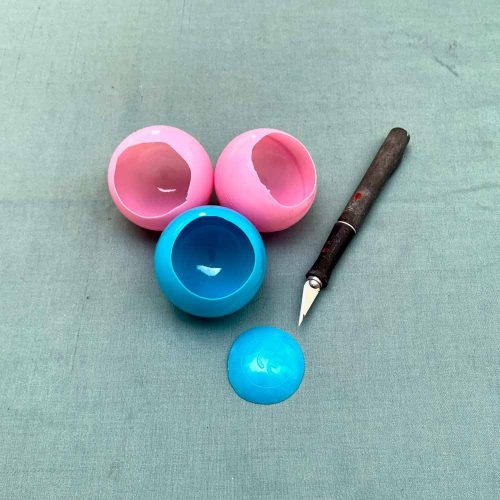
Cut the top off the plastic balls with the X-acto. It’s easier if you slice it sideways while you cut, rather than up and down.
Step 2. Mix The Cement

Remove the plastic ball casing and then use the X-acto blade to remove the plastic by slicing it carefully.
Just pull outward to avoid cutting yourself or scratching the cement, and then peel the plastic off.
Step 3. Mould The Candle

Using your finger, spread the cement mix around the inside of the ball to smooth it. Work your way around molding inside of the ball and patting the sides.
Try to get the walls are smooth and even. Build them up to between 1/8”- ¼” on the sides and ¼” at the bottom.
Now gently tap the bottom of the ball to create a slightly flat bottom.
Don’t tap too much or you may cause air gaps in the cement. The flat bottom will prevent the candles from rolling. Even without this bottom, they shouldn’t really roll, instead they tend to tilt a little.
You may need to wait a minute or two before moulding the ball so it that the cement sets slightly and it sticks to the sides better.
Let the balls cure for at least 1½ hours.
Note: If the cement Christmas candles have not fully cured, then they won’t be shiny when you remove the plastic, and instead will be matte.
I wanted mine to be shiny, so I made sure to wait at least 1½ hours, otherwise you can de-mould sooner.
Step 4. Demould The Round Cement Ball

Remove the plastic ball casing and then use the X-acto blade to remove the plastic by slicing it carefully.
Just pull outward to avoid cutting yourself or scratching the cement, and then peel the plastic off.
Step 5. Sand The Cement Candle

If your edges need refining you can use a regular 220 grit sanding block.
Step 6. Paint The Cement

Using a foam brush, paint the insides with the liquid leaf paint and take care near the top edges.
I wanted the top edges to have the gold color and so I ended up dipping my finger in the paint and running it on the inside top edge which gave me better control than a brush.
Use the paintbrush to get inside any crevasses or divots, and then let them dry.
Step 7. Seal The Round Christmas Candle
You will want to protect the outside from getting wax drips because the cement will stain, so you can help prevent this using sealer.
Pour a little bit of the sealer into a small bowl and use the foam brush to brush it on. Let it dry per the instructions. I recommend a second coat.
Step 8. Melt The Candle Wax

Take a saucepan and fill it half way with water, then put a glass measuring cup inside.
I put mine on a rubber gripper to protect the pan’s coating from getting scratched, then add the wax flakes.
You’ll need about 3/4 of cup or more of flakes. Now turn the heat on to med-low and stir occasionally with the craft stick until melted.
Step 9. Fasten The Candlewick

Once the paint is dry, glue your wick to the bottom with hot glue and trim the wick so that it will be 1/4″ higher than where you want your wax to end.

This should put the top of the wick nearly flush at the top of the cement ball.
Step 10. Pour The Wax For The Cement Christmas Candle

Pour in the wax, leaving ¼” of the wick free of wax. Be careful when you pour because the wax is very oily and it will stain the cement.
I used a paper towel to hold under the glass while I poured so that if it did drip, it would hit the towel.

Let it solidify, about an hour. Then go ahead and light up your cute cement Christmas candles!
This is another candle –with a cool metallic effect that you can also make with these balls.
For another easy candle tutorial, check out this one using a pre-made silicone mold.
Here’s a whole article dedicated to 12 concrete candle holder ideas!
And if you’re interested in making candle holders from any other material, then take a look at this list of 49 ideas for candle holders.


Round Cement Christmas Candle
Make these cute round cement candles for Christmas. I used plastic bouncy balls as my cement mould to get them round! Step by step.
Materials
- Cement
- Candle wax
- Wick
- Gold paint
Tools
- Please see the full materials list above the tutorial.
Instructions
- Trim The Top Of The Balls To Use As The Cement Mold
- Mix The Cement To A Mud Pie Consistency
- Mold The Cement And Sculpt Out The Center To Create room For The Candle Wax
- Demould The Round Cement Ball
- Sand The Cement Christmas Candle With Sandpaper
- Paint The Cement With Gold Paint
- Seal The Round Christmas Candle With Conrete Sealer
- Melt The Candle Wax In A Saucepan
- Fasten The Candlewick To The Bottom Of The Concrete Candle
- Pour The Wax Into The Round Cement Christmas Candle


These are so beautiful!
Thanks Arlene. They are quite easy to make too.
Love this idea and going to make them soon.. thanks for the idea.
Hi Christine,
Thanks! Let me know if you have any questions.
Hi Ellen These are great – did you paint the outside of the balls as well? I see they are different colours. If so, what did you use and did you have to seal the concrete first?
Hi Jakki,
Thanks! I didn’t paint the outside, I think they just look that way Because of the lighting. In real life they look all the same color. I very rarely seal any of my cement. I think the Cementall cement is so compact, that it never occurs to me to seal it. If I were making things with something like Quikcrete, I would probably end up sealing it because it has so much aggregate in it.
How do you smooth the bottom so it is sure notto roll
Hi Lucinda,
You just tap the ball on your work surface, (gently) after you have sculpted the cement inside. It will make the tiniest indent and that’s all it needs. The first time I made these, I didn’t do anything and they didn’t roll much, but best to be safe. Another thing you can do is roll up a tiny amount of cement into a ball shape and just indent it with your finger, or push the ball onto it. Let that little piece cure and then the candle can rest on that.
I hope that helps!
Thank you for a quick response. I am going to try it. Thank you
Good luck! Let me know if you get stuck anywhere.
Love these. Can you do this (successfully with larger balls?
Yes! I’m assuming it isn’t an issue because I did this with the cement balloon planters that are 7″ in diameter. The cement for those goes on the outside, so it should be even easier on the inside. I recommend using cold water with the Rapid Set cement to give you a little more working time. Use ice cubes if you need to.
Would love to try this but it looks like an entire section is missing after mixing the cement. What happens after that?
Holy cow! Thanks for telling me about that Gail. I had no idea there were steps missing- and you’re right, quite a few. Fortunately I had somewhat of a back up copy to pull these steps back in. Thanks again. Let me know if you run into any questions.
Hey Ellen; I’ve been thinking about a cement project for two years and the day has finally arrived to make it. Of course I’ve been doing research ahead of time and reading up on expert makers like you! What is a homemade cement sanding block and how do you make it?
Hey Sara!
I actually forgot to put the blurb about how to make the block into the post. *Head smack*.
Whenever you have any excess cement, instead of tossing it, just make a sponge/block shape with it and let it cure. Then you have a no-cost sanding block! It works great for getting the rough stuff off.
Let me know if you have any questions along the way!
thanks so much; you’re the best! I’m on my second try and having a blast (except for a migraine). Keep your fingers crossed for me. I hope I can get it to release; 5 minutes away from checking ?.
Ugh, I’m a chronic migraine sufferer. That sucks. I feel for ya.
Fingers crossed!
I guess the 3rd time will be the charm! Last question: have you ever painted cementall? If so, how long should I wait begor painting?
Yep, I have painted it. It will depend on what it is. The thicker it is, the longer it will take for all the moisture to go away. If it’s your cool baseball planter, then to be safe, I’d wait 8 hours. A day would be 100% safe. If there’s still some moisture in it, then the paint will peel.
Thanks Ellen; it is the baseball planter! The third time worked out perfectly. It is pretty thick; once its dry would you use a primer first or can I go direct to paint?
I just paint it with a primer. I haven’t painted concrete too often, but when I have, I just use an acrylic paint and then a sealer. You can use any paint sealer. I have even used one of the concrete sealers- Easy Seal and it did a nice job. I also like Liquitex varnish. The varnish will be more water resistant.
Hello, Thank you for your tutorial, The candles came out wonderfully but I am wondering what you did with the bottle caps that were in the supplies list? I read your instructions twice and am sure I didn’t miss the explanation but you never know lol. I am thinking you used them as stands to keep the plastic balls from rolling while the cement cured? Thank you for taking the time to answer.
Hi Leslie,
Thank you for mentioning that. You can ignore the bottle caps and you are correct about their purpose. I updated the post not long ago because I found that by tapping the ball with cement on your table will create enough of a flat spot that they don’t roll so the caps shouldn’t be needed. I didn’t realize they were still listed on there, so I have just now removed them.
What I actually did was to put a piece of plastic wrap inside the cap, then put cement into the cap and press it in. After about 20 minutes (I think) I pulled them out. Then I had a cement version of the caps to use as a base. If your balls are rolling, you can use a small flat washer (for screws) and put them on that. You won’t be able to see them as easily as the caps.
Thanks gain for bringing that to my attention.
?