How To Make A Jesin Candle Jar- Easy and Durable
This simple tutorial will guide you through the steps of how to make a JESIN candle jar.
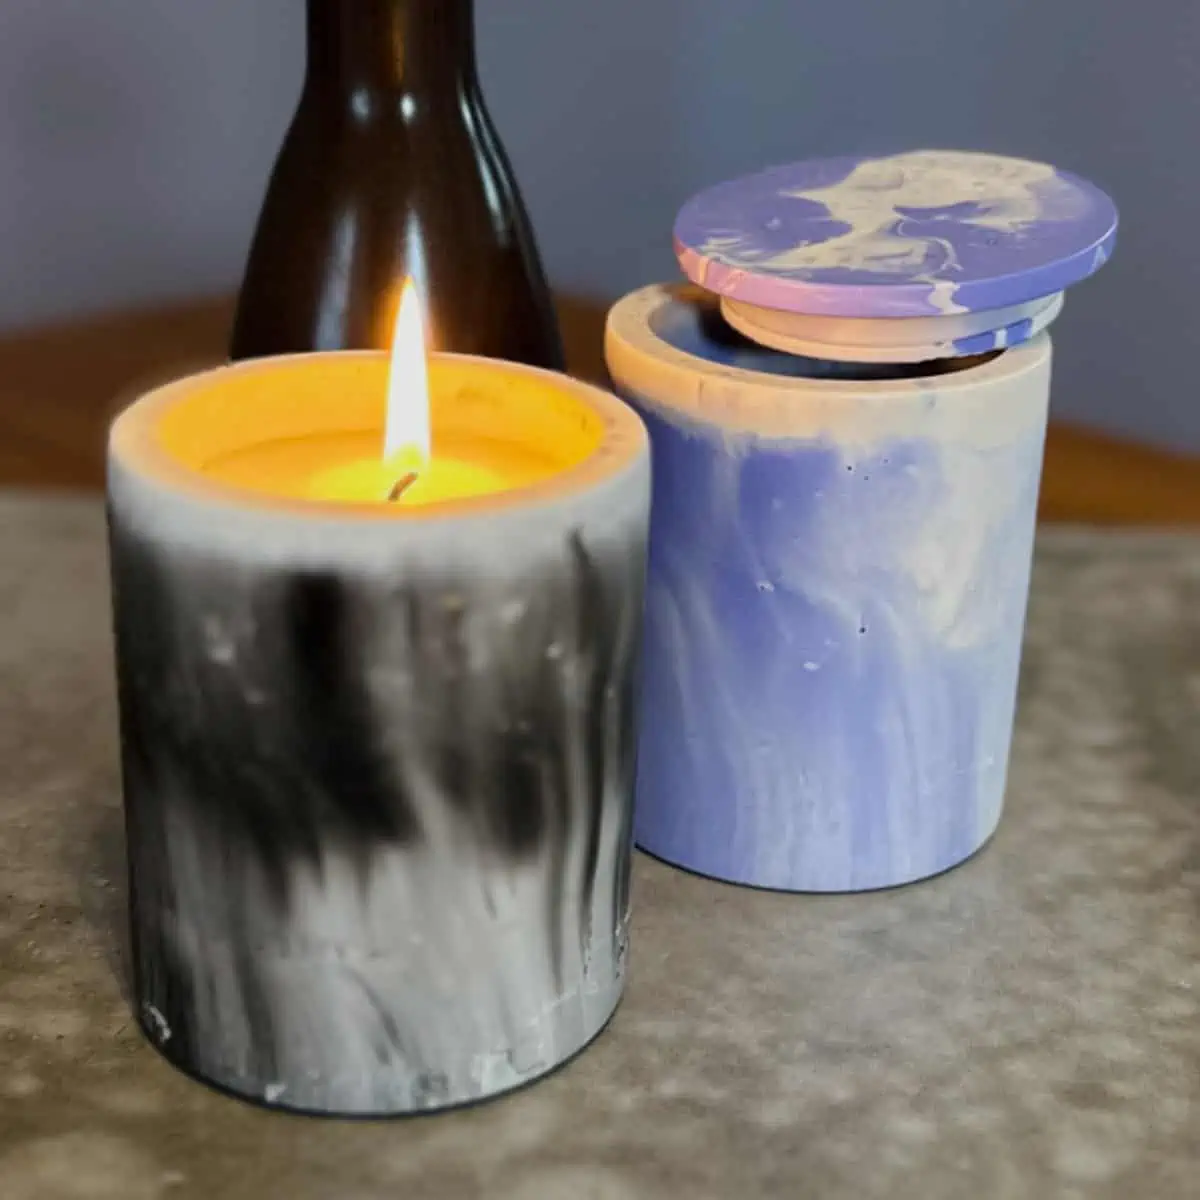
Making a candle jar using JESIN is a simple process. You can demold it in about an hour, make it any color, and add many decorative elements if you wish.
Your jar will be incredibly durable and long-lasting and look professionally made. Best of all, you will have a blast making it.
What Is JESIN?
JESIN is an eco-friendly polymer plaster casting material that is a new product available in the US, and it is a fantastic material for making candle jars.
I feel fortunate to be one of the first in the US to try it. For someone who has been making concrete crafts for quite some time, I love getting to make many of the same decorative items but with JESIN.
I was given this material to try at no charge. I’m not required to say anything positive about it, but I want to mention that from the start.
You can find my article with detailed information on Jesin here, including how it compares with concrete since many of you already work with concrete.
Let me tell you that JESIN can be used to cast just about anything.
It’s quite hard and, when fully cured, can be used as any decorative home decor item. If you seal it, it can be a planter.
Video For How To Make A JESIN Candle Jar
If you are familiar with Jesmonite, which many outside of the US are, then JESIN is basically the same type of material.
It’s a different brand, with a few key differences that I’ll explain more in a future post.
The most significant difference is that it allows for almost twice as much working time.
Currently, JESIN can only be purchased online, at least in the US and Canada. Use my discount code: ELLEN10 to get 10% off! See the links in the materials list below. It is also available in Europe through Mrs. Colorberry.
If this JESIN jar looks familiar, this is the same mold I used for the concrete candle jar! It’s a great way to repurpose your silicone molds!
Read on for the tutorial on how to make an easy JESIN candle Jar.
Some of the links on this page have been provided as a convenience for finding materials. These links may also be affiliate links. As an Amazon Associate I earn from qualifying purchases, at no extra cost to you.
I only recommend products I’ve used and loved, unless otherwise stated. Click here to read my full disclosure policy.
DIY DIFFICULTY LEVEL | Easy
List of Materials For How To Make A JESIN Candle Jar
- JESIN powder and liquid
10% off use code: Ellen10 - Liquiments colorant– Mystery (blue) or Jet (black)
10% off use code: Ellen10 - Gold leaf foil– optional
- Plastic or paper cups
- Nitrile gloves
- Safety mask
- Plastic table cloth
- Silicone mold for a candle jar vessel
- Kitchen scale (important)
- Craft sticks
- Vibrating machine or orbital sander– optional
- Sandpaper, 200 and 4-800 grit
- Disposable plastic container
- Acrylic sealer
- Microfiber cloth
Materials Note:
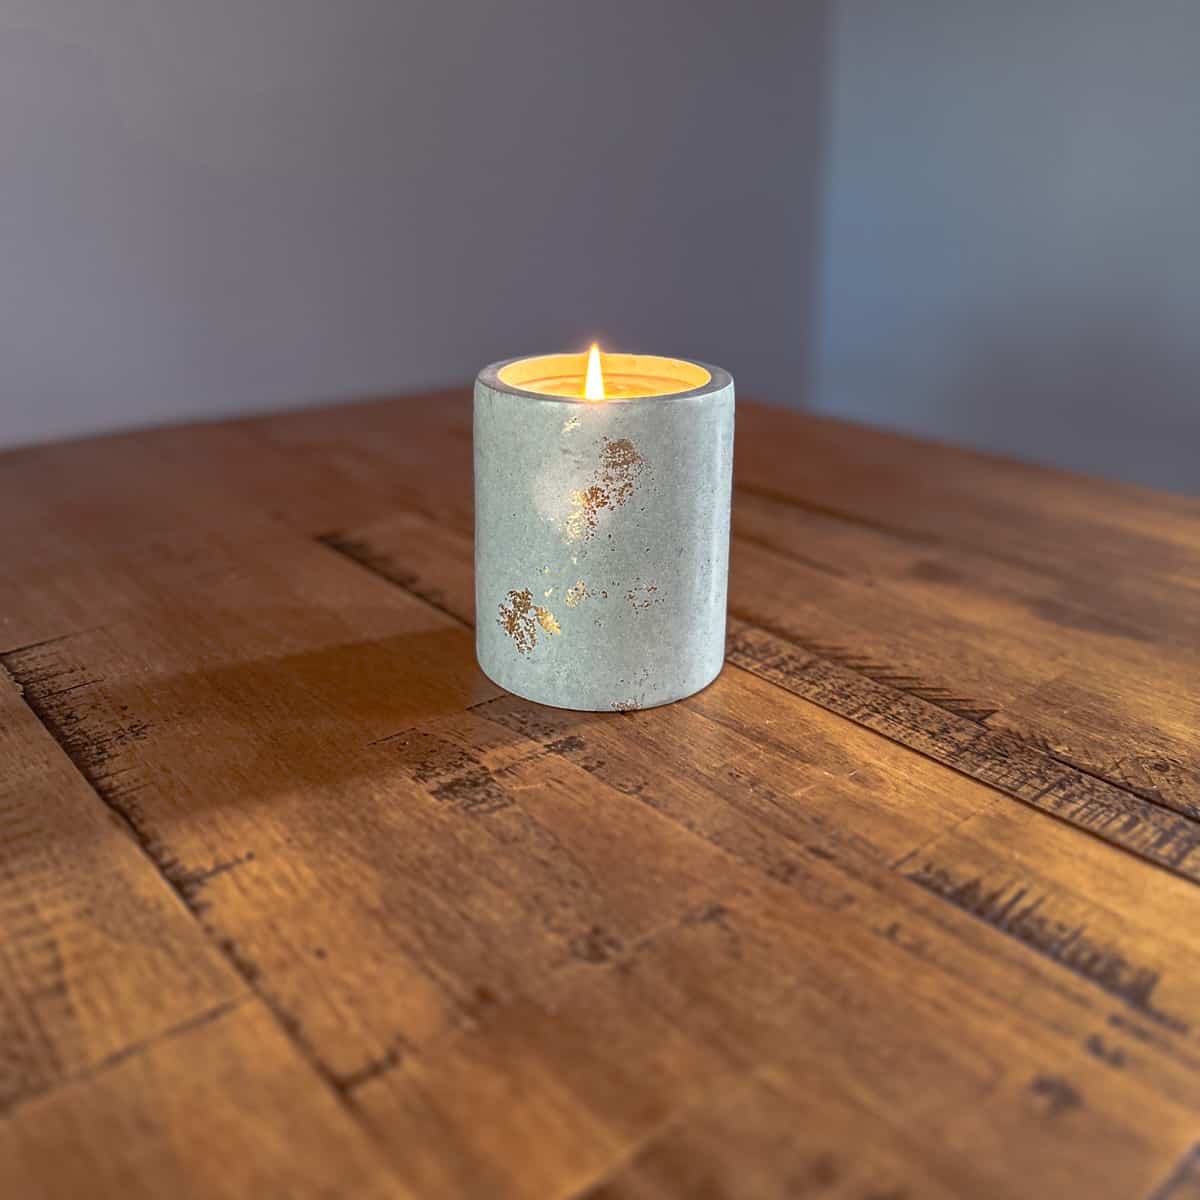
The reason my candle jars have this ombre effect is because I used the vibration machine to release trapped air bubbles.
The vibrations pushed the colors up and down, so my technique for coloring didn’t need to be perfect.
If you don’t have a machine that will create vibrations, I recommend following the marbling, or swirling technique I have in the steps below. I’m still working on mastering this effect.


How To Make A JESIN Candle Jar Tutorial Steps
Step 1. Calculate The Amount Of Powder And Liquid JESIN You’ll Need
I’ve done this for you, but here’s how you determine how much JESIN you’ll need for your candle jar. You can try this for yourself if you’d like.
JESIN is formulated to be mixed at a 2:1 ratio of dry to wet mixture.
To determine how much total JESIN you will need, you first determine how much water weight the mold cavity contains and then double that.
So, put the mold onto the scale and set the unit measurement to grams. Now zero it out and fill it with water.
I like to round up a little. This mold, including the lid and slight rounding, came to 266 grams. I rounded this to 270.
So after doubling that amount, you need 540 grams of total JESIN.
Then, to get the 2:1 ratio, divide the total amount of JESIN needed by 3.
540 divided by 3 = 180.
So you have (3) 180 increments to work with. Two 180-gram increments go to the dry powder mix: 180 x 2= 360 grams. The remaining 180 grams is for the liquid.
360 dry JESIN
180 wet JESIN
And, a bonus of JESIN is that you don’t have to waste anything as you can use the leftover mix to make terrazzo chips!
Simply thin out the extra, let it cure, and break it up. Details on this are in an upcoming tutorial.
Step 2: Mix The JESIN
First, cover your work table with a plastic or vinyl cloth. Or even wax paper will do.

Place a large disposable plastic cup or disposable, flexible bowl onto a scale, zero it out, and pour the powder into it until you reach 320 grams.
Note: Don’t use a container that isn’t disposable, like I did. I had to throw this out because the JESIN stuck to it.
And since it wasn’t flexible, I couldn’t crack the cured JESIN bits off.

Set it aside, place another large disposable plastic cup on the scale, zero it out, and pour in the liquid JESIN until you reach 160 grams.

Now, pour the liquid into the dry mix and combine them slowly with a craft stick.
You have 20 minutes of working time before the mix starts to set so that you can take your time. Get the mixture smooth and lump-free.
Tip! You can also use a larger disposable mixing container, in which case a flexible baking spatula is quite helpful for getting the lumps out.
Step 3. Add The Color For The Candle Jar

Following the swirl technique below may be better if you don’t have a vibrating machine or something else to vibrate or oscillate the mold.
Because of this, I skipped the swirling to create a marble effect. Instead, I just blended the two colors and let the machine’s vibrations do the work to create the ombre effect.
You can test this to see if it works with an orbital sander or a massage gun. I have not tried these alternatives.
For the ombre effect- if, and only if you have a vibration machine or tool that causes vibrations:
If you have a vibration machine, or a tool that creates vibrations like an orbital sander or a massage gun, then you can follow this technique.
Otherwise move on to the swirl technique to get more of a marbling.
Divide the mix into two equal parts and then add 3 drops of the Mystery Liquiment (purple) color to one part.
Pour both colors (white and purple) together and around each other. The video shows this at 06:19.

Fill the mold to the top and then fill the lid.

For a marbled effect- without a vibration machine or power tools that cause vibrations:
This photo is from the black and white ombre candle jar I did. I show this technique at 8:19 into the video.
I used gold leaf foil in the video that was barely visible on the finished piece.
My concrete candle jar tutorial shows you how to correctly make the gold leaf foil effect.
With this swirling, your jar should come out more marbled (with lines) than having the two colors gradually fading and blurring into each other (ombre).
Add a few squirts to the top of the mixed JESIN and then use the craft stick to swirl it in, but don’t stir it fully, or the whole mix will turn that color.
A cup wider than I used in the photo above will be more helpful, as just a couple of stirs start to blend the black in too quickly. A wider cup will give you more room.
The color should look marbled inside your cup. Pour it into the mold just like that.
Step 4. Vibrate The JESIN

Vibrate the mold on a vibrating machine.
If you don’t have one, place this onto a tile or a level, rigid board and use an orbital sander (without the sandpaper and vibrate it against the tile or board.
Alternatively, any oscillating power tool will work. Otherwise, use your hands to raise the rigid board to tap and vibrate the board on your work surface.
You can also lightly tap the mold on the sides.
I had very different curing times based on the temperature in my room.
Typically, JESIN cures in about 20-25 minutes, but for this mold, it was anywhere from 45 to about 1 hour and 15 minutes until the JESIN cured. My room temp was about 68 when it took longer and 76 when it was quicker.
The JESIN gets warm while it is curing. So the way to know it is ready to be removed is once the mold feels cool to the touch, or cooler than room temperature, it should be safe to demold.
Step 5. Demold The Jar And Sand It

To demold this, peel back the sides of the silicone mold and pull out your JESIN candle jar.

This candle jar mold came with a ring that you can place around the neck of the inside of the lid.
It might make the lid tight, but if so, you can sand the neck to make it a better fit.

If the bottom or neck has rough areas, sand them with 200-800 grit sandpaper.
Step 6. Seal The JESIN
The JESIN should be sealed because it is a porous material that must be protected from stains and moisture, especially if you plan to use it as a candle jar.

To do this, add the dippable sealer to a container that is taller and wider than the candle jar (my container was a little too narrow).
Now dip and roll the jar in the sealer. Keep it immersed for 15-30 seconds.

Then, remove the candle jar and wipe it down with a microfiber cloth.
Be sure to wipe it well so it’s free of smudges. Also, be sure to get fully inside the jar.
Wait a few minutes, repeat this process, and do the same with the lid. I did this three times for my candle jars.
The sealer needs to cure for at least 24 hours before being used or before you add any wax.
If you are using any other sealer than the one I recommended in the materials list, please follow the times and instructions on your label.
Sealers vary from manufacturer to manufacturer.
Once that sealer has fully cured, go ahead and add the wick and wax and light that gorgeous baby up!
Did you love making these? Then check out this tutorial for how to make kintsugi coasters with Jesin!
And for more candle making ideas, here is a cool-looking round concrete candle vessel.
Don’t forget to Pin it for later!

Don’t forget to Pin it for later!

Make A Jesin Candle Jar
A sstep by step tutorial for how to make a JESIN candle jar with a gorgeous ombre effect. This acrylic plaster casting material is durable and perfect for making candle vessels.
Materials
- JESIN powder and liquid
- 10% off use code: Ellen10
- Liquiments colorant– Mystery (blue) or Jet (black)
- 10% off use code: Ellen10
- Gold leaf foil– optional
- Plastic or paper cups
- Nitrile gloves
- Safety mask
- Plastic table cloth
- Silicone mold for a candle jar vessel
- Kitchen scale (important)
- Craft sticks
- Vibrating machine or orbital sander– optional
- Sandpaper, 200 and 4-800 grit
- Disposable plastic container
- Acrylic sealer
- Microfiber cloth
Tools
- Please see the full materials list above the tutorial for details and links.
Instructions
- Calculate The Amount Of Powder And Liquid JESIN You’ll Need
- Mix ThePowder and Liquid JESIN
- Add The Color For The Candle Jar
- Vibrate The JESIN
- Demold The Jar And Sand It
- Seal The JESIN With The Dip And Seal Sealer


Ellen,
Great post about Jesin. I have been casting my Lostartifax.etsy.com plaques for a year and a half using Jesmonite and Hydrocal. I am actually thinking of abandoning Hydrocal altogether to shorten my process time and produce plaques with less air bubbles. The Jesmonite behaves much more uniformly than plaster and I have found a reliable supplier at a good price.
I was using Colorberry Jesmonite earlier this year, sourcing from Blick but then it was discontinued. I found Madmayker in Toronto and starting buying 28kg kits from them. Quite reasonably priced and shipped rapidly.
I figured that Mrs. Colorberry got out of Jesmonite and came up with this Jesin that requires 2:1 mix and has a longer pot life. I guess that is an improvement but they don’t seem to be offering anything in bulk yet so it is not priced competitively against Jesmonite.
Jesin seems to be manufactured in Germany and Jesmonite in the UK so nobody in the US gets any without international shipping. If Mrs. Colorberry finds a mixing company in the US and sends them 100’s of Kilos at a time to repackage, as Jesmonite UK does with Madmayker, they may at some point become competitive but right now I don’t foresee it.
Your followers would love using this material (either Jesin or Jesmonite) as I have and there are hundreds of creative paths to take with it once you get acclimated.
Thanks for the informative post.
Steven
Hi Steven,
I took a peek at your art, beautiful!
Ah, yes, you are correct, Colorberry makes their own now, so Blick now sells Jesin now in place of Jesmonite. I am not able to compare Jesin to anything unfortunately, but I do love it. I think the longer working time is the biggest benefit.
And… you don’t pay international shipping!!! It ships from Florida. So if you meet the $50 shipping minimum you get free shipping. That’s from Jesin.com. I think Blick has a higher ship free minimum. This is all new as of a couple of weeks ago. I’m sure they have to test this all before they can go to bulk, but I bet it’s not out of the question. It’s very exciting. Thanks for your comments. It’s nice to hear from someone who knows this material! Good luck with your art!
Ellen
Hi! I received my Jesin shipment and used it all up on the same day because I had molds waiting. I don’t know what I’m doing with anything I create and I was really impressed with this material; even the oops jar came out lovely! Thanks for the recommendation. 🙂
Ha ha, it’s addicting, isn’t it? I had to restrain myself so I didn’t do the exact same thing! It’s true, even the mistakes turn out nice. I’m so glad you are enjoying working with it.
Ellen