How To Make A Cute Cat Jack O’ Lantern DIY
How to set your pumpkin apart from all the other Halloween pumpkins with a beautifully carved DIY cat Jack O’ Lantern.
If you’re a cat lover, then why not carve a cute cat, instead of a typical Jack O’ Lantern face?
I’ve had so much fun carving pumpkins this year, as this is my second pumpkin and my second one of a cat.
The first was a mini pumpkin, where I used a mini carving stencil.
The design for that was the silhouette of a black cat. I also surface/etch carved it, which is a little different, that cutting straight through.
FAQ For Carving A Cat Onto A Pumpkin
How do you make a cat Jack O’ Lantern?
The best way to make a cat Jack O Lantern is by using a pattern to draw the image of the cat.
Just use scissors to cut the paper at different angles so that you can bend the cat pattern around the pumpkin.
How do you carve a cat in a pumpkin?
Use a paring knife and wood cutting tool to carve away the outlines you have drawn from your cat carving pattern.
The flat blade from a wood carving set will help clean up the edges after using the paring knife.
What tools do you need to carve a Cat O’ Lantern?
You don’t necessarily need an official pumpkin carver kit to make a cat Jack O’ Lantern, but it wouldn’t hurt.
You can usually pick those up at Michaels stores or on Amazon.
Out of all my clay, linoleum and wood carving craft supplies, there were only a few tools I actually used
I found the most useful to be a few wood carving tools and a clay one that served as a scooper. Please see the photo of the materials below.
For different cat carving patterns, here are 67 to choose from.
And if you want to carve a miniature pumpkin, here is the mini pumpkin I carved and here’s where you can get mini stencils for it.
Some of the links on this page have been provided as a convenience for finding materials. These links may also be affiliate links. As an Amazon Associate I earn from qualifying purchases, at no extra cost to you.
I only recommend products I’ve used and loved, unless otherwise stated. Click here to read my full disclosure policy.
DIY Cute Cat Jack O’Lantern Materials List
DIY DIFFICULTY LEVEL | Easy
- Cat face pumpkin carving pattern
- Printer
- Blue tape
- Scissors
- Awl or punch tool
- Ballpoint pen
- Serrated knife
- Paring knife
- Carving tools: Linoleum cutter kit and/or wood carving kit
- Spoon
- Toothpicks (only if needed for repairs)
- Baby oil, vaseline or vegetable oil
- Cotton swab and cotton ball
- Battery operated candle


Tutorial For How To Make A Cute Cat Jack O’Lantern Step By Step
Step 1. Cut An Opening In The Top Of The Pumpkin
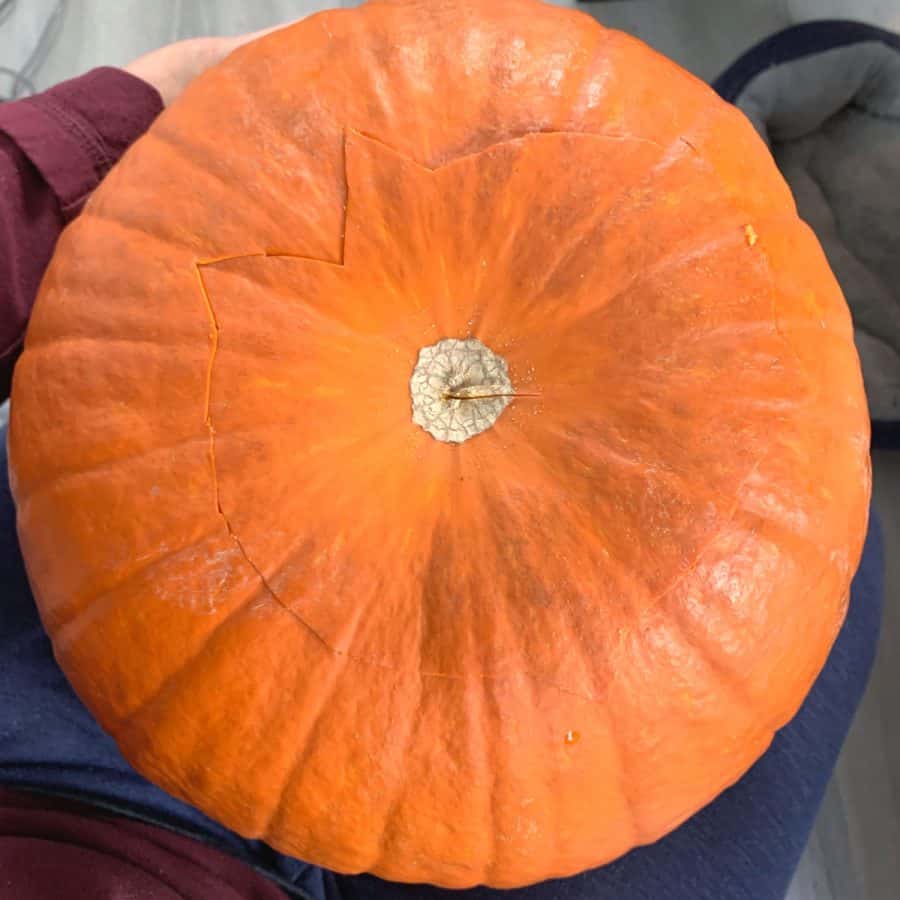
In a Youtube video I watched, someone recommended cutting the bottom of the pumpkin instead of the top, so that you don’t have to look at the cut line.
One big thing to consider here is that if you are going to put a real candle inside, you will need to cut the top off, otherwise, the candle can’t get oxygen and the flame will go out.
I used a battery powered candle and so decided to follow that recommendation of cutting the hole in the bottom, but regretted it. It made for very messy carving.
The bottom piece didn’t want to stay in while I was carving, so pulp kept falling off of the areas I was carving and down through the hole.
Plus whenever I go to turn on the light, I have to keep pulling the bottom off and more pulp comes out.
This may be an issue that you don’t encounter. I think it was because my pumpkin had an unusual texture inside, it was like spaghetti squash.
If you think you may find this troublesome as well, then you may want to cut the standard hole in the top.
Step 2. Choose And Download A Cat Carving Pattern
Go here to find your free cat pumpkin carving pattern digital download. There are 67 amazingly adorable options to choose from. You can find the cat stencil I used here. It wasn’t free, but it was cheap.
Step 3. Print And Resize The Pumpkin Stencil To Fit The Size Of Your Pumpkin

Once you download the pattern, you will probably need to size it to fit your pumpkin. The image I used came 12” x12”.
My pumpkin was a relatively large pumpkin at 10” high, but still smaller than the stencil size.
After playing with a couple of different sizes, I chose to make the design a fair bit smaller than the pumpkin.
I scaled the carving pattern down to 5 ½”. Unfortunately, I can’t instruct you in detail on how to size the drawing because this will very much depend on what software you are using.
If you have design software, it should be a matter of grouping all the objects, then selecting them and dragging them inward.
If you don’t have design software, you may need to scale it by percentage in the printer dialog box.
In which case, you may need to play with it a little. I am assuming that scaling it to 50% should make it about 5”.
When you print this, it will actually work a little better if you use thinner, cheaper paper. Print this in black and white.
Step 4. Trace The Pumpkin Stencil Pattern Onto The Pumpkin

First, make angled cuts around the paper, up to the image. This will allow the paper to bend around the pumpkin. Then tape the edges.

Next, use the awl to punch through the paper at the edges of the black. I recommend punching just inside the black lines, rather than right at the edges.
This will give you a little room for error, in case you get too close to the edge. If you notice in this photo, the eyelids and eyeballs are close together.
I took this photo on the backside of the pumpkin because on the front, I didn’t leave room for error.
My cuts were too close and actually ended up cutting these too close together and the eye broke off near the temple. You can see this in Step 5.

Once you have the whole image traced, you can remove the paper.

The lines from the awl may be light. Mine were pretty noticeable, but I still found it helpful to trace it with a pen.
You will be cutting out the areas that were black on the paper printout (negative space). It may be helpful to fill those parts in to help avoid any confusion when cutting.
Step 5. Carve The Cat Face Into The Pumpkin
You may find different tools work better for you, but these are the tools I liked using the best. For the bigger, longer lines, the paring knife got the job done quickly.

First, carve the outline with the paring knife.

Then cut through the middle of that section and chop it up into little pieces. Then push it through into the pumpkin.

For the smaller lines, I did the same, but I alternate between the small and large straight cutter, the tiny curved cutter, the regular curved cutter and the paring knife.
The smaller, flat blade cutter is probably what I used the most.
At the back/inside of the cat Jack O’Lantern, you may have remnants of pulp that get dug up from carving. If so, use the spoon to carefully pull the remnants away from the face.
Note: If you accidentally cut through a part of the pumpkin that should have been attached, it can probably be fixed.
As I mentioned in the previous step, I cut through the eye at the temple.
If you look carefully at the photo above, you may be able to tell that the eye on the left isn’t actually intact. It broke off when I was carving.
To fix this, I used a toothpick to push through the top eyelid and into the left side of the head.
It worked out nicely that I had plastic toothpicks that were multicolored and one of the colors happened to be yellow.
Step 6. Clean Up The Remaining Debris From The Jack O Lantern
Just go through and use the various tools to scrape away any bits and pieces of sliced pulp, or furry bits that are stuck to the carved edges.
I found the paring knife and straight wood carving tools the most useful for cleaning.
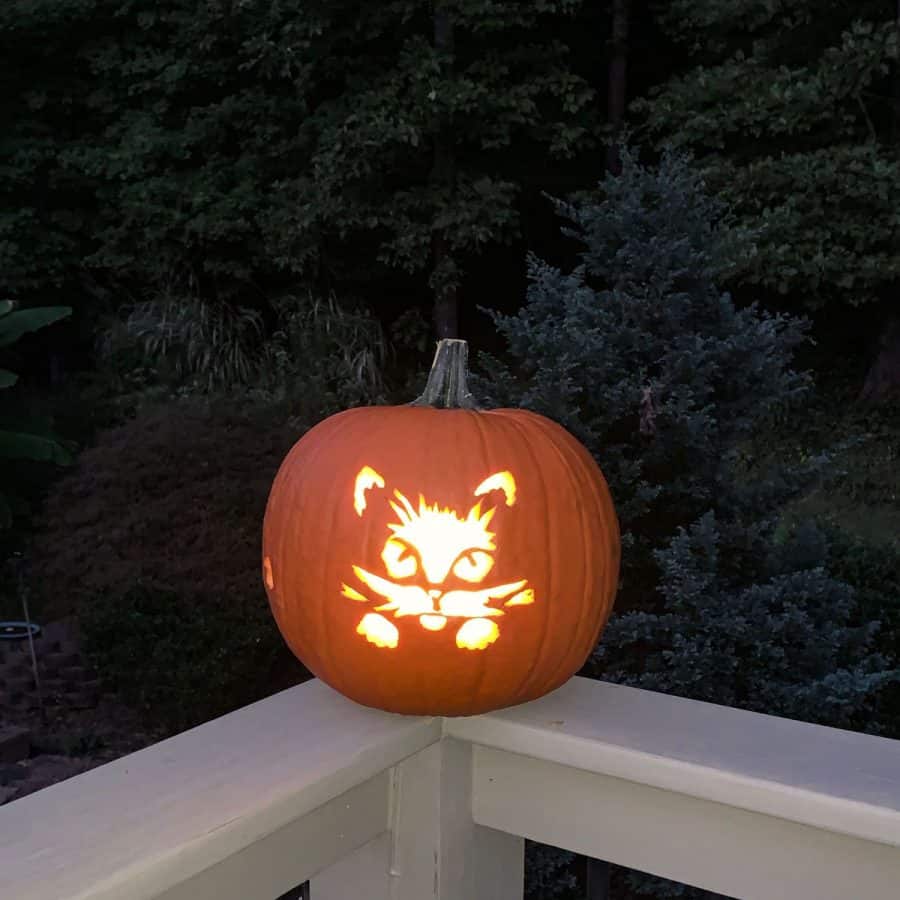
Step 7. Add A Light To The Cat Jack O’ Lantern

Make sure you have fresh batteries and turn on the lantern for a glowing design.
Then set your cute cat O’ Lantern out on the front porch to welcome Halloween night trick or treaters.
For other Halloween pumpkin decor, take a look at the shimmery concrete pumpkins and the cement Jack O’Lantern.
And here’s where you can find inspiration for making your own fall decor, and fall wreaths.
For other fun for cat lovers, here are coloring pages for unicorn cats for kids!
Don’t forget to Pin it for later!

DIY Cute Cat Jack O’ Lantern
How to carve a cute cat Jack O' Lantern using a downlaodable free cat carving pattern. Make your pumpkin look professionally carved, for the best Halloween decor.
Materials
- Pumpkin
- Carving pattern of a cat
- Wood carving tools
Tools
- Please see the full materials list above the tutorial for details and links.
Instructions
- Cut An Opening In The Top Of The Pumpkin And Remove The Pulp
- Choose And Download A Free Cat Carving Pattern
- Print And Resize The Pumpkin Stencil To Fit The Size Of Your Pumpkin Using Design Software, Or Resize Within The Printer Settings
- Trace The Pumpkin Stencil Pattern Onto The Pumpkin Using A Bookbinding Awl
- Carve The Cat Face Into The Pumpkin Using A Pairing Knife And Wood Carving Tools
- Clean Up The Remaining Debris From The Pumpkin With The Wood Carving Tools
- Turn On The Battery Powered Candle And Place It Inside The Cat Jack O’ Lantern
This is just too cute!!! Great job!
Thanks Merry!