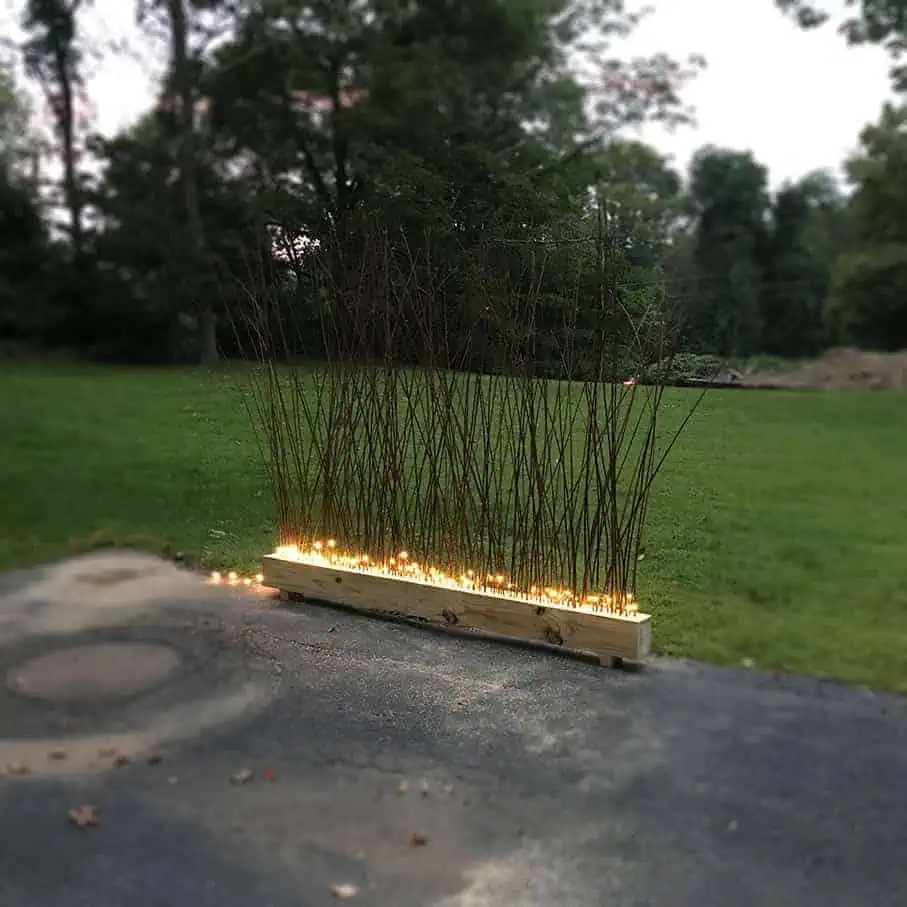
DIY Privacy Screen With Ikea Twigs
A tutorial for how to easily make your patio or porch more private with a pretty outdoor DIY privacy screen made with twigs and fairy lights.
DIY DIFFICULTY LEVEL | Moderate
Years ago when I was living in a loft complex, I had a patio that faced a busy road and I always felt watched by passersby.
I was renting this loft so was limited to making any kind of permanent construction and so installing a wooden fence wasn’t an option.
Lattice panels would have made a good screen material, but they didn’t fit in with the loft’s modern aesthetic.
I also considered doing a bamboo privacy screen, but wasn’t sure how to secure the bamboo together plus figured it was going to be a little pricey.
The last consideration was to do privacy trees and get small trees to line up, but this was also not going to be very budget friendly.
Then I finally was touring some old historic lofts and saw someone had a planter that just had willow branches wrapped with fairy lights.
And somehow the pine beam and twigs with lights idea came to life. With its unique look, it was the perfect DIY backyard privacy screen for my outdoor space.
Also, if you’re in need of a balcony privacy screen, this is a great option for that. It’s lightweight and transportable if you need to get it up a floor or two.
Here’s another great way to use Ikea twigs with lights for your outdoor patio.
Some of the links on this page have been provided as a convenience for finding materials. These links may also be affiliate links. As an Amazon Associate I earn from qualifying purchases, at no extra cost to you.
I only recommend products I’ve used and loved, unless otherwise stated. Click here to read my full disclosure policy.
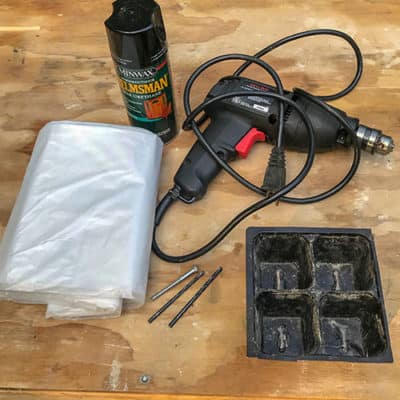
DIY Privacy Screen Materials List
- 6″x 6″ Pine beam, cut to 80″
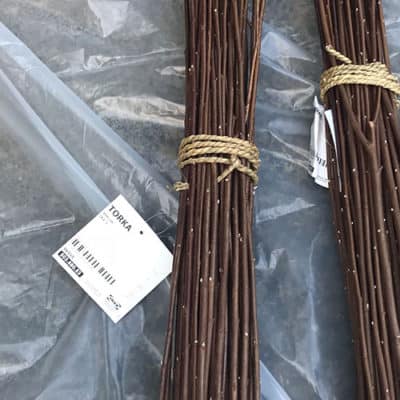
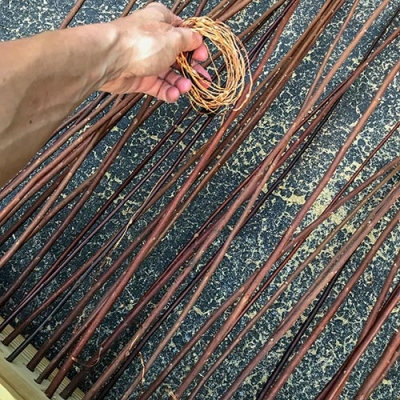
- *Dried twigs- Torka from Ikea
- Polyurethane spray (2)- satin
- 3″ wood exterior screws (4)
- Vegetable oil spray
- Fast setting concrete
- Disposable mixing bowl
- Nitrile gloves- light duty
- Mould for legs- mini plastic pots
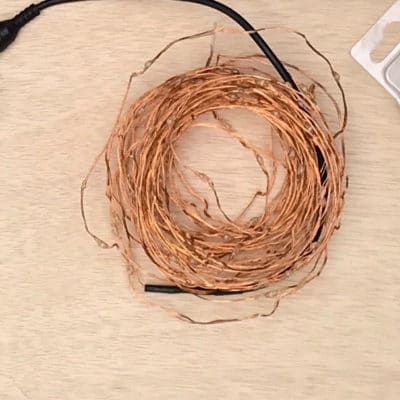
- Outdoor LED Fairly Lights
- Corded power drill
- Drill bits of various sizes ¼ – ½”.

*Materials Note:
The privacy screen you are seeing in the tutorial is one I made last year.
This lit fence has less branches than the one made initially because at the lofts I really wanted a lot of privacy and only needed a little privacy where I was living last summer.
So I recommend adding more than two bunches of branches if you want the screen to be dense.
DIY Privacy Screen Tutorial Instructions
Step 1. Protect The Twigs From The Elements
Lay the twigs onto a plastic drop cloth and spread them out (I forgot to get a photo of them spread out for spraying).
Spray the Torka branches with the polyurethane all on one side. Then after about an hour, you should be able to flip these over to spray the other side.
Repeat two more times. You may want a third coat if their final location will be exposed without overhead cover.
If you are wondering, I did also try to spray them once they were inserted into the holes in the beam.
But that wasted a lot of urethane because most of it went in between the branches, rather than on them.
Step 2. Make The Legs
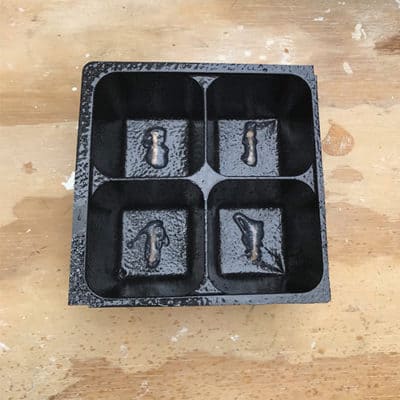
The easy way to get nice durable legs for this DIY privacy screen is just to make them out of concrete.
Get the cement mix together and mix it up to the consistency of a mud pie, using your gloved hands.
Spray the vegetable oil into the planter mould and pour in the concrete.
Wait about 10-15 minutes, then push the head of a screw into each container of concrete so that they are submerged about an inch inside.
Take care that they are in the center and are straight.
Note: These will cure in about an hour, but you shouldn’t attach them until they have fully cured. The following day is ideal.
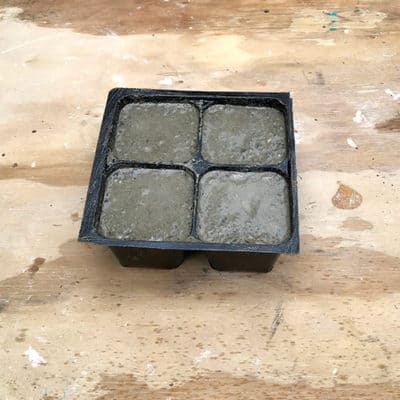

While they are curing –during that first hour, you should check back a couple of times to make sure the screws haven’t started leaning.
They need to stay centered and be standing straight.
Also, I recommend not moving them too much within the curing concrete or you may end up loosening them within the concrete and the screws will be too loose to screw properly into the beam.
If a screw does become too loose, like one of mine did, it’s okay because I have a fix, which I’ll get to in Step 6 below.
Step 3. Drill The Holes For The Feet
Garden Planner!
Printable PDF Download
$2.99
Everything you need to plan your garden.


This will subscribe you to my newsletter where you’ll get updated when I have a new post, or tips and tricks. You are free unsubscribe at anytime.
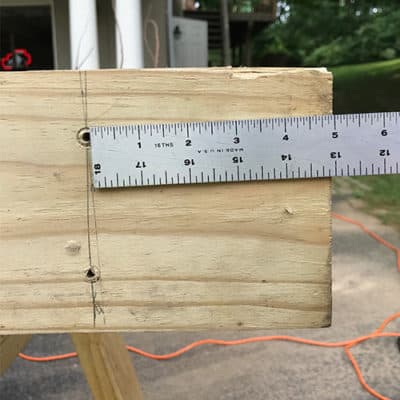
First, you will check each side of the beam and look for the side that has the least amount of knots.
That’s the side you will want for your branches. Flip the beam over to the opposite side, and that’s the side you will drill the holes for the feet.
Mark the center location for two of the concrete feet for each end. Mark them out at about 5″ down from the end.
Next,mark the center of each foot by measuring in at 1 ¼” from each side. Then drill a pilot hole that fits the width of the screws in the concrete feet.
Make sure you will be able to screw in your legs without hitting the one next to it, but these will be attached in Step 6.
Step 4. Organize The Ikea Twigs By Size
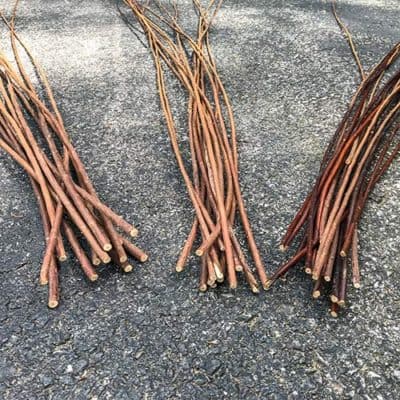
You’ll end up with a variety of twigs in your bunch –some will be thicker than others.
To prepare for drilling the holes, you’ll need to group them by the size of the base of the stem.
Separate them into large, medium and small piles.
Step 5. Drill The Holes For The Branches

Choose your drill bit sizes according to the diameter of the ends of your twigs.
Now use the corded drill to drill the largest holes down the center of the beam.
You will have to test these as you go to make sure you drill enough holes to fit the sizes of the twigs you have. It’s a bit of trial and error.

Next, move to the medium size bit and drill to each side of the large holes in an off center pattern.

Go ahead and put all the medium and large branches into the holes.
Most of your branches are not likely to be straight, so think about what direction you want them to go.
This bunch that I got from Ikea for this project was very flexible, almost rubbery which made them less likely to break in the process.
When I originally made the first version years ago, the branches were straighter and more brittle.
The branches for this privacy fence were pretty curvy and so I let them flare outward, but you may want them facing more inward or sideways.
After you have the medium and large branches inserted, you can drill the smallest holes.
Eyeball these holes based on where you think you need to fill in the spaces.
Step 6. Attach The Concrete Legs To The Beam

After the concrete has cured 24 hours, you can de-mould the legs. Carefully flip the beam onto its side.
Have someone assist you so you don’t break any branches and screw in the legs.
If you end up with a screw that is loose within the concrete and it won’t screw it in, then make the hole a little larger and add some construction adhesive (or similar) to the hole.
Construction adhesive is nice and gooey so it fills in the space decently.
Then just push in the foot with screw, rather than twisting it and let it dry an hour or so before moving on to the next step.
Step 7. String The Led Fairy Lights Around The Privacy Screen Twigs
Lay the beam back down on its side and add the fairy lights by stringing them carefully between the branches, and wrap and wind as you go.

**Keep the lights on the roll they came with.
You’ll want to take special precaution not to let the string slip off the roll or you will end up with a knotted ball of lights like I did, and you will have to constantly unknot.
** To make it easier, you can weave the lights mid-way up the branches and then slide the wire down after.
Get someone to help you gently flip it over to stand up right and position it.
Sit down with a glass of wine, beer or coffee and enjoy the privacy in your outdoor area with your new pretty screen.


DIY Privacy Screen
Want some outdoor privacy? A tutorial on how to build a DIY privacy screen with lights for your patio. A great way to screen out the neightbors.
Materials
- 4 x4 pine beam
- LED fairy lights
- Ikea Torka branches
Tools
- Please see the full materials list above the tutorial.
Instructions
- Protect The Branches From Outdoor Elements With A Polyurethane Spray
- Make The DIY Privacy Screen Legs Out Of Concrete, Using A Plant Tray Mold
- Drill The Holes Into The Beam For The Feet With A Corded Drill
- Organize The Ikea Twigs And Separate Them By Diameter –Small, Medium And Large
- Drill The Holes For The Twigs Using Multiple Sized Drill Bits –Sizer Per The Diameters Of The Twigs
- Attach The Concrete Legs To The Beam By Screwing Them In
- String The Led Fairy Lights Through The Ikea Twigs, Starting From The Bottom


Very attractive!
Thanks! The good ambience felt like a bonus to the privacy.
I’m trying to figure out what makes this a privacy fence. It’s very cute art but not a ounce of privacy given ?
It just depends on how many branches you put in it. The first version I made about 15 years ago and I had an extra bushel of branches in it. It was very private. I also used it as a pet fence. My patio was open only on one side and we were renting so I couldn’t put up a permanent fence. This allowed my cats to be on the patio, safely.