The Perfect DIY Plant Stand: Indoor/Outdoor
Here is a tutorial for how to make the perfect indoor/outdoor DIY plant stand that is the solution for holding all your plants year round.
Succulents are my favorite plants, and that’s what fills my planters.
I can keep them outside a little more than 8 months of the year, but they must be inside the other four.
Once they are inside, it’s always a dilemma of where to put them.
I have an atrium window, but I have a lot of plants, and the shelves there aren’t strong enough to hold most of the concrete planters I make, so I needed a better option.
My issue when they are outside is a couple of things.
I have been lining the pots up all over the deck floor, creating an unintended obstacle course.
And it’s not so fun when I need to tend to them, crouching down all the time.
Plus, the deck is growing mildew underneath the larger pots, and they really needed to be raised off the ground.
Clearly, a simple plant stand wouldn’t fit my needs.
And at first, I tried to find a fancy-featured plant holder I could purchase, but I couldn’t find one that filled the requirements.
So I decided the only way I would get what I needed was to make my own plant stand.
After a year of looking at many DIY plant stand ideas and not finding the exact solution, I finally came up with a great idea.
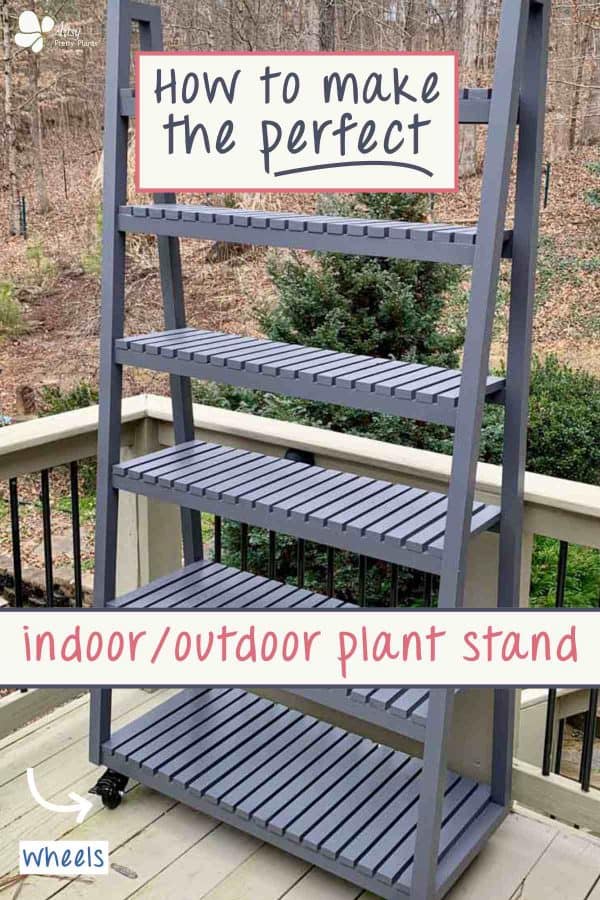
It’s a hybrid indoor/outdoor holder that finally gives me the perfect plant stand!
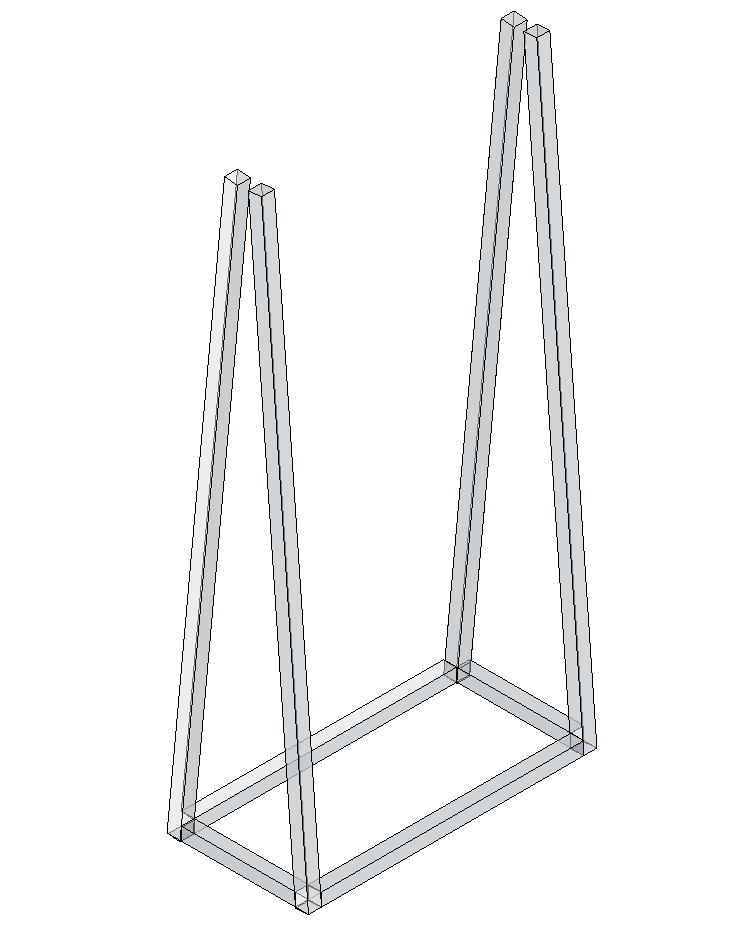
By the way, if you don’t have ample outdoor space, this A-frame stand works great because it has a lot of vertical height and won’t take up too much space.
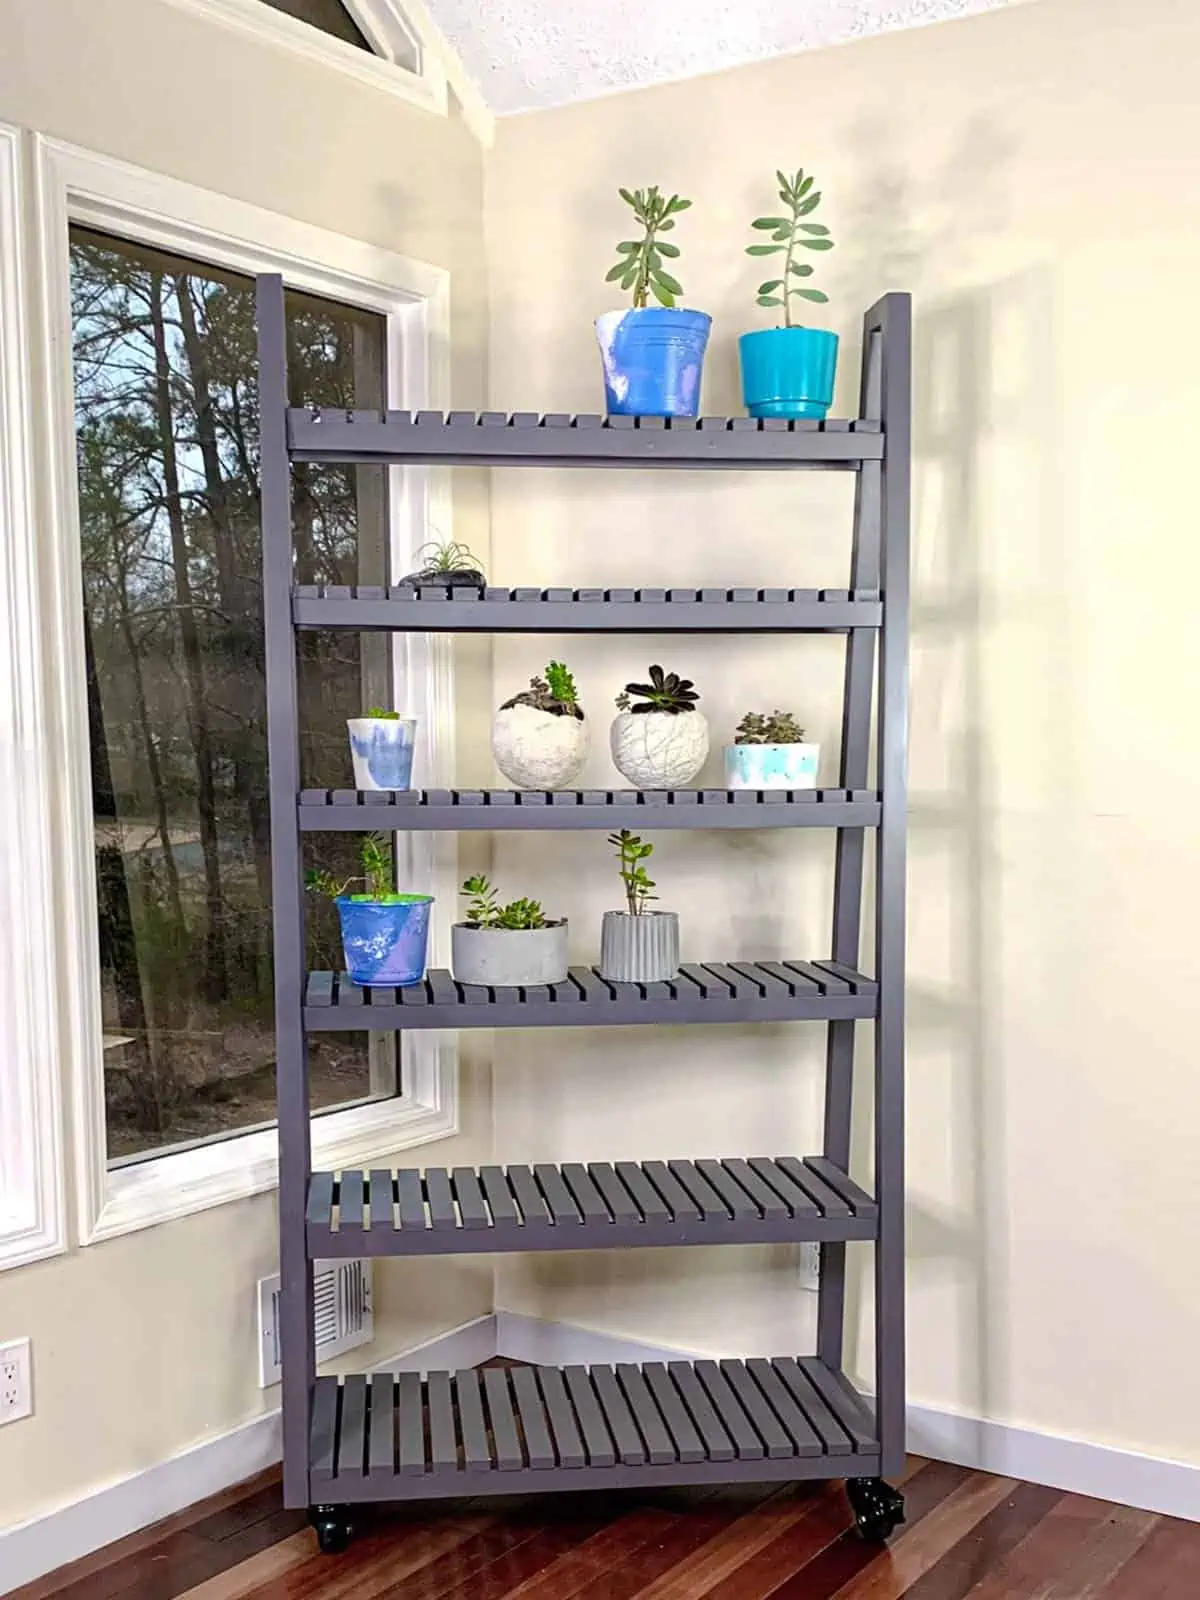
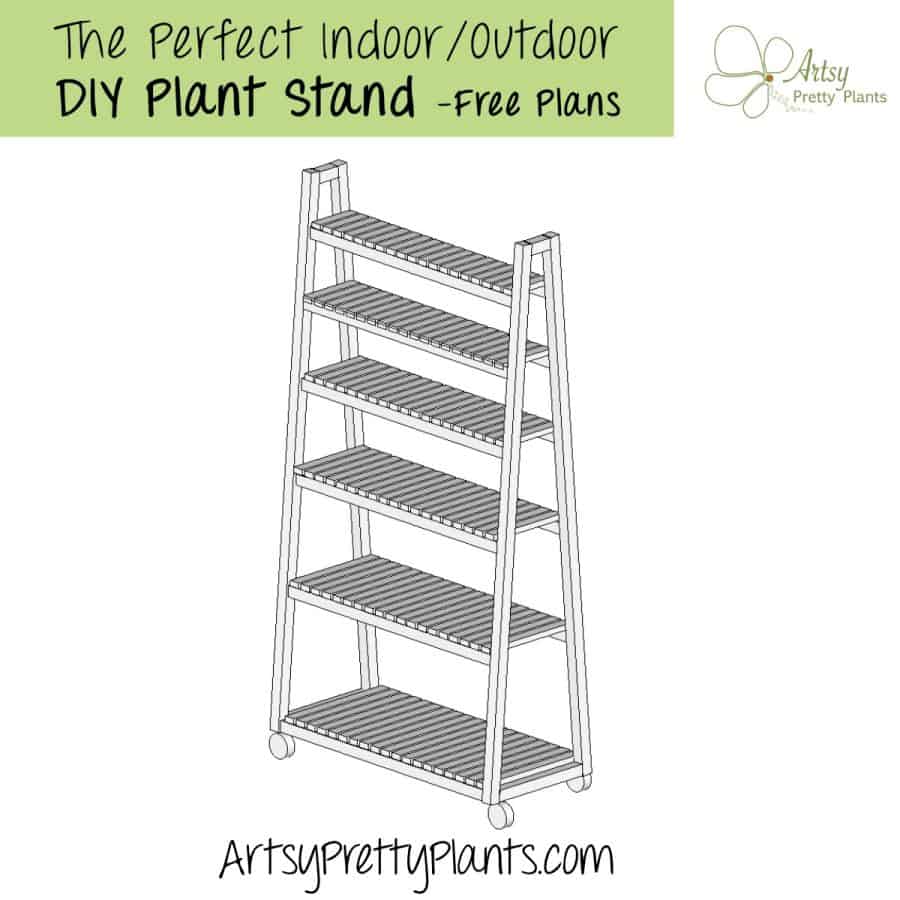
Why is this multi-tiered modern plant stand perfect? It has–
- 6 shelves
- Shelves become shallower as they go up, allowing for sunlight to reach even the small plants on the lower shelves.
- Wheels that allow the stand to be moved from inside to the outside to act as an outdoor plant stand.
- Deep enough to hold a large plant.
- Looks good as an indoor plant stand.
- Looks like something you’d buy for a lot of moola from West Elm.
- Holds the weight of my potted plants, which are primarily concrete planters.
- A true A-frame shape, so you can rotate it. It’s a great way to get plants on different sides more or less sunlight, depending on the time of the year.
- Now I can maneuver the plant stand into the perfect position because of the wheels.
- The sunlight angle and length of time it hits my porch varies greatly depending on the time of year, and I need to be able to change positions easily.
And you should know you will want a second pair of hands to help you with this just because the size of the pieces makes it very difficult to hold the pieces in place while also screwing things together.
Now I will have the ability to maneuver the plant stand into the perfect position because of the wheels.
The sunlight angle and length of time it hits my porch varies greatly depending on the time of year and I really need the ability to change positions with ease.
Get the free DIY Plant Stand plans download at the bottom of the tutorial!
But that being said, it really isn’t a high difficulty either. You can definitely do this if you have the power, tools, and time. The hardest part for me was engineering it.
I’m really happy with how it turned out. It’s super sturdy, and the sunny, empty corner in our living room is the perfect place for it.
If you don’t have more outdoor plants than indoor plants and are lucky enough to live in a moderate climate year-round, you can use this just as an outdoor plant stand and maybe even skip the wheels.
By the way, have you checked out the DIY potting bench yet? It will make your life so much easier when you are potting your plants! Free plans with that too!
Some of the links on this page have been provided as a convenience for finding materials. These links may also be affiliate links. As an Amazon Associate I earn from qualifying purchases, at no extra cost to you.
I only recommend products I’ve used and loved, unless otherwise stated. Click here to read my full disclosure policy.
Here are 27 other DIY projects for wood planters you may be interested in, and this one planter box I used wood and handmade concrete tiles.
DIY DIFFICULTY LEVEL | Moderate
How To Make A Wood DIY Plant Stand Materials List
Pine boards
- (4) 8’ 2×2’ select pine
- (6) 8’ 2×1’ select pine
- (13) 8’ 2×1’ picket fence slats or cheaper wood boards
- Pocket hole jig
- Pocket hole screws 1 ¼”- outdoor
- Power drill or impact driver
- Orbital sander and sanding discs grits #180, 220
- Scrap wood- 3×1’s, 2×1’s 2×4
- 2” wood screws
- 1 ¼” wood screws
- 1 ¼” wood screws -wafer head (for wheels)
- Wood glue
- Blue tape
- Measuring tape or yardstick
- T-square or squaring tool
- Level- 24” and small 9”
- Nail gun and brad nails –1 ½”
- ⅜” spacer*
- (4) Casters with brakes –optional
- Washers to cover the caster screw hole openings
- Wood filler
Optional:
- Exterior latex paint
- Paint sprayer
- Acrylic top coat spray
Materials Notes:
-I opted to use paint instead of a wood stain for longevity, since most of the year it would get outdoor use.
-Cedar would be more durable for use outdoors, but unfortunately it’s not available in the sizes needed for this project at my local home improvement store.
-A space of ⅜” was perfect for getting the distance between the slats so that the spacing stayed even.
I couldn’t find anything that was exactly ⅜”, but I did have two thin bass boards that were 1/16” each and taped them together and it worked out great.

-You may notice in some photos that my pocket holes are covered.
We had to use wood pocket hole plugs to cover the screws because I couldn’t screws that were outdoor rated at my local store.
They do sell them on Amazon though. Try to get the outdoor ones, those plugs were a lot of extra work.
How To Make An Indoor/Outdoor Wood DIY Plant Stand Step By Step Instructions
Get the free DIY Plant Stand plans download at the bottom of the tutorial!
Step 1. Sand The Wood

Doing this ahead of time makes it much easier than trying to sand in between all the assembled shapes after.
Don’t worry about sanding the ends of any boards now.
It will only be the shelf slats that will need to be sanded and this will happen after they are cut and nailed to the shelf supports.
Step 2. Cut The Plant Shelf Supports (Cross Bars) And Create Pocket Holes
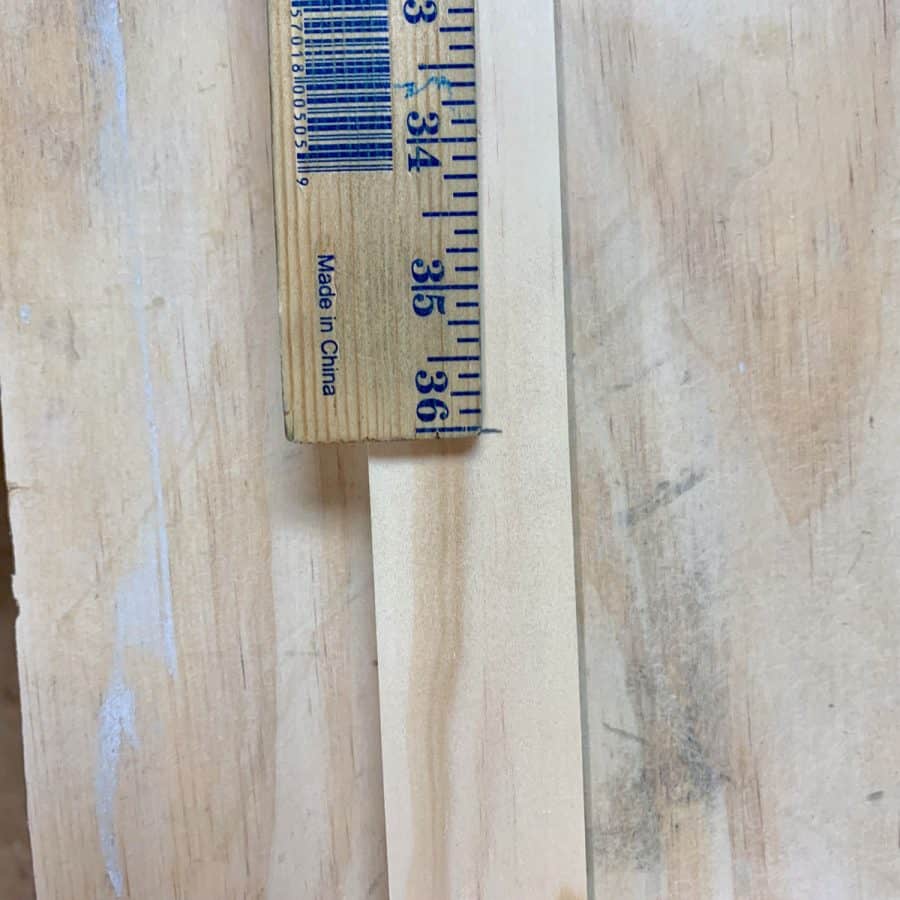
From the (6) select 2×1 wood boards, measure and mark each shelf support at 36”.
If you are building six shelves, you’ll need 12 pieces. You’ll be able to cut 2 shelf supports per 8’ board.

Use the miter saw to cut the board to your 36” marks and hang on to the leftover pieces because they will be used later for the shelf slats.
Step 3. Make Pocket Holes In The Ends Of The Shelf Supports

Use the pocket hole jig to create two pocket holes on each end of the 36” supports you just cut.
Step 4. Cut The Legs To Fit The A Frame Plant Stand Angle
The 2×2’s are going to be too long to work with at the 8’ lengths they came in, so to make them more manageable, trim off 20” from all four of them.

Tip: For the angled cuts and even the other cuts going forward, you may want to test them first on some scrap wood.
Set the miter saw to a 4.5 degree angle and cut just one end of each of the (4) 2×2’s.
These angle cut ends will be the feet. Put a piece of tape near the bottom of each one.
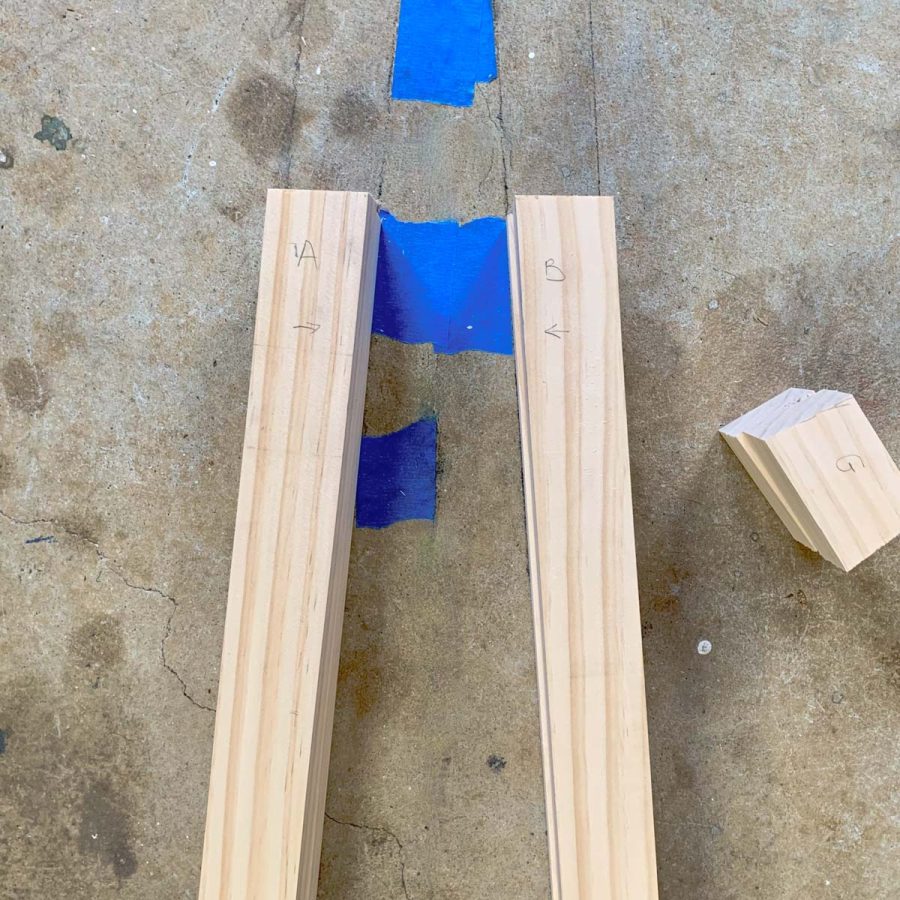
Mark one leg A, one B, C and D and draw arrows that point upward, away from the cuts.
You’ll need to work on the floor to make sure all your angle cuts are correct, unless you have a work table longer than 71 ½”.
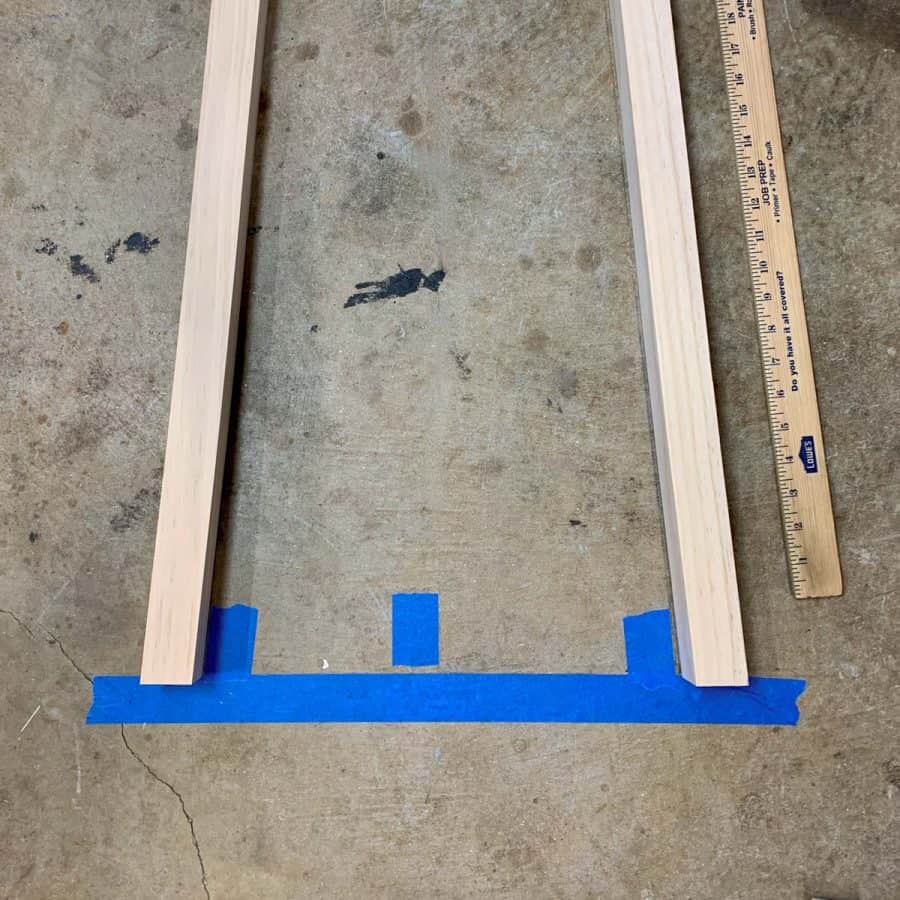
Take a ruler or straight edge and draw a straight line on the floor that is at least 18” long. This will act as the floor line.
If it helps, run blue tape across the line to help you see it better.
Lay two of the legs on the floor flush against the straight line and measure the distance between them at 14 ¼” and angle them inward to create the A-shape.
Use a yardstick or straight edge to check that they are flush.
You may want to draw arrows on the tape here also to indicate which direction is the outside since the angles are very shallow, it’s not easy to tell by looking.
Next, lay the other two leg pieces on top to check that they are also flush.
Step 5. Cut The Frame Side Connecting Pieces
It’s important that you check each of your measurements before cutting. With this project having angles, it is likely that your measurements could vary slightly.

Now from one of the 2×2 cut offs, cut the frame side supports –E, F. These will fit in the 14 ¼” spaces and will have the same 4.5 degree angle.
The widest point is the 14 ¼” which runs along the bottom (across the line), it will angle inward on both sides to make the A-shape.
Measure and mark 14 ¼” at the outer edge (closet to you – further from the saw).

Next, place one of the side connector pieces between the legs and line it up to check that everything fits and is flush.
Then check with the other two legs and side connecting piece.
Step 6. Cut The Top A-Frame Connecting Pieces
It’s important that you check each of your measurements before cutting. With this project having angles, it is likely that your measurements could vary slightly.
Use the tape measure to measure 71 ½” up the inside of each leg and mark that. The distance between the two legs at that point should be 3”.
It’s possible your measurement will be slightly different if your angles are off by even just .5 degrees.
It’s okay if it is, you’ll just need to adjust the depths of everything slightly from what I have here. So you will use whatever measurement you have at the top.
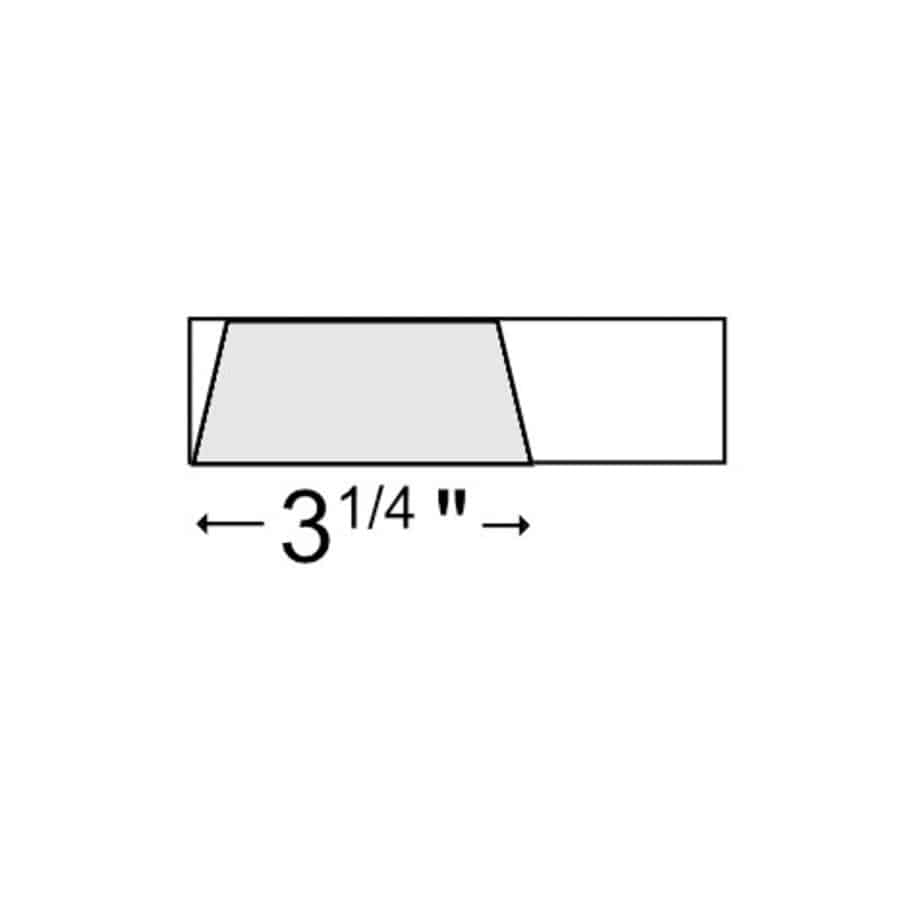
Next, take another piece of scrap 2×2 from the cut offs and cut two the two A-frame top connecting pieces at 4.5 degrees.
Measure the widest part at 3 ¼” (this will be the bottom) and make those marks on the edge closest to you. This gives you a top edge of 3”.
Check that these all come together to make a tight A-frame fit for both legs at the top and the bottom.

Now go ahead and trim the tops of the legs. These angles will match the feet, so each board has parallel cuts.
Lay the legs back on the floor to make sure they are all the same length and still leave that 3” distance at the very top and that the top connecting pieces fit.
Then you can move this all to your workbench.
Step 7. Make The Bottom Frame
Tip: Be sure to use wood glue between each connecting frame piece.

First, make pocket holes in the side frame pieces E & F. Then screw F into legs A and B.

Next, place a 36” cross shelf support with the pre-drilled pocket holes at a right angle to leg A.
Position it ⅜” in from the outside edge of the leg. Screw this to A.
Now follow the same steps for the other side with the E side frame piece screwed to legs B and C, then connect a cross shelf support between legs B and C and then screw them together.
For extra durability, you’ll add corner supports to the frame for the wood plant stand.
This is especially important if you are using wheels.
Cut a piece of scrap 2×4’s at 45 degree angles so that you have 4 corner pieces.

The corner brackets need to be screwed to each side of the frame and need to be pre-drilled and the screws countersunk with the 2” screws.
They will go in two spots about 1 ¼” in so that the holes will be straight when the corners are placed inside the frame.
Take care that they don’t hit any of the pocket screws.
Step 8. Secure The Top Frame Pieces.

Glue the top frame pieces together. Normally you would clamp these, but the angles make it awkward.
So instead, wrap blue tape around the top a couple of times to secure the pieces until the glue has dried.
The glue should be dry enough in an hour to remove the tape and screw these together.

Use the 2” wood screws, be sure to counter sink and pre-drill the hole. You can easily cover the screw and fill the hole with wood filler before you paint.
Step 9. Fasten The Cross Bar Shelf Supports To The Wood Plant Stand Frame
The shelf supports will need to be screwed into the centers of each 2×2. To locate the center, lay the DIY plant stand on its side.
Mark a line going from top to bottom on the inside where the shelf supports will go.

This needs to be ⅜” in from the outside edge of each leg. Make the line from top to bottom
The ⅜” mark will be made from each outside edge because this will be how far in you’ll place each support- basically the center of the 2×2.
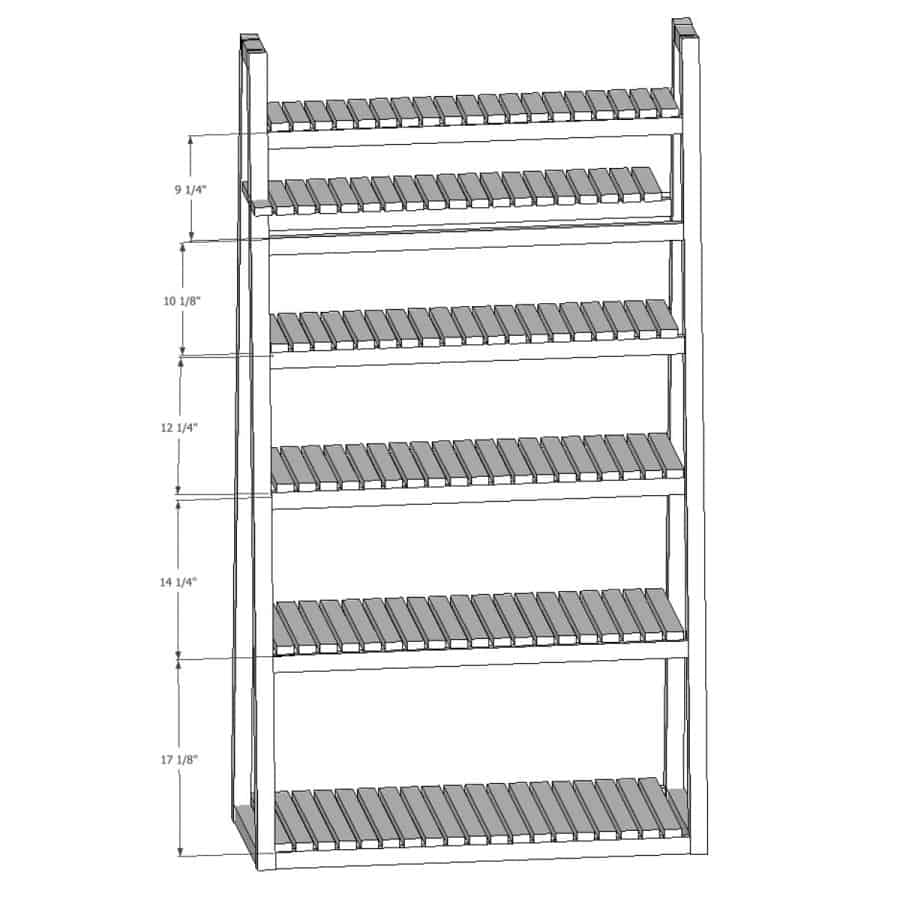
Now measure 17 ⅛” from the bottom of the frame (either I or J) going up the one of the legs along the ⅜” line. Mark that spot.
That’s where the top outer edge of the support will line up. Make the same mark on the opposite side.

Place the support in between those marks and use a level to make sure it is level in both directions- across and front to back, then screw it into the first side.
Now do the same on the right. Double check your measurement mark, follow the level for best results.
When screwing these pieces in, take care to not over tighten because it’s easy to split the wood and torque the board out of square.
Now move to the back side and repeat those steps, but use the 1st shelf support to help get this next piece level.
Once the supports for the second shelf are done, The next support will have 14 ¼”of space between the bottom of the board and the top of the one below.
The remaining shelves will have 12 ¼”, 10 ⅛”, 9 ¼” respectively (see pic above).
If you change these spacing distances, this will also change the lengths you’ll need for the shelf slats, so adjust accordingly.
Step 10. Add The Support For The Wheels – Wheels Optional

The wheel plates are bigger than what we have for the frame.
There’s one screw hole that doesn’t have any wood to go into, so to fix this and provide enough support, you’ll need to add a couple of pieces.
Since there’s not a good way to accomplish getting screws into another 2×2 that could run between the corner 2×2’s, you’ll need 2 scrap pieces of 2×1’s and 2 scrap pieces of a 3×1.
This way you can get all the screws into the wood and provide enough surface area for the wheel plate.


Take a 2×1 and cut it to fit between the two corners on the short sides- approximately 8”.
Screw this into the 2×1 side connector with the 2” screws and be sure to pre-drill and countersink.

Then use the 3×1 scrap and draw the wedge angles on it to get the size and fit to go next to the 2×1.
Just place it against the legs and trace where the corner braces are.
Step 11. Make And Fasten the Slatted Plant Shelving

It’s important that you check each of your measurements before cutting. With this project having angles, it is likely that your measurements could vary slightly.
Double check all the distances from the outside to outside of the cross bars.
If any of your shelves are the slightest distance higher or lower than what’s in the tutorial, then your slat lengths will be different.
Also it’s very possible that one end of your plant stand is a little wider than the other, so go with your widest measurement.
Be sure to add ⅛” to the total distance of the measurement you get so that you have 1/16” of an overhand on each side.
These dimensions are approximations only and will be based on all your cuts for each part of the planter.
You’ll need 19 pieces for each shelf.
- 16 ⅜”
- 13 ⅞”
- 11 ⅝”
- 9 ½”
- 8 ¼”
- 6 ½”
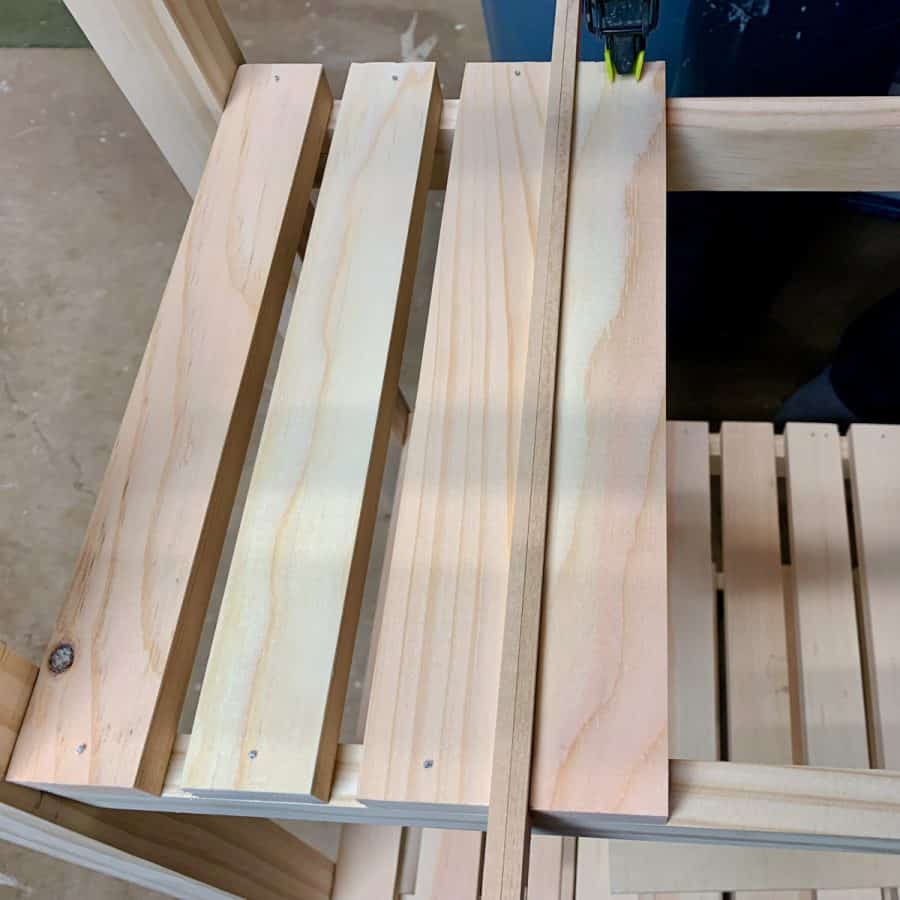
Once all the slats are cut, you can nail the wood plant stand shelf slats to the supports. First, place the spacer against the sides of the frame.
I recommend testing the spacing out with the spacer you are using before nailing these to the supports since your spacer may not be exactly the same width as mine.
When nailing, take care not to go through the other side of the shelf support.
We did that on a few of them and they were very difficult to pull out.
Most wouldn’t come out and so we had to cut them and then cover them with wood filler.
Step 12. Finishing The A-Frame DIY Wood Plant Stand
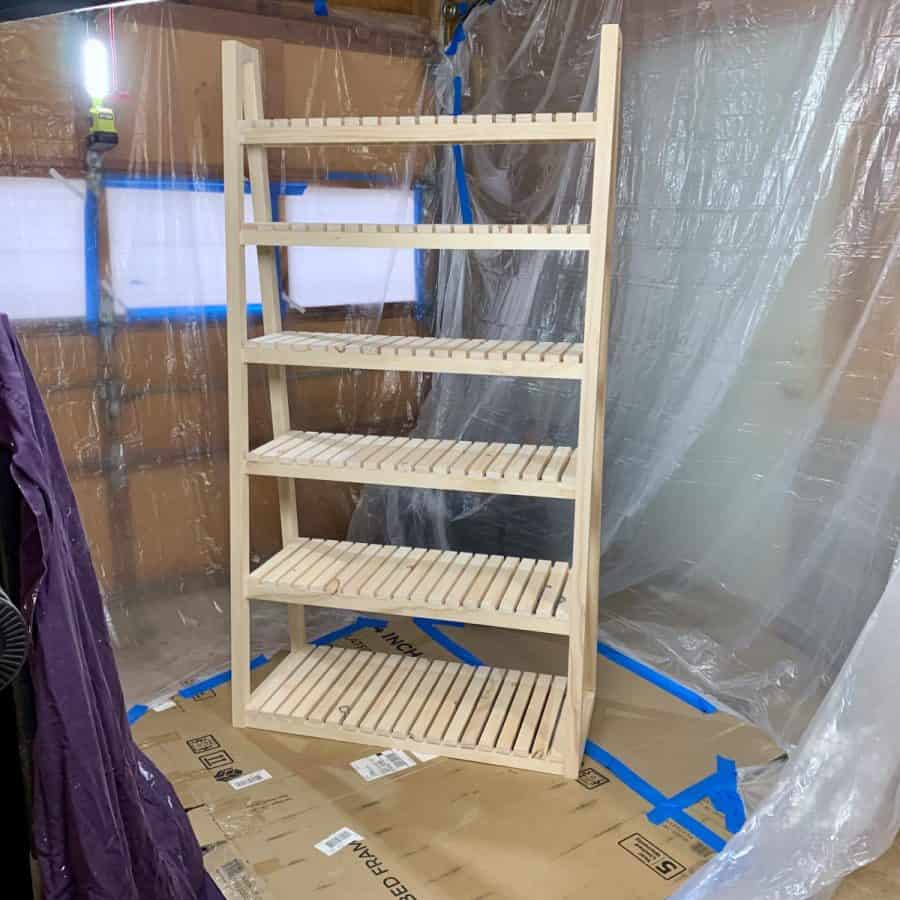
First add the wood filler to the holes at the top of the A-frame where you screwed the connector to the legs –see you can’t even see where the holes were!
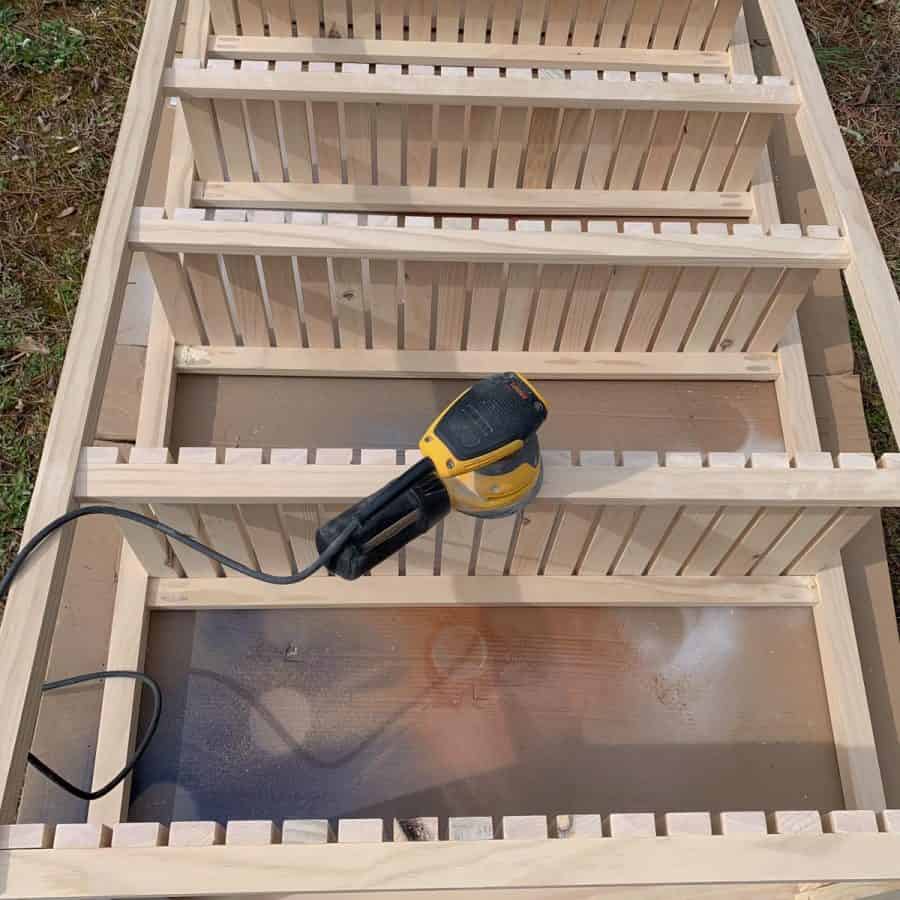
Then sand all the edges of the slats.

Be sure to wipe the whole tiered plant stand down with a lint free cloth before painting or staining.

Set up a spray tent and spray two coats of exterior house paint. Be sure to get both the underside and the top.
After 24 hours, I recommend coated the shelves with an acrylic clear top coat.
Step 13. Add The Wheels

Line up the wheel plate so that each screw will be in the middle of a board and not in between any boards.
Mark the hole locations, then pre-drill a hole for each screw. Do this for all the wheels.

Next, use the 1 ¼” wafer head screws, with washers to screw the wheels to the frame.
That’s it, roll it to it’s seasonal location and fill it up with your plants.
If you’re interested in making concrete planters, this article has great in-depth information on how to make them, along with a tutorial.
Free DIY Plant Stand Plans
Fill out the form below to get your free plans. You will automatically be subscribed to my newsletter where you’ll get updated when I have new posts and tips and tricks.
Don’t forget to Pin it for later!

The Perfect Indoor/Outdoor DIY Plant Stand
How to build an indoor/outdoor wood DIY plant stand that is 6 feet tal lwith an A-frame and six shelves for all your plants. Keep them on one stand all year, just roll them in out when the seasons change.
Materials
- 2x1 Pine boards
- 2x2 pine boards
- Orbital Sander
- Brad Nail Gun
- Miter Saw
Tools
- Please see the full materials list above the tutorial for details and links.
Instructions
- Sand The Wood Prior To Making The Cuts Or Assembling The Plant Stand
- Cut The Plant Shelf Supports (Cross Bars) And Create Pocket Holes
- Make Pocket Holes In The Ends Of The Shelf Supports With the Kreg Jig
- Cut The Legs To Fit The A Frame Plant Stand Angle With The Miter Saw
- Cut The Frame Side Connecting Pieces
- Cut The Top A-Frame Connecting Pieces At 4.5 Degree Angles
- Make The Bottom Frame WIth Pocket Holes And Corner Braces
- Secure The Top Frame Pieces Together With Wood Glue And Screws
- Fasten The Cross Bar Shelf Supports To The Wood Plant Stand Frame
- Add The Support For The Wheels: Wheels Optional
- Make the Slatted Plant Shelving By Making The Cuts And Use The Nail Gun To Set In Place
- Finish The DIY A-Frame Wood Plant Stand With Paint or Stain
- Add The Wheels To Make It Movable To Go Indoors And Outdoors


Wonderful project. This is the perfect size for my garden. I have a lot of scrap wood. For my needs I can can make it shorter. That will also allow me to rip 2x4s to make 2x2s.
This will probably take one pallet in my shortened version.
This size project is a good challenge but is worthwhile for exhibiting plants.
And a pallet will save you some money for sure!