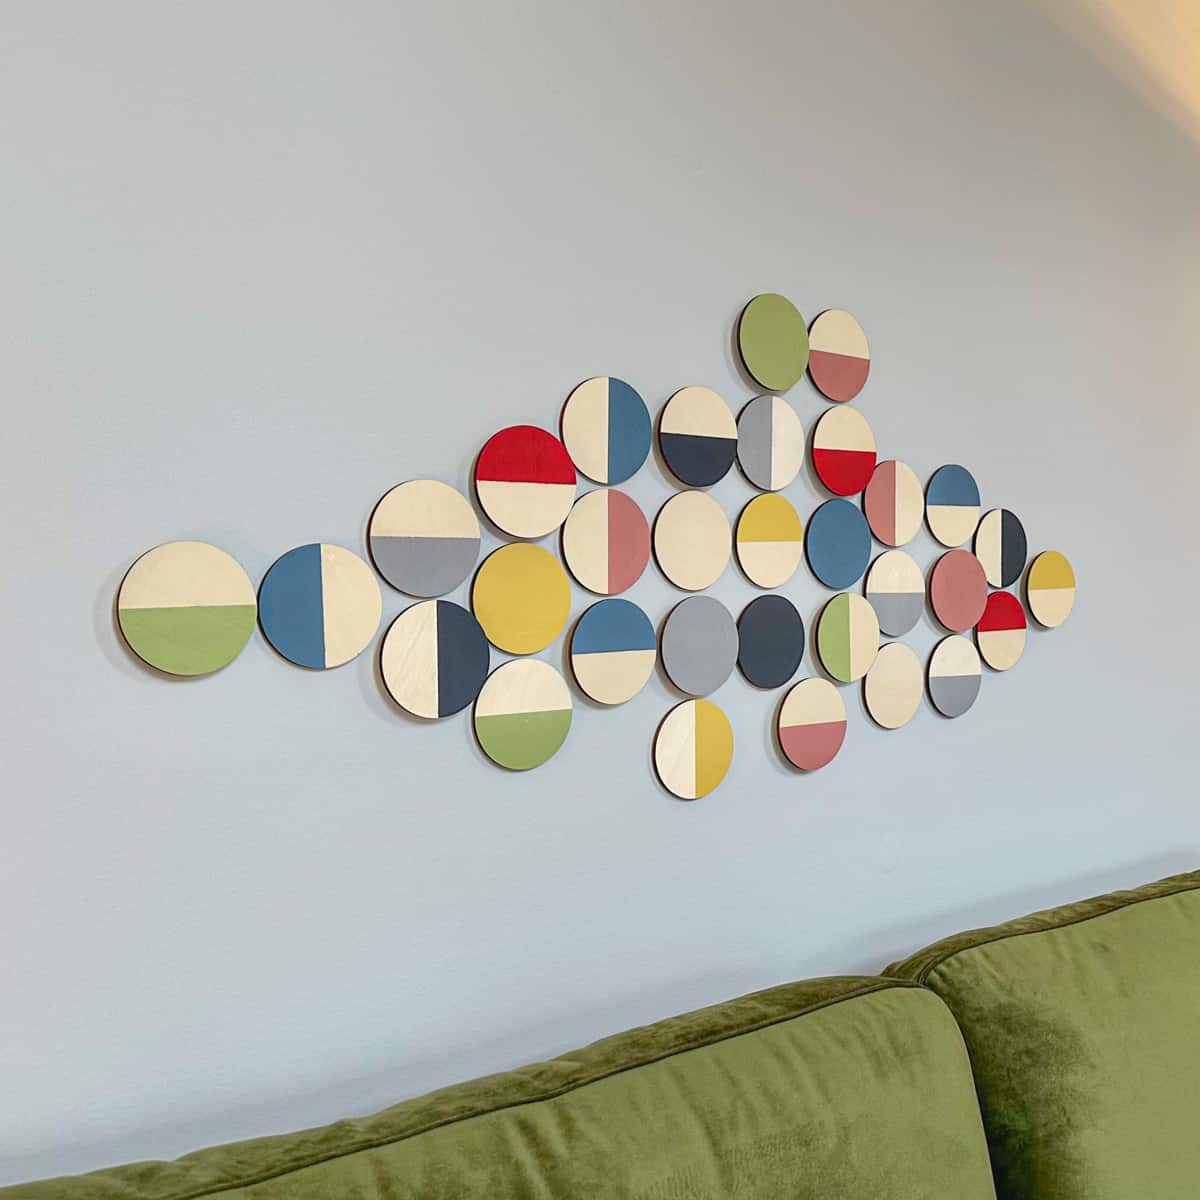
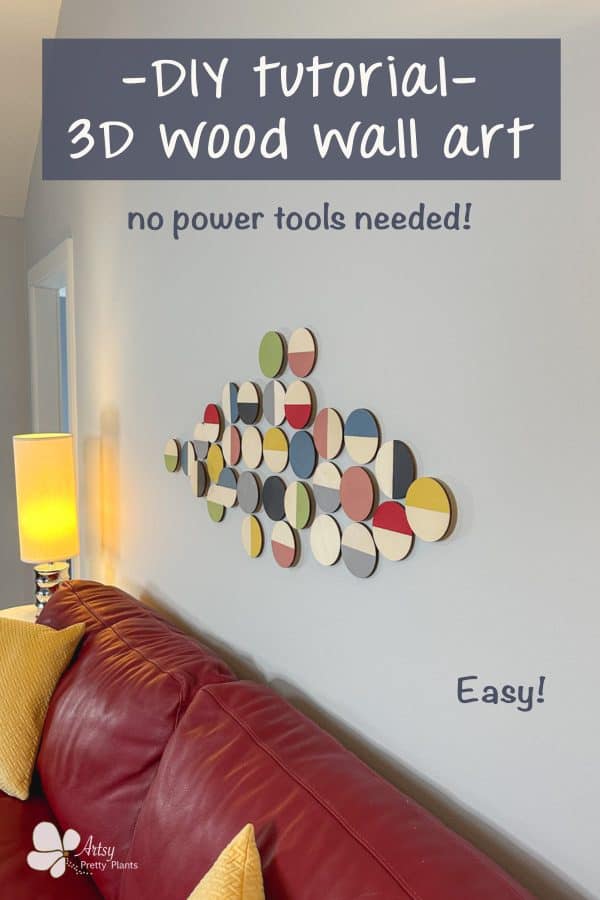
DIY Geometric Wood Wall Art Circles
I’ll teach you how to make this large DIY geometric wood wall art. It is perfect for filling in a big space and warming up the room.
The design makes a stunning statement with soft colors, warm wood tones, and 3D elements.
My reason for creating this is that I’ve got a big empty wall to work with and needed artwork to warm up our living room.
Since a great way to warm up a space is by using wood, I started thinking about what type of wooden wall art I could make for the area above our sofa.
I’ve come across lots of beautiful art pieces made from wood. But I’m not a finely skilled woodworker, so I wanted to develop a relatively easy DIY project.
I saw a piece like this, but it had a plywood backing and was encased in a wood frame.
Having it encased in a frame is handy for hanging the wall art, but I thought it would be much more interesting to have the circles look more three-dimensional, directly popping off the wall.
Here are some of the best things about this project. First, you won’t have any nail holes in your wall since you can use adhesives for the hanging mechanism.
You don’t have to have power tools, though a miter saw will save you a little bit of time.
And you can move the circles to different locations or directions if you change your mind about which colors should go where.
Finally, it’s the perfect size for going over a couch as it’s 46 ½” wide and height is 20 ½” high.
What inspired this particular design? Glad you asked.
Last week I made another geometric wall art piece for the wall that also has the half-moon appearance, but that one has a slightly softer feel because I made it from yarn and embroidery rings.
And these gorgeous, round DIY indoor moss wall art panels are nice and lush, and are also very geometric.
Here is another Mid Century Modern wall art design you might like, these concrete wall tiles.
Read on for detailed instructions on making this easy geometric wood art.
Some of the links on this page have been provided as a convenience for finding materials. These links may also be affiliate links. As an Amazon Associate I earn from qualifying purchases, at no extra cost to you.
I only recommend products I’ve used and loved, unless otherwise stated. Click here to read my full disclosure policy.
DIY DIFFICULTY LEVEL | Easy
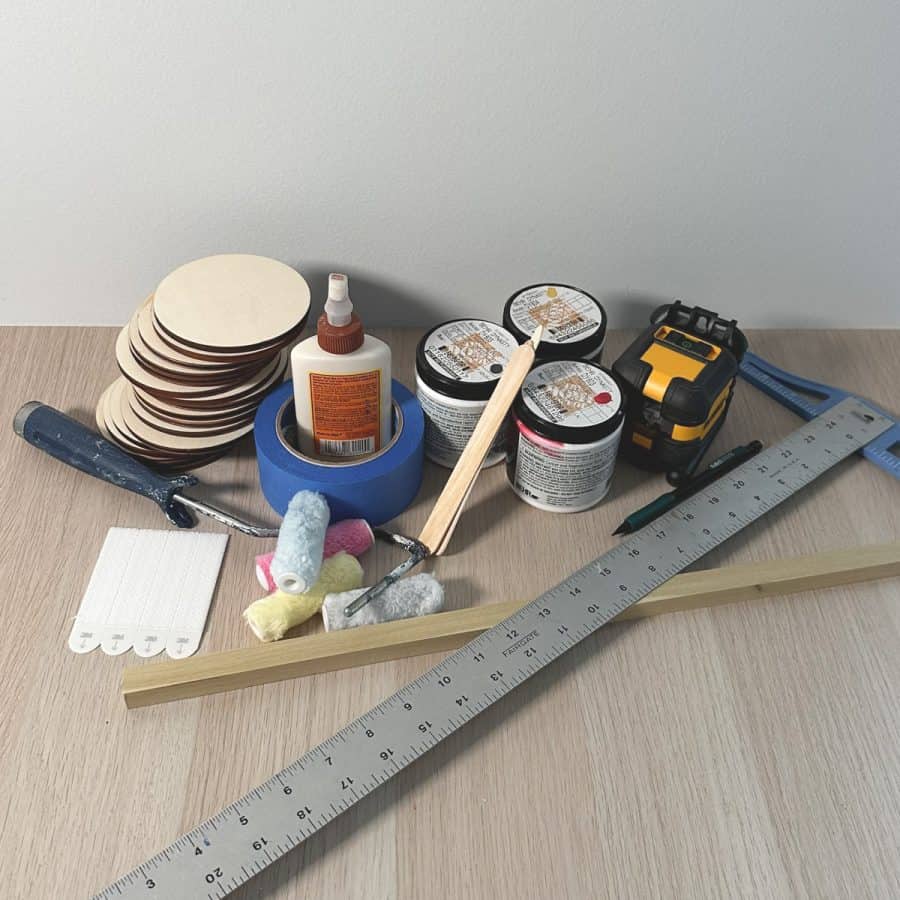
DIY Geometric Wood Wall Art Materials List
- Wood circles*
- Painter’s tape
- T-square
- Mechanical pencil
- Sample paint jars- 7* (see colors below)
- Trim rollers
- Aluminum foil
- 220 grit sandpaper
- Crafts sticks
- Square wood dowel– ⅜ x 1” x 36” or paint sticks*
- Wood glue
- Miter or hand saw
- Adhesive wall hanging strips
- Laser level
Materials Notes
Paint Sticks
For the piece that raises the circles off the wall, I didn’t think they sell square dowels at the home improvement stores, so I used paint sticks glued together, which you can do.
Using the square dowel is the best way, or the quickest. If you want to use paint sticks, you will need 2 or 3 paint sticks glued together, but paint sticks come in different thicknesses, so be sure that when combined, they are 5/16″ or 3/8″ thick.
The different brands have slightly different thicknesses.
I redid the photos to show the more straightforward process with the square dowel.
Sample Paint Jars
My paint samples were a matte sheen because I planned to use many of these for some wall paintings I planned on making, which I also wanted to be matte. The samples are available in any sheen.
Whether you get matte paint or something more protective like eggshell, satin, or gloss, you should still spray them with a top acrylic clear coat to protect the wood –especially from yellowing.
This will also help with cleaning because dust will come off more easily. So either way, a top coat is recommended.
If you are concerned about yellowing, you can always use a wood stain or paint the wood half with cream-colored paint.
Also, an optional, fun material idea would be to use circular mirror pieces in place of the solid wood circles.
To pick my color scheme, I looked at photos of Mid Century Modern colors on the internet, then sifted through all the sample paint chips I’ve accrued over the past couple of years and quickly selected my theme.
The paint colors I used were: Behr paint in Grey, Green, Red, Dark Navy-Purple, Blue, Pink, and Yellow. You can order the samples ahead of time online too!
The colors I linked to are the ones I used, but use whatever you like, there are no “right colors”.
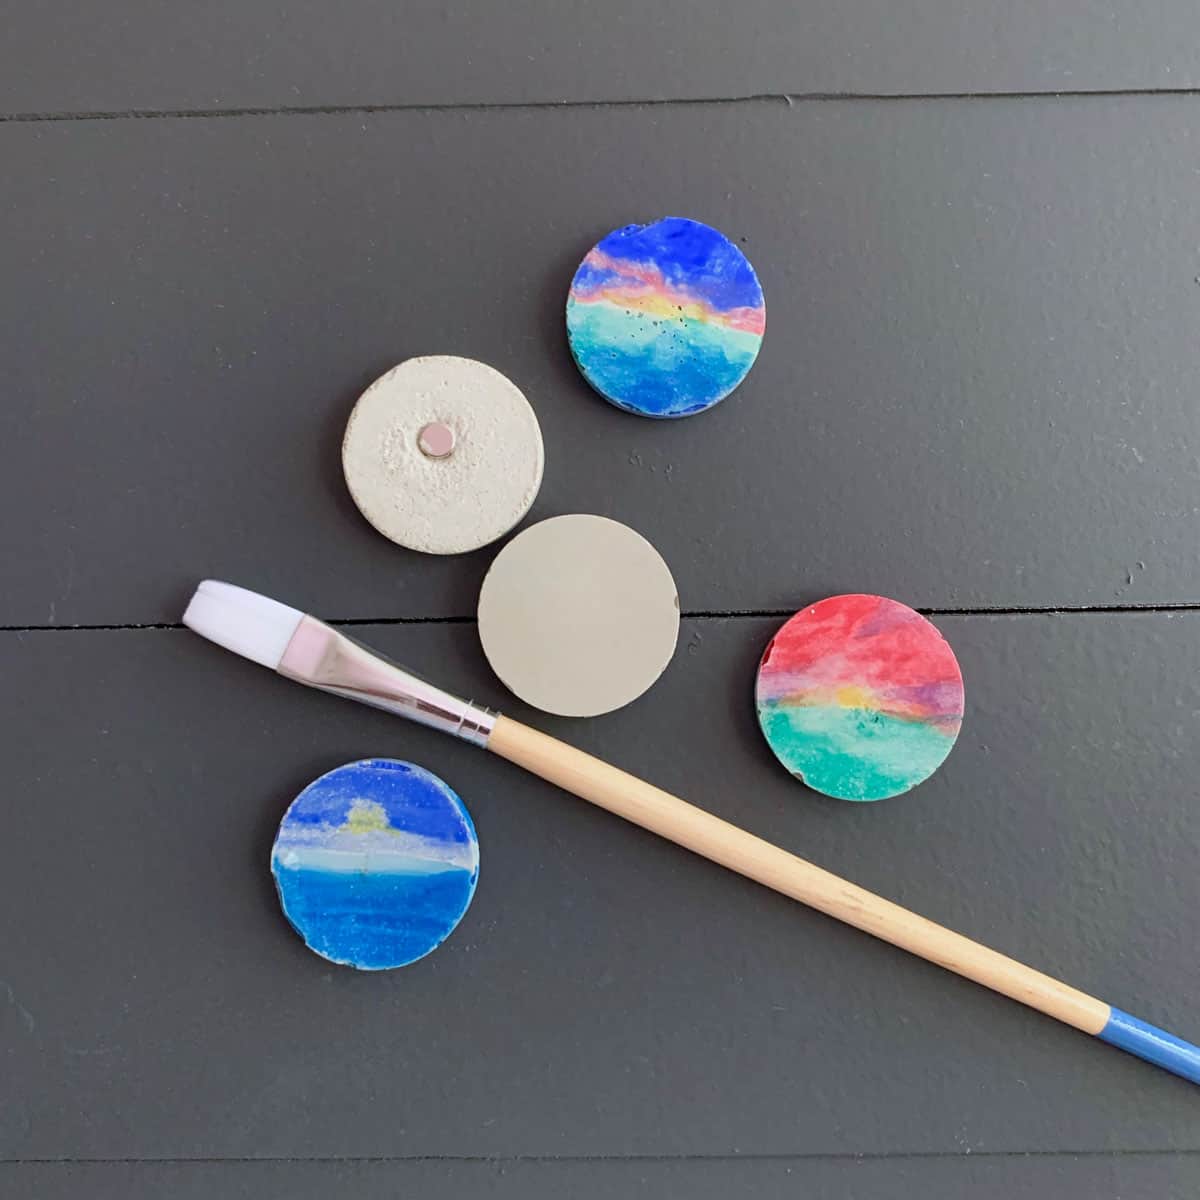
Wood Circles
These come in lots of sizes, mine were 4″, but just be sure to get the 1/4″ thick. I linked to the exact ones I used in the materials list. You’ll have extras to play with colors, test sheens and use for other projects.
How To Make Geometric Wood Wall Art Tutorial Steps
Step 1. Mark The Centerline Onto The Wood
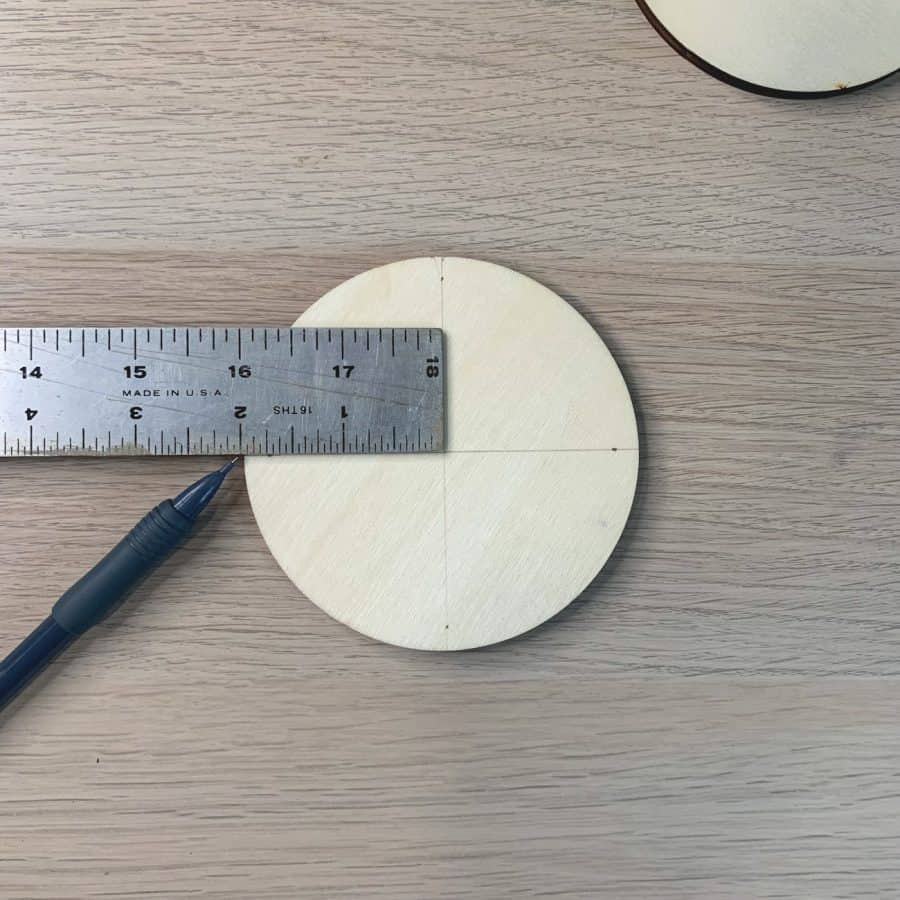
You’ll need to draw a straight line through the circle’s center. To do this, measure 2″ in from the top and from left and right, and mark the center. Draw an X.

Now use 4 circles that aren’t part of your wood circle art and tape them around the circle with the cross through it. You are creating a guide to hold each circle as you mark the halfway point.
This is a template set up to help you quickly mark each of your circles without needing to measure.
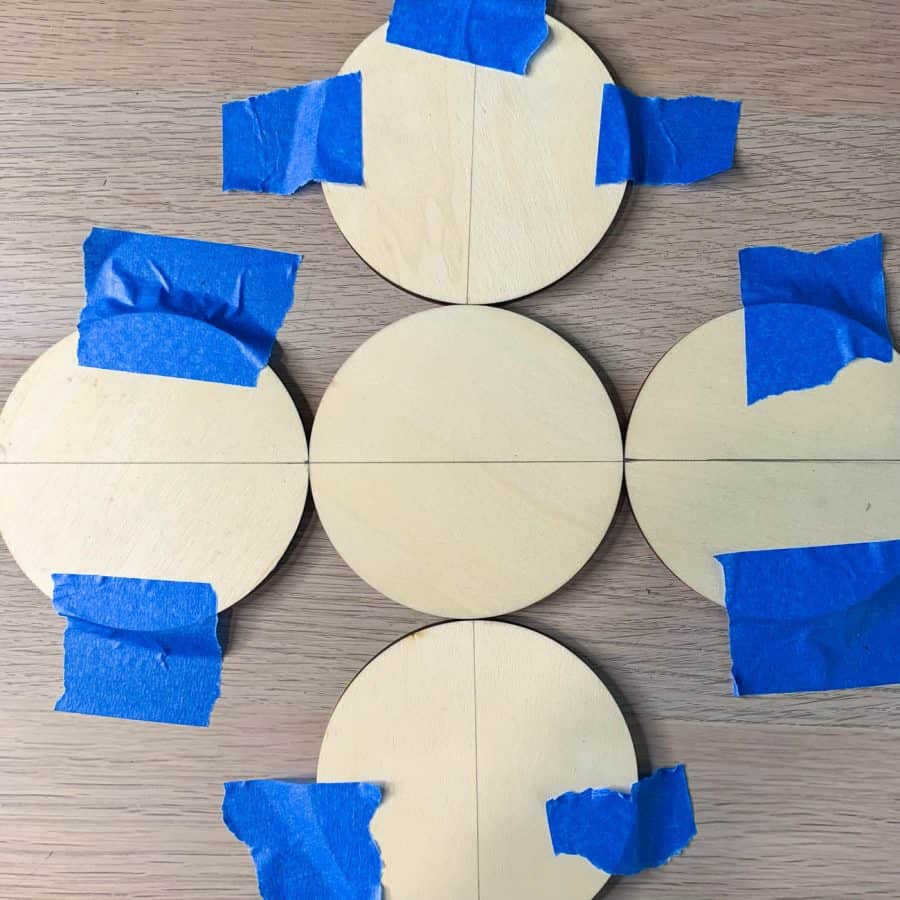
Once the center circle is secure, use a ruler to draw a straight line extending from the center circle into the ones holding that one in place. Then remove the center circle.
Repeat this by placing each wood circle inside, using the ruler, and marking the horizontal halfway point for each.
Step 2. Mask Off The Area That Won’t Be Painted

Tear off a piece of blue tape for each circle to mask off the unpainted half.
Ensure the tape is tight, so the paint doesn’t bleed through.
Step 3. Prep The Circles For Painting
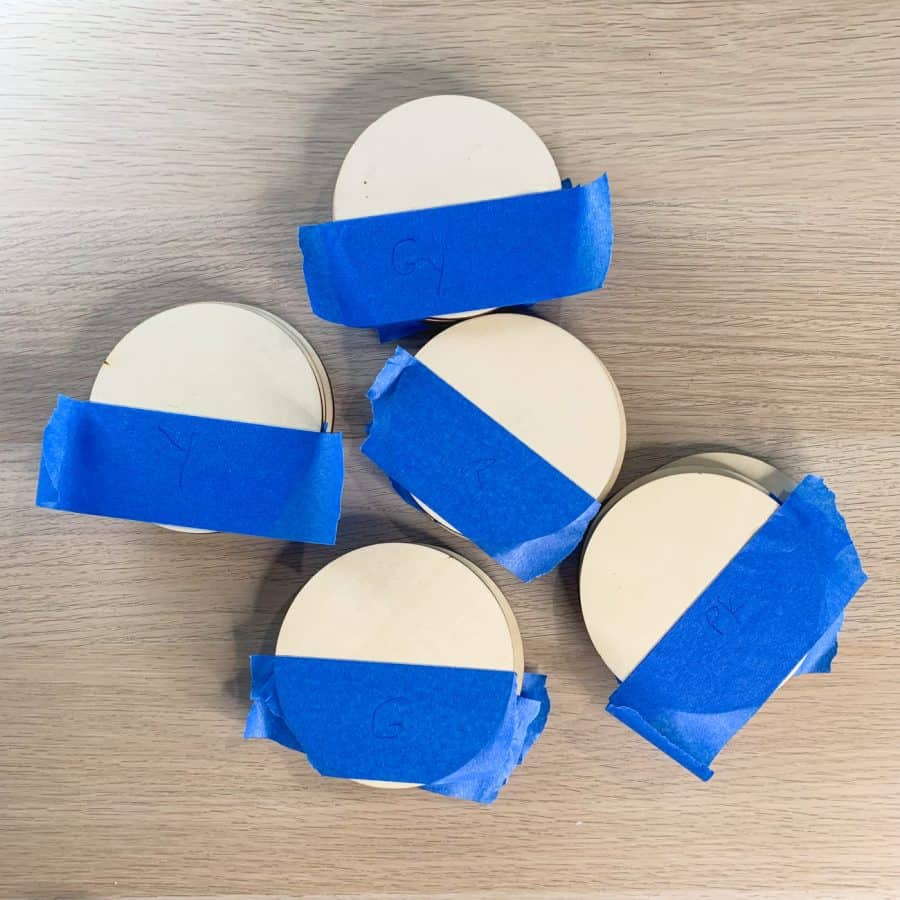
Count the number of colors you have of each, place them in separate piles, and label them.
Don’t press too hard with the pen because the pressure may cause lines on the wood.
Lay down some newspaper or plastic drop cloth sheeting, then use a craft stick to mix your first color.

Next, take your first pile and use the lint cloth to remove dust particles from each piece.

Next, pour it into a liner and roll the paint onto each wood circle for that color. Take care not to get paint on the edges of the pieces.
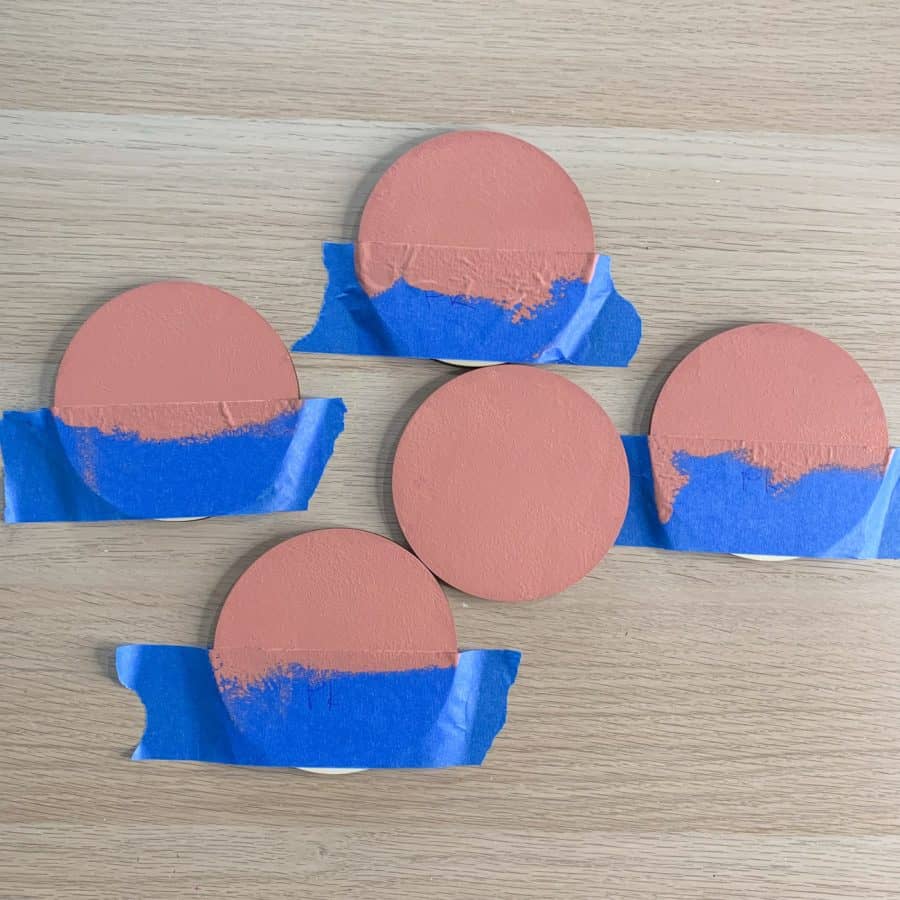
Repeat this for each color you have. Then, you can either wash the liner and roller head between each color or replace them.
If you are cleaning them, thoroughly wash all the paint out and dry the roller head so you don’t get a washed-out appearance with your following colors due to the water in the roller.
Then remove the tape for about an hour until the paint is completely dry.

If you have minor bleeding from the paint on the wood grain side, use 220 grit sandpaper for sanding it down to remove it.
Step 4. Cut The Wood Dowel

Following my design, you will need 12 pieces. They should be cut between ¾” to an inch wide.

Step 5. Glue The Wood Squares To The Backs Of The Circles

Use wood glue to fasten the wood dowel pieces to the backs of 12 wood circles and in the middle.
If you have excess glue, wipe it away with a wet paper towel. These need to dry 24 hours before you place them on the wall.
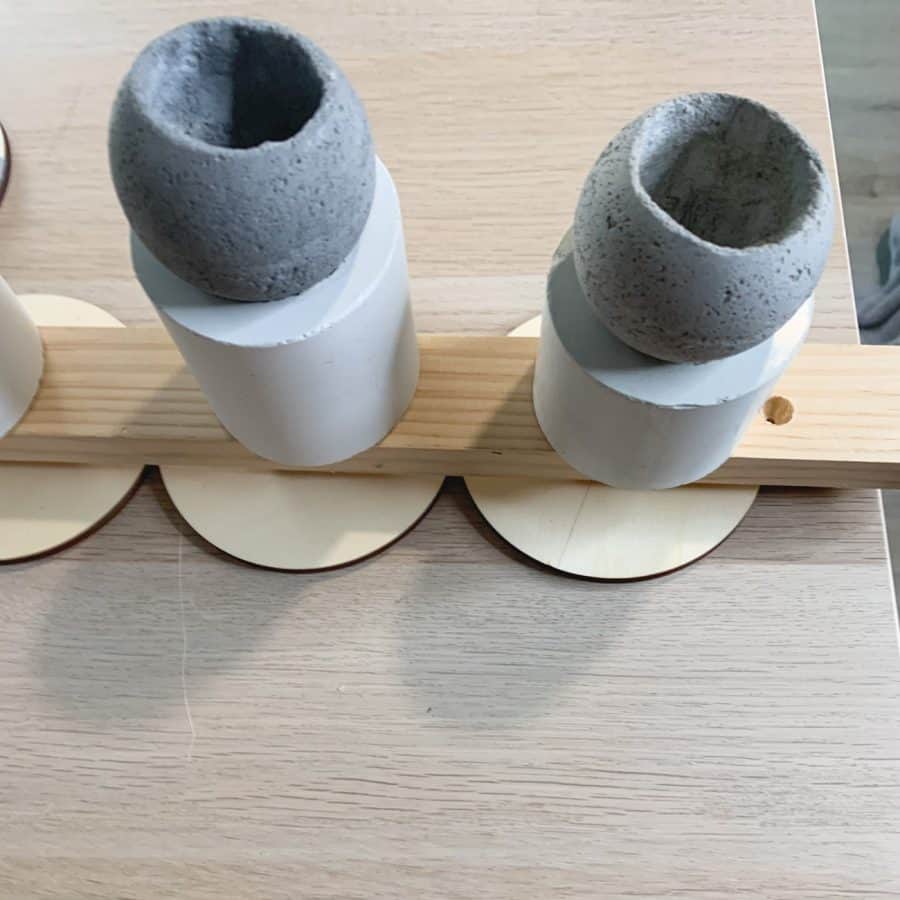
After you add glue, cover them with something weighted, like a scrap piece of wood, while they dry.
To make it weighted enough, I added some concrete pieces to the top of the wood.
While the glue is drying, apply the adhesive strips directly to the back of the remaining circles.
They don’t need to be perfectly centered. These will be the ones going flush to the wall.
To do this, attach two single strips, then cut them into three pieces, each about ¾” wide. Then peel off one side and stick it to the back of the wood squares.
Step 6. Spray A Protective Coating Over The Geometric Wood Wall Art

Spray a coat of clear protective spray over the circles. Take care to do this in a sweeping motion.
It’s better to do two light coats than one heavy coat because you may get drips or bubbles. So I only sprayed one layer.
Step 7. -Optional: Paint The Sides Of The Wood Squares
The location of the geometric wood wall art in my house is a spot where you can see them easily from the side.
So I chose to paint the protruding sides of the square pieces of wood the same color as the wall.
Let the glue dry a bit before you paint. I painted mine about 4-6 hours after I glued the squares to the wood circles.
When the paint is dry, attach the hanging strips to the rest of the squares.
Step 8. Determine The Borders And Center For The Wood Wall Art
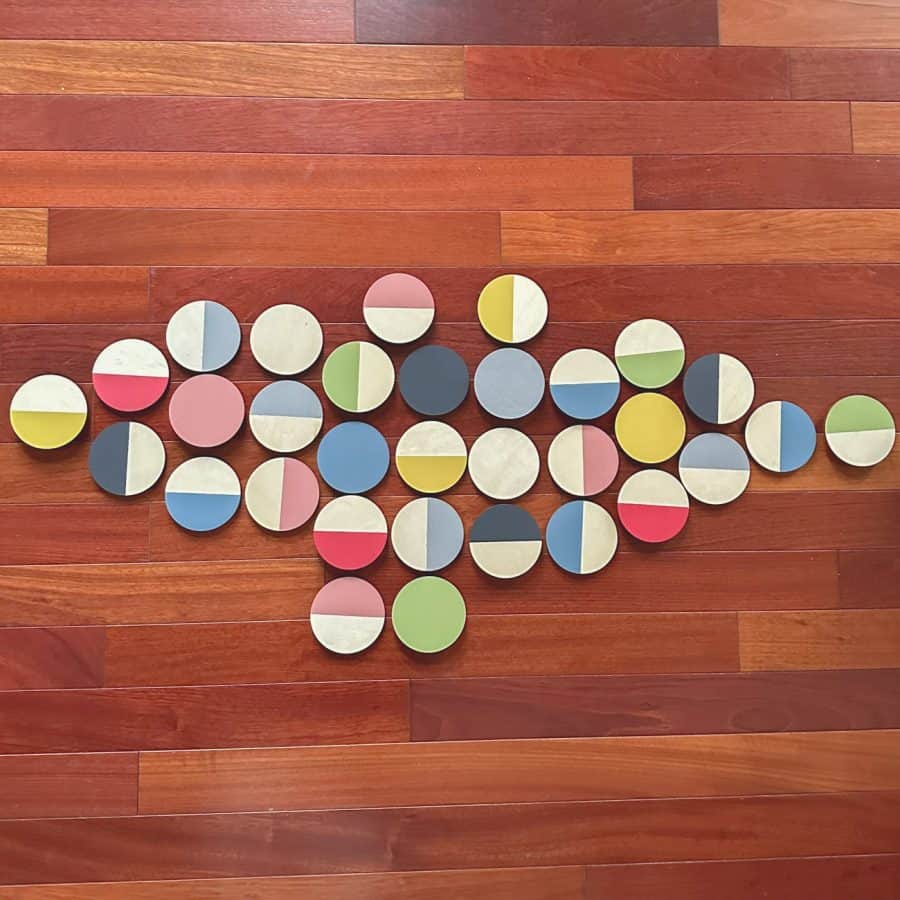
Layout the circles again in the pattern you will place on the wall.
Also, reference my computer drawing photo or your own if you are doing your own layout.

Note
I used a laser level for attaching these to the wall, but I also tried to use the blue tape grid line method so you would have photos to reference. Unfortunately, I didn’t do it correctly, but I have adjusted the process, so the instructions are correct, and the computer drawing below shows how to do it.
The first thing you need to do is get the two most center columns placed and centered in your space, as well as level and equally spaced.
If you have a wall laser level, this will be pretty easy. The more extended middle column with the yellow half-circle is the best place to start.
Unfortunately, I made the mistake of starting with the pink one. This made it tough because it was already a circle that was off-center.
If you don’t have a laser level, then first, find your center for where you want the center of the art to be on your wall.
You can eyeball this or measure the space between two objects and divide it in half to find your center. Make a tiny pencil mark where this point is.
The center of the wood circles is very close to the right edge of the column with the lowest yellow half-circle. Use this as the art’s center point.
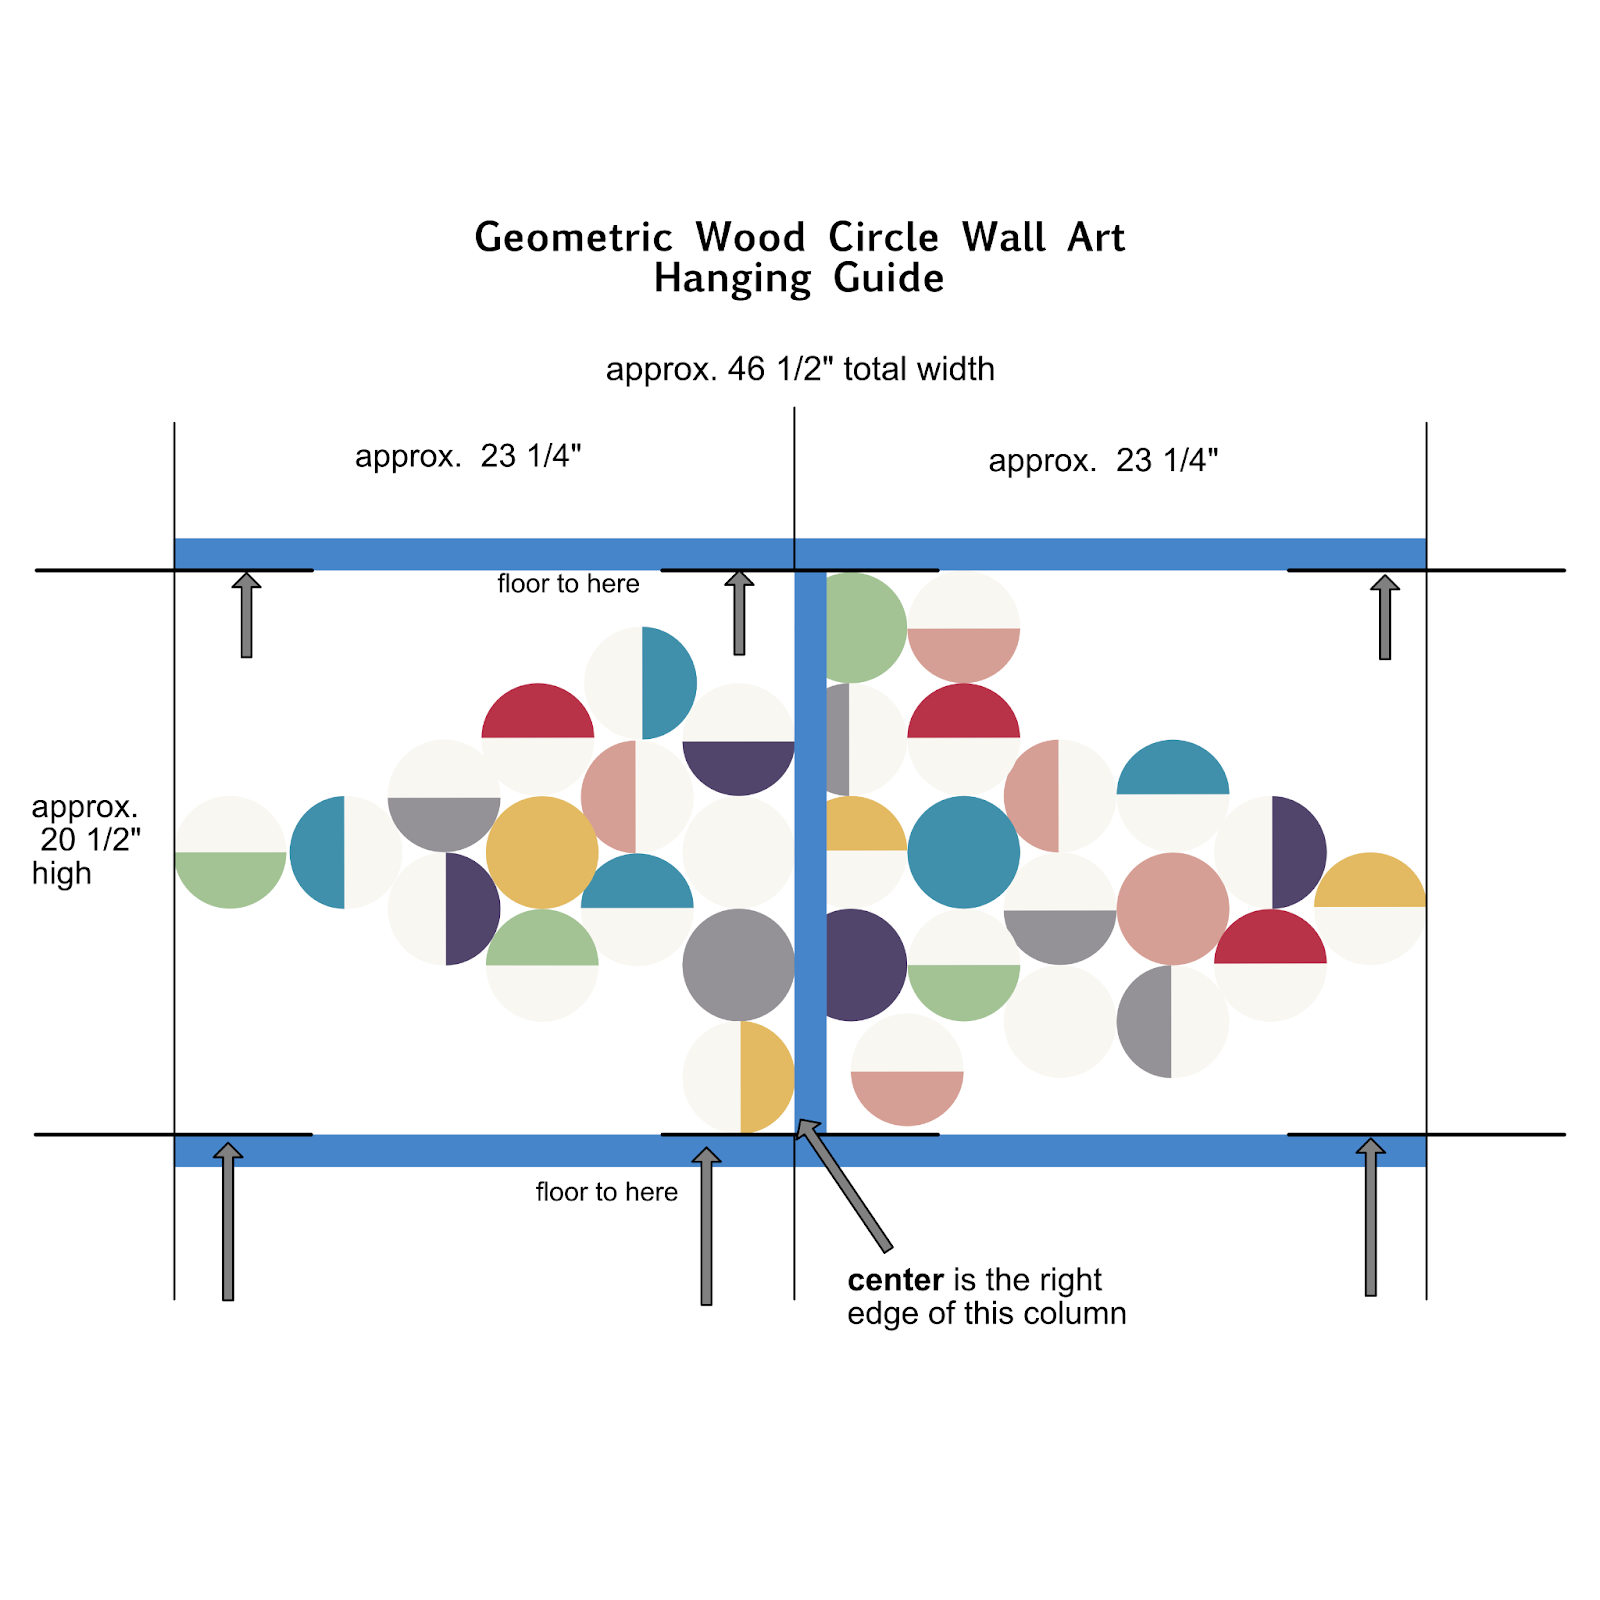
Measure from the floor up the wall to the height you want the lowest circle.
Since wood circles are above a couch, I chose to place it 9″ above.
So, if this were your scenario, you would measure from the floor to that point that is 9″ above the couch.
The next step is to measure that same distance from the floor up, but this time go about 23″ to the left and right of your center and make tiny pencil marks.
Then run a piece of blue tape across those points so that the top of the blue tape edge is the part you are lining up with your marks.
This will give you a visual for your lowest point.
Now to get a general visual for the top, you can measure from your bottom line up 20 ½”.
Again, do this on both ends and run the blue tape across those marks. This time the bottom edge of the tape will mark your top line.
Finally, use a T-square with the blue tape as your guide and mark the vertical centerline point at the top.
Then, run the blue tape, so the left edge is the centerline for lining up the edges of the column with the lowest yellow circle.
Step 9. Hang The Geometric Art Circles On The Wall
Now you are ready to adhere the geometric wood circle art to the wall.
Peel off the adhesive hanger backing from the wood and attach the first one so that the outer edge lines up with the left side of the center blue tape and the top edge of the bottom blue tape.
The next circle to place is the one above it, the solid grey one. Continue up this column and then move to the column on the right.
You will need to remove the blue tape for this, but at this point, your first column of circles should be straight, so you have your guide.
After you go through some pain lining up these first two columns, the rest goes much more quickly.
Plus, you can reposition them into the right place after you have adhered the hanging strip to the wall.
I did most of my adjusting as I went, so I didn’t start getting things uneven.
Now step back and marvel over your new handmade wall art home decor.
Another tutorials you may be interested in for wall decor with wood is this rustic wine vase made with pallet wood.
Don’t forget to Pin it for later!

DIY Geometric Wood Wall Art Circles
Here’s a detailed tutorial for how to make gorgeous DIY geometric wood wall art. Perfect for a bigger space, or over a sofa.
Materials
- Wood circles
- Painter’s tape
- Ruler
- Mechanical pencil
- Sample paint jars
Tools
- Please see the full materials list above the tutorial for details and links.
Instructions
- Mark The Centerline Onto The Wood
- Mask Off The Area That Won’t Be Painted
- Prep The Circles For Painting
- Cut The Wood Dowel
- Glue The Wood Squares To The Backs Of The Circles
- Spray A Protective Coating Over The Geometric Wood Wall Art
- -Optional: Paint The Sides Of The Wood Squares
- Determine The Borders And Center For The Wood Wall Art
- Hang The Geometric Art Circles On The Wall


This looks amazing Ellen! I may have missed it but what’s the diameter of your wood circles?
Thanks Sara! You’re right, I didn’t mention it. They were 4″. They come in lots of sizes, but I liked these because the thickness was 1/4″. Many I saw were thinner and I was concerned about warping.
I’d say, just be sure they are 1/4″. I linked to them in the materials list near the top. You’ll have lots of extras if you want to test other colors, etc. or use for another project.