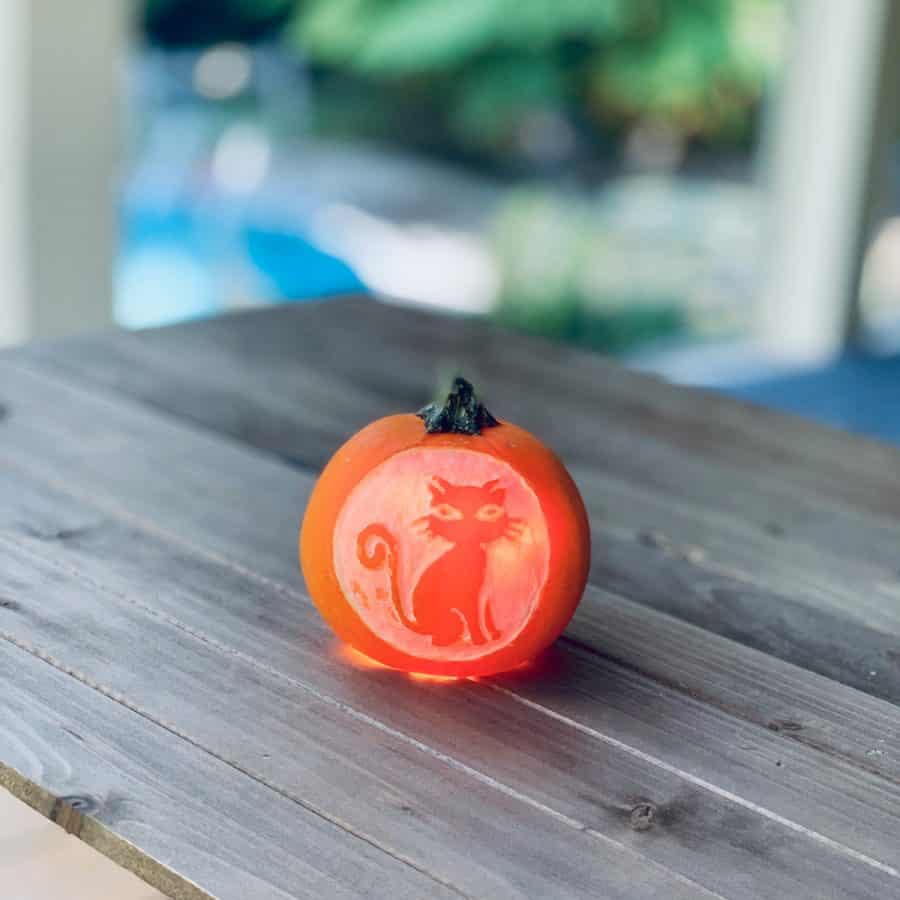
Carve A Mini Pumpkin Cat For Halloween
Up your spooky season decorating and learn how to carve a mini pumpkin for Halloween this year.
Up until this year we had been renting our home and I guess over the past decade-or-so, I felt like there was no need to decorate much for holidays.
But now that we own our home, I’ve been bitten (no pun intended –truly)!
Believe it or not, I wasn’t always this way. Many years ago I was a renter and always decorated. I don’t know what happened, but I’m back!
You may know I’m a cat lover, as I’ve made several cat crafts over the years.
In thinking about what design I wanted to do for a pumpkin, it was of course going to be a cat. Finding a cat stencil was really easy, but finding a cat mini stencil was far less so.
The good news is that I found all of these mini pumpkin stencils that you can use for carving your tiny pumpkins.
These are actual physical stencils that are super inexpensive. And a handful of them are cats.
Just start shopping now though, because with shipping times added for some of these cool designs, it may be calling it close for getting done in time for Halloween.
Here are 67 free pumpkin patterns of cats, if you are planning on carving a regular sized pumpkin of a cat.
Okay, so how does it work? What exactly is pumpkin etching, or surface carving?

Etching/surface carving is where you carve into a pumpkin, but you don’t cut all the way through the pumpkin. You usually won’t create holes that go completely through the pumpkin.
Instead, you scrape away the skin and whittle down the pulp, like you would do with a wood carving.
As you reduce the layers of the pumpkin, it will allow light to show through the thinner areas of remaining pulp.
What’s really fantastic about etching a pumpkin, is that it gives you way more flexibility in the designs you can carve.
ou can create really intricate designs that would be near impossible if you made through cuts.
Carving the surface is easier than cutting straight through because a mini pumpkin is quite small and so is the stencil. Usually the stencil is less than 3” high.
With the small stencil, you’ll have some lines so close together that you’ll risk cutting through them and pieces falling off–like an eye, a paw or a whisker. You get my point.
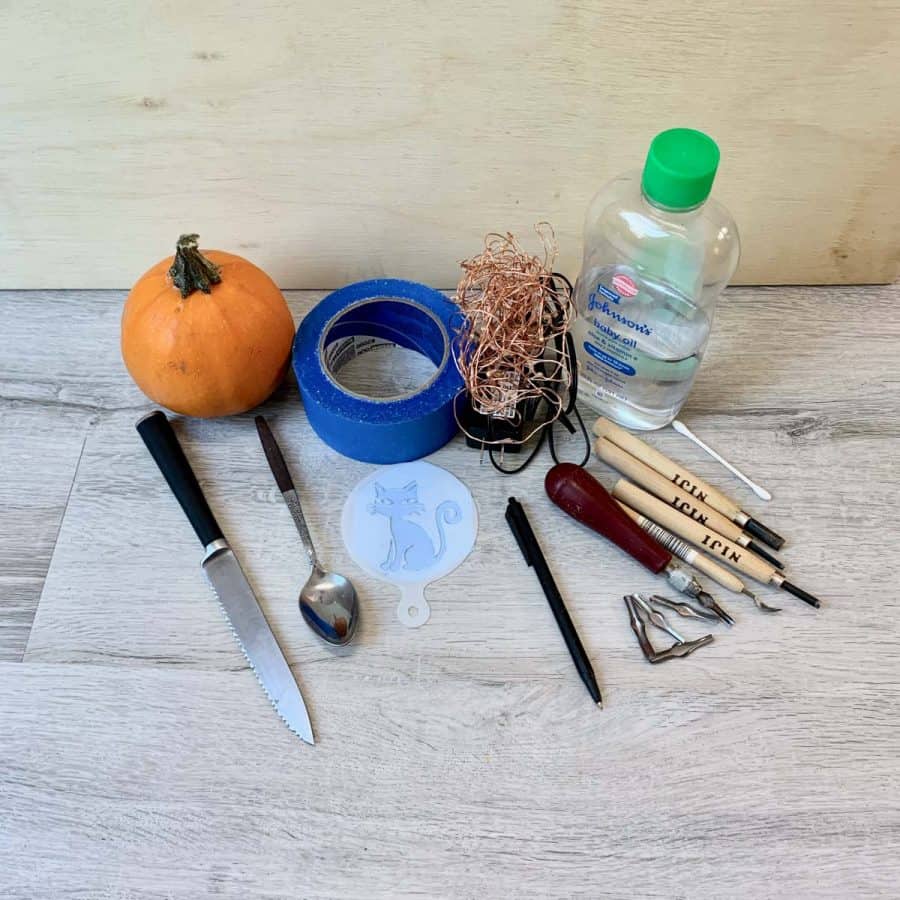
What Do I Need To Surface Carve A Mini Pumpkin?
It helps if you have the right pumpkin carving tools, and for etching, most of those tools are found in a linoleum carving kit.
These kits are really inexpensive and can be purchased at any hobby store or through Amazon.
You do not need an official pumpkin carving kit because it won’t contain the right tools.
I needed to add a Dremel to my list of materials because the mini pumpkin I chose was so hard that even my wood carving tools weren’t getting the job done.
You should have seen the pile of pumpkin pulp that fell on the ground when I was carving with the Dremel.
You would have thought I was carving wood, because it looked like a pile of sawdust.
Chances are your pumpkin will be soft like a regular pumpkin and lino cutters will work great.
I did notice when I picked out my pumpkin how hard it was, but I didn’t realize this would make carving the skin so difficult.
If you choose a pumpkin that feels extremely firm, then you’ll probably need to use a Dremel.
Using the Dremel was quite fun though, but if you don’t have one, just know that you don’t need to make a special purchase just for this project.
Here are two other cat crafts you may want to check out. A cement cat vase and mid century modern wall art.
Some of the links on this page have been provided as a convenience for finding materials. These links may also be affiliate links. As an Amazon Associate I earn from qualifying purchases, at no extra cost to you.
I only recommend products I’ve used and loved, unless otherwise stated. Click here to read my full disclosure policy.
DIY DIFFICULTY LEVEL | EASY
Tools For How To Carve A Mini Pumpkin
- Mini pumpkin stencil of your choice
- Ballpoint pen
- Blue tape
- *Linoleum cutter set or wood carving set
- Serrated knife
- Baby oil (or vegetable)
- Cotton swab
- Led fairy lights
Materials Note *If your pumpkin is extremely firm, then you will need:
- Dremel with flex shaft (flex shaft is helpful, but not necessary)
- 2 bits: .118 mushroom head shaped, .079 round
Those bits and other helpful ones come in this kit
How To Carve A Mini Pumpkin Of A Cat Step By Step Instructions
Note:
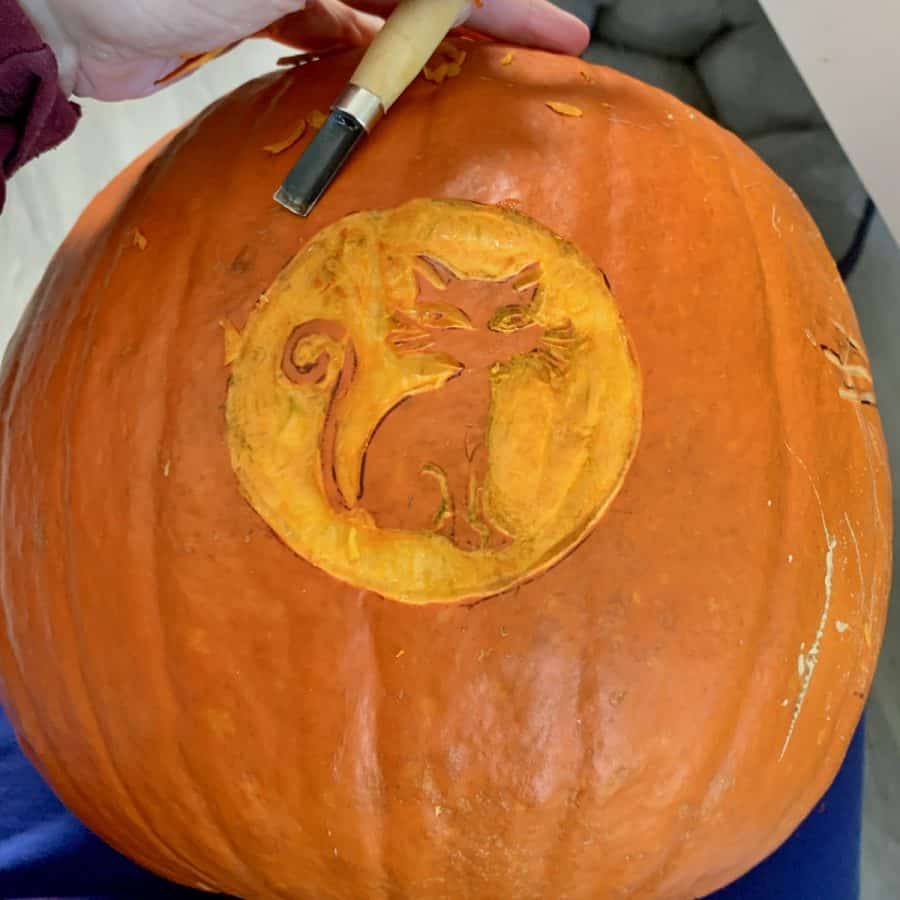
In some photos I’m demonstrating how to use the linoleum cutter on the back of a large pumpkin.
I did this so I could show how to use the lino cutting tools. The small pumpkin I chose was too hard to demonstrate this.
Step 1. Trace The Image of The Stencil Onto The Pumpkin
Since you’re etching the pumpkin, there’s no reason to remove the pulp first like you do when you carve one.
It will make it easier to maneuver the pumpkin while you are etching, if you wait until after.

So first, start by drawing the stencil onto the pumpkin. Stencils are typically made to be used on flat surfaces.
To work with the stencil, bend it around the area of the pumpkin while you draw. Basically, bend as you go.

Tape the top or side of the stencil first and trace that area, then add tape to the next area and remove it from the area you just traced. Keep working your way around the stencil like this.
My cat shape required using several fingers and some tape to hold, while drawing, but it was easy enough.
When you etch the design, you have the option of etching inside the cat, or the outside like I did. If you do the outside, you will need to draw a circle around it.

This is an example of a pumpkin where I etched the inside of the cat’s outlines.
Step 2. Carve The Outlines On The Pumpkin


After tracing, you are ready to start carving. It is easier to start with the #1 or #2 (narrow V groove-shaped) linoleum cutter to trace the outlines.
Then go back to fill everything in and deepen the grooves after.

So first, use one of those narrow cutters and carefully trace the outlines of the drawn image.
You will want to hold the tool fairly parallel to the pumpkin while cutting.
Dremel Method:
After you have the outlines carved, then use the Dremel to carve away the skin and pulp.
I started with the smaller round bit to come in close to the outlines. You may be more comfortable using different bits.
This will depend on your skill level and the intricacy of the template you are using.
Once you have carved away the outlines, use the mushroom shaped bit. It does a great job of gently carving away the larger pieces of material.
Linocut Method:
Use the widest groove cutters to scrape away the skin and pulp, as well as reduce some of the thickness to help clean up the edges.
Both Methods:
Keep in mind that you don’t want to go too deep. You want to keep the thickness of the pulp fairly even because the light will come through more evenly.
Test how this looks with your light source before you finish fully shaving the pulp.
Step 3. Remove The Pulp From Inside The Pumpkin
If you plan to place a real candle inside, you will need to cut the top of the pumpkin so that the flame can get air and won’t get extinguished.
For lights with a cord, then a bottom cut is much better so that you can hide the cord. If you use a battery powered candle, then make a bottom cut to look cleaner.

Use the serrated kitchen knife to cut the hole. I couldn’t use a serrated knife, but usually the serrated one makes the job easier.
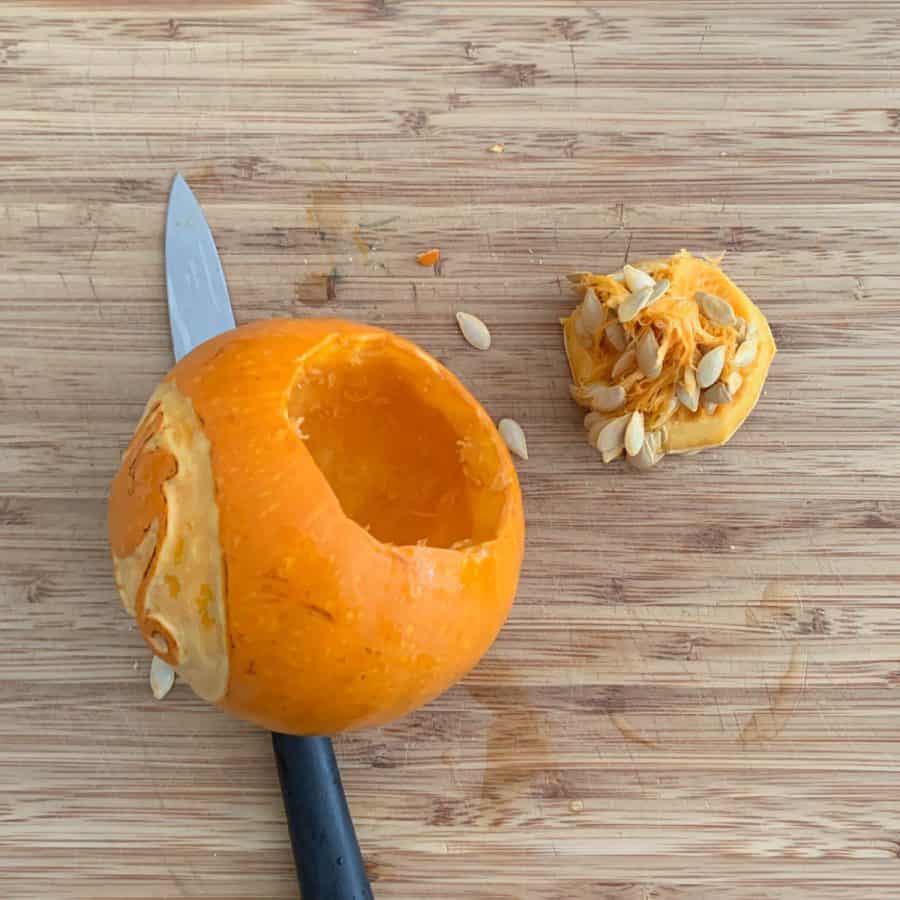
Remove the bottom pieces and scoop out the inside of the pumpkin with a spoon. Once the pulp has been removed, rinse off the pumpkin.
Of course, one of the extra benefits of carving a pumpkin is that you have leftover pumpkin seeds. The seeds can be cooked for snacks.
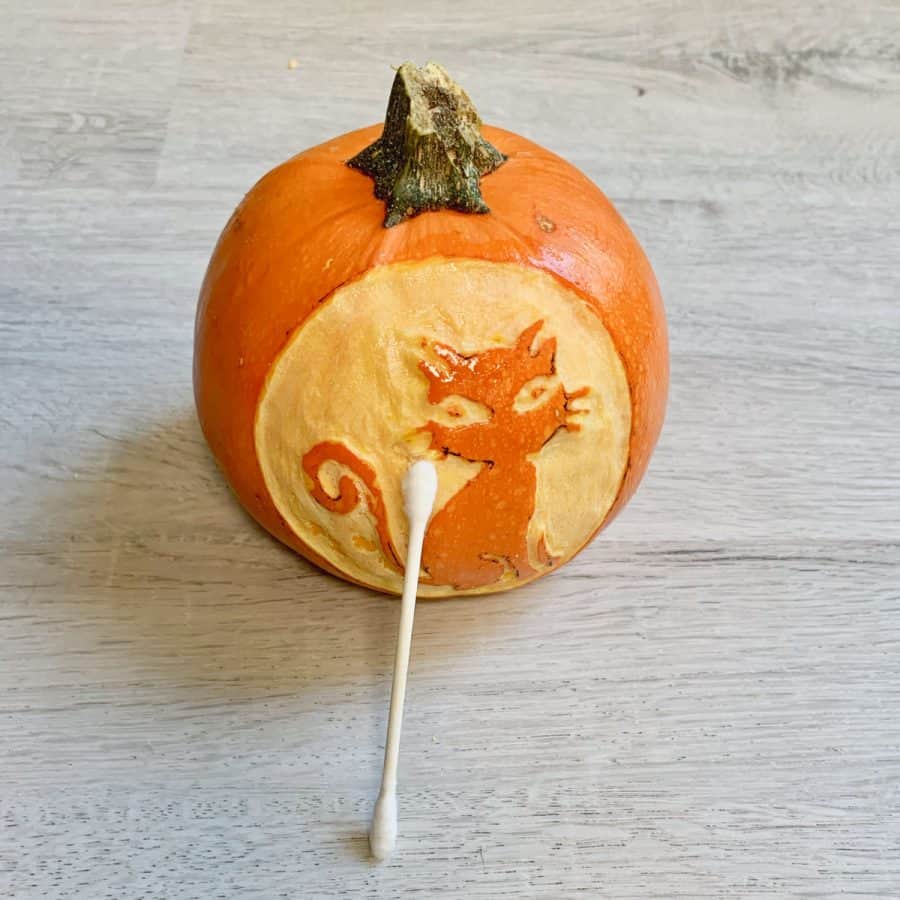
Step 4. Test The Lighting In The Cat Mini Pumpkin Carving
Now you will test the etched pumpkin to see how much light shines through.
Take the battery operated candle, or whichever light source you have chosen and place it inside the pumpkin.
If it lights up the design well enough and looks even, then you are done. Either replace the piece you cut from the bottom of the pumpkin, or leave it off to give it a flatter bottom.

Otherwise, continue scraping down some of the pulp. You can go do this with the Dremel or lino carving tools. You may also scrape the pulp away from the inside with the spoon.
Step 5. Preserve Your Carved Pumpkin Design
Pumpkins get dehydrated very quickly, so to help your pumpkin last longer, you can lubricate it with oil.
Use a cotton ball and or cotton swab to rub oil on all the areas that you have cut or carved.
You may also love these 15 tutorials for making Halloween painted rocks!
Don’t forget to Pin it for later!

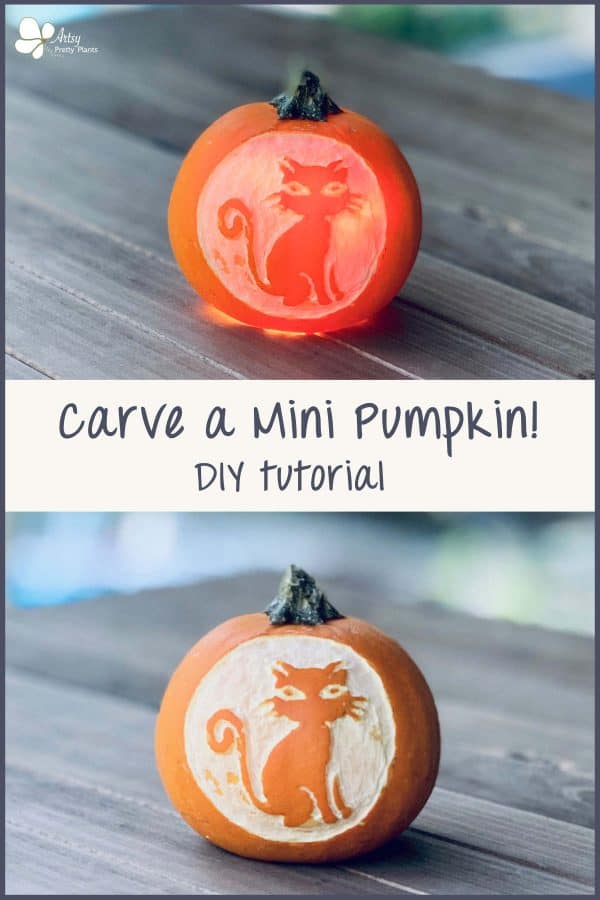

Carve A Mini Pumpkin Cat For Halloween
How to carve a mini pumpkin of a cat, using a stencil. Use linoleum carving tools to etch carve little pumpkins and then light them up for Halloween.
Materials
- mini pumpkin
- lino carving tools
- serrated knife
Tools
- Please see the full materials list above the tutorial for details and links.
Instructions
- Trace The Image of The Stencil Onto The Pumpkin
- Carve The Outlines On The Pumpkin
- Remove The Pulp From Inside The Pumpkin
- Test The Lighting In The Cat Mini Pumpkin Carving
- Preserve Your Carved Pumpkin Design