How to Make Cement Wall Art With A Stunning 3D Textured Design
Create a gorgeous piece of cement wall art in a unique three-dimensional design worthy of being hung in an art gallery.
Learn how to make a piece of stunning 3D cement wall art that looks like it came straight from an art gallery, regardless of your concrete experience level.
DIY DIFFICULTY LEVEL | Moderate
There’s something incredibly satisfying about creating art that has both presence and personality —especially when it’s made from an unexpected material like cement.
Do you love the sleek, sculptural look of modern wall art but would rather not pay the big ticket price for it?
With this DIY project, you’ll learn how to transform simple materials into a unique and lovely piece that looks high-end but can be made at home.
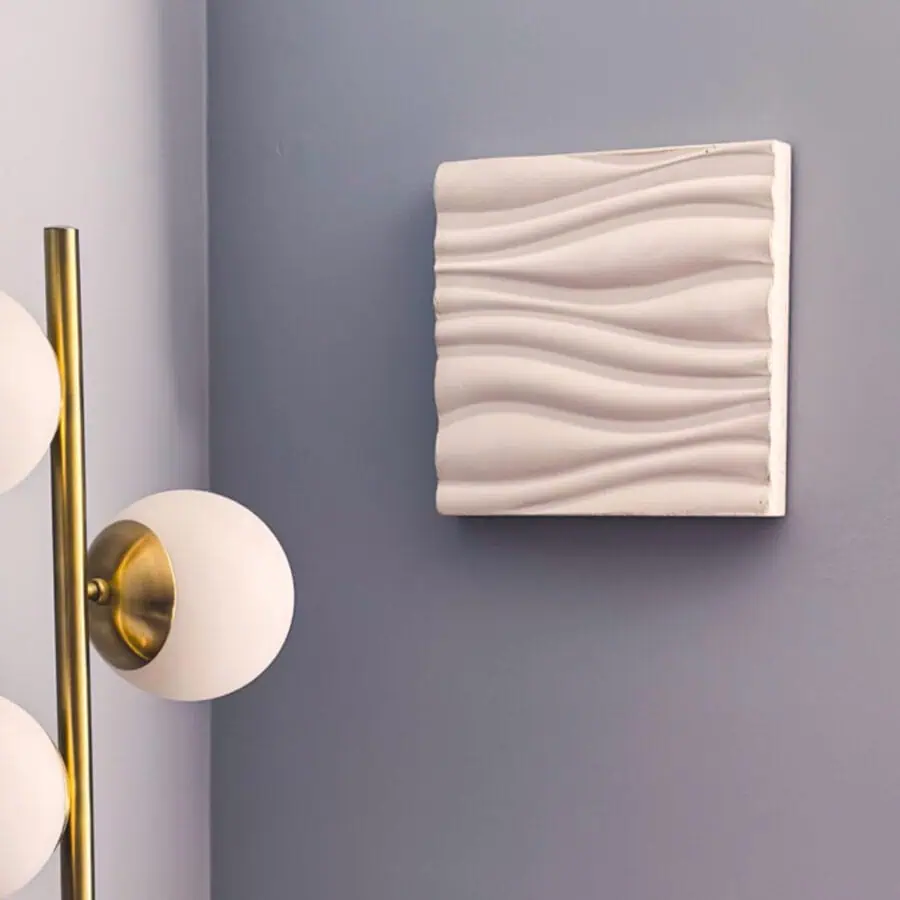
In this step-by-step guide, I’ll show you how to use an inexpensive PVC panel as a mold to create stunning 3D wall art from cement. The result is a uniquely textured, gallery-worthy piece that adds depth and character to any space.
I rated this as moderately difficult due to the need for some woodworking tools. However, I created this tutorial with all the details you need to complete this project, regardless of your experience level working with cement.
Here are two other cement wall tile tutorials you may also like, these Mid Century Modern ones and a pretty outdoor tile.
Did you happen upon this tutorial in the winter? Then check out this Bohemian wall yarn hanging you can make. And how about this cool geometric circle sculpture?
Some of the links on this page have been provided as a convenience for finding materials. These links may also be affiliate links. As an Amazon Associate I earn from qualifying purchases, at no extra cost to you.
I only recommend products I’ve used and loved, unless otherwise stated. Click here to read my full disclosure policy.
Materials to Make 3D Cement Wall Art
- Glass Block Mortar Mix*
- Disposable bowl
- Plastic cup for scooping mix
- Durable nitrile gloves
- Safety glasses
- Safety mask– rated for silica dust
- 3D PVC Wall Panel*
- Squaring tool
- Cork-backed ruler and/ or T-square
- Sharpie
- Blue tape
- Utility knife
- Small level
- Melamine shelf* or board minimum of 17”x17”
- Table saw
- Miter saw or hacksaw
- 1 1/2″ wood screws
- Flat head screwdriver
- Play sand
- Pink foam insulation
- X-acto knife with long blade
- Mineral or baby oil, or Johnson’s Paste Wax
- Square trowel
- Putty knife
- Diamond grit sanding block – 60-200 grit
- Hot glue gun and glue
- Plastic straw
- Strong drywall anchors*
- Hanger bolt ¼” x 2 ½” (2” is okay, but 2 ½” is ideal)


Materials Note
Glass Block Mortar Mix:
This is found at Lowe’s and some big box stores in the Midwest. Not all locations sell it. It’s a pure white mix that is good for some projects.
If you don’t have access to it but can find white portland cement, use it with sand at a 3:1 ratio of cement to sand. Otherwise, you may need to opt for a grey mix. CTS Concrete Leveler or a standard grey Portland cement 3:1 ratio may be a good choice with this.
3D PVC Wall Panel:
The pricing on these changes from time to time. If the price is higher, hunt around a bit. My old link took me to the same panel and showed $24 when I originally purchased it for $8.
When publishing this tutorial, I found a new link that has it for $10. Make sure you have the single piece selected (not a package) and in white. Other designs are also available for $6-12.
Melamine board or shelf:
You will likely find it most economical to purchase a melamine shelf instead of a board. My store stocks them in the smallest size: 15 ¾” x 36” x ¾”. This will be enough material for all your cuts.
Strong drywall anchors:
You will need a substantial drywall anchor if you hang this into drywall. We found the one I linked to work very well. You will need both the drywall anchor kit and the hanger bolt in the list.
If you can go directly into a stud, you will still want to use a hanger bolt. The hanger bolt, unlike a screw, is headless. This provides an even and stable surface for the 3D cement art to hang on. A screw head will cause wobble.
Tutorial Steps For DIY 3D Cement Wall Art
Step 1. Trim The PVC Panel

If you are using the same design that I did, it only measures approximately 19 x 19”. At this size, it will be quite heavy, so to make it more manageable for hanging, trim it to a smaller size.
I made mine 12×12”. I used a squaring tool to mark 90-degree lines and a long ruler to mark a 12” square.

You’ll notice that I marked my 12×12 space close to the center of the panel. This is because the 3D waves stop at the edges, and since you want all sides to be the same, you’ll need to cut the flat edges off. The 3D waves will butt up flush to the sides of the mold box you build.
Cutting this is a little bit of a challenge because the PVC is slick and has bumpy waves. To help prevent the ruler from slipping, tape the ruler to the plastic tile with blue tape and then mark your dimensions.
I didn’t think to do this until after I had already cut it to size, which is why you don’t see it in the photo.
Use a utility knife to cut the panel to size.
Step 2. Cut The Wood For The Form For Your Panel


First, start with the base. It’s okay to use an oversized piece of melamine for the base and not trim it. Just ensure the space inside is 12 x 12 ⅛”.
Having one dimension a little bigger at 12 ⅛”, allows more wiggle room for the panel to be more easily removed when you level it before you cast the cement.
The 1st graphic is how the form box would be built ideally. But if, like me, you are working with scraps and want to reuse the side pieces for another project, your form box may look a little more like my photo. For reference, my long sides were about 22” long.
But if you want to make the base sized to fit, trim it no smaller than 14 ½” x 14 ½” since the melamine sides are 1” thick.

Next, for the sides of the form box, cut 2 pieces of melamine 2” high x 12 ⅛” long. Cutting these at 12 ⅛” allows wiggle room when you remove them in a later step.
The other two sides of the box must be 2” high and a minimum of 17” long. The extra length will give your hands some additional space for leverage when you demold.
Step 3. Assemble The Mold Form Box
Use a squaring tool and then screw the sides into the base and each other.
Step 4. Place The 3D Panel

First, ensure your work table is level.
The 3D panel is fairly flexible, so pouring the cement directly on top of it would cause the PVC panel to warp. To remedy this, add sand to the bottom of the mold box to support it.

Place the decorative panel inside and ensure it is level. To test for level, you’ll need to remove the panel a few times, which is why we added the extra ⅛” space. A flathead screwdriver helps jimmy the panel out.

Also, be sure that you have the side that will be the front/good side, face down, touching the sand –this will be what you see when it is hanging on the wall.
The side facing up toward you in the mold box will not be your final result. I recommend letting the extra ⅛” space be at either the top or bottom of your wall so it’s not weighted to one side when hanging.

Again, the PVC panel is placed so the backside faces you (bumped out part is down- touching the sand.
Mark a line ⅝” down from the top of the PVC mold. This is where your stop point is for where you fill the cement. It’s a good idea to mark this across all four sides.
Step 5. Mix The Cement And Pour

Mix the cement to a mud pie consistency. When I pressed my hand in the mix, it held the shape of my handprint.
That’s what you are looking for. It can be a bit thinner as well, but basically, you want a thick but pourable mixture.

Pour until it reaches just below the top of your marked line.
If necessary, weigh the form box down while maintaining its level. Let it cure for 24 hours.
Step 6. Add The Sides And Hole For Hanging The Art

Next, we will create the back void, which will provide depth for the sides and a spot to add the hole for hanging the concrete art.
Now that the cement has cured, cut a piece of pink foam to make the void insert. The foam will be smaller than the tile to allow for ¾” deep sides/edges and a 1” thick top edge (for extra durability and space for the hanger hole notch).
So measure a piece of foam at 10 ½” x 10 ½” and cut it with an X-acto knife with a long blade.
Note:
I added this next part after making the 3D art because my original solution for hanging this could be much better. This part of the process has been modified to make hanging the heavy concrete much more manageable.

Take a plastic straw and cut it to about 2”. Then, use a hot glue gun to add hot glue to one end of the straw. Now pack it with wet sand. You can leave the other end open. Lay it on its side and set it aside for now.

Mark the top center edge of the foam insert. Then, using the ¼” hanger bolt, create an indentation for the straw to sit in.

This will create the half hole (or indentation) for the hanger bolt to grab onto so it sits securely on the wall. When done, it will look like the graphic above.

Press it in only with enough pressure to make the indentation just less than half the diameter of the bolt. This will help support the straw and cradle it while you add cement around it.
I recommend making the straw indentation just a tad wider than the straw since the threads of the hanger bolt make the bolt just a little wider than ¼.
However, keep the indentation at half the thickness of the bolt or just under that.

Next, lubricate the foam on all edges and the bottom with oil and a cotton ball. I used baby oil.

Center the foam inside the box on top of the cured cement.
Be sure you have positioned the foam insert so that the straw is at the top of your wall art, where you want it to hang. (This part is not shown in the photos since I modified it after making it.)
Mix more cement to the same consistency as before and place it between the sides and the foam. Use a couple of pieces of melamine scraps to help keep it centered while you add the cement.
When you add the cement to the area where the straw goes, place it against the depressed spot. Then pack the cement around it.

Now, use a trowel to smooth the edges, and let it cure for 24 hours.
Step 7. Remove The Insert And Demold The Wall Art


Demold the concrete art by first unscrewing the sides. Then, use a tool with a thin edge to jimmy the foam-free. I used a caulk spatula.

Step 8. Sand The Edges

Use a diamond-grit sanding block (ideal) or 180-grit paper to smooth the edges and corners. This is quite heavy, and you want the edges to be flat and without any sharp protrusions.
Once sanded, blow off all the dust. If you have an air compressor, use it; otherwise, use a damp rag or paper towel to remove any additional dust.
Step 9. Seal The Art and Add Protection For Your Walls
Please note that this cement art piece is very thick, so it may take several days to dry fully.
Once the cement is fully dry, seal it with your favorite sealer, following the manufacturer’s instructions.

You will also want to protect your wall from the concrete edges. I found the easiest way to do this was to add ribbons of hot glue to the edges. They act as bumpers and won’t be visible.
When adding the glue, add it one side at a time and then press something down on top of the bead or zigzag so that it flattens evenly and doesn’t have high or low points. I used a piece of cardboard.
To time this right, allow just enough time for the glue to start to firm up but still have some flexibility. This way, the cardboard won’t stick, and the glue won’t have hardened yet. Do this for each edge.
Step 10. Hang Your 3D Waves

Follow the instructions for installing the drywall hanger. Then use your fingers to unscrew and remove the screw that came with it.
Then screw in the headless bolt, leaving enough space to hang the art. The bolt will fit the curve molded into the cement by the straw.
If the straw indentation is a bit narrower than the hanger bolt, just rub the edge of the bolt up and down against the cement to help widen it.
This should easily chisel the cement away, and only a slight curve is needed for 3D cement art to maintain stability.
Now, just hang the cement block onto the bolt! This fantastic piece of handmade artwork you just made likely would have been in the $100s to purchase, and you did it for under $35.
Don’t forget to Pin it for later!


I cant find the link for the Single 3-D PVC wall panel. Could you send to me, please?
Thank you!
Kelly
Hi Kelly,
Sorry about that. I added it in the materials list!