DIY Wine Cork Succulent Planters –The Ultimate Guide
A step by step, detailed tutorial on how to make these adorable wine cork planters for wedding guest or party favors.
I made these wine cork succulent planters for my own DIY rustic wedding.
They came out beautiful! Years later, many guests are still talking about how much they loved them.

That’s why I created the ultimate guide with a detailed tutorial showing you tips on the best methods for making these that will save you time in the long run.
When my husband and I made them for our wedding, none of the tutorials had enough detail, or explained what some of the obstacles might be and how to get around them.
Have a lot of wedding guests? This tutorial will guide you through the most efficient way to make these. Get started with the best method to date I have found.

These are easy to make.
When my husband and I made them for our wedding, none of the tutorials had enough detail, or explained what some of the obstacles might be and how to get around them.
Have a lot of wedding guests?
This tutorial will guide you through the most efficient way to make these. Get started with the best method to date I have found.
Also, if you want more cork crafts, check out the Christmas version of these cork planter tree ornaments, and this gorgeous Christmas wreath.
And here’s a tutorial for making a grapevine hanging basket planter!

Some of the links on this page have been provided as a convenience for finding materials. These links may also be affiliate links. As an Amazon Associate I earn from qualifying purchases, at no extra cost to you.
I only recommend products I’ve used and loved, unless otherwise stated. Click here to read my full disclosure policy.
DIY Difficulty Level | Easy/Moderate
Materials For Making Wine Cork Succulent Planters
- Wine corks
- Bonsai jack mix
- Succulent potting soil
- Succulent cuttings- Sedums and mini Sempervivums. The mini Sempervivums are the easiest to plant. If you need many multiples of these, Mountain Crest Gardens (not an affiliate link) was the least expensive resource I found. I bought a bulk half tray. A local farmer’s market may also have cost effective pricing.
- Washi tape/ lace tape
- Wired ribbon in Periwinkle
- Wired ribbon in Light Blue/Sage
- Foam egg cartons- lots of them (to hold your planted corks so they don’t tip)
- If you are making lots of these- see the Automated Tool option.
- Making just a few of these- see the Semi Automated Tool option
- X-acto knife
- Eye-dropper
- Poker- metal or wood
Materials -Semi-Automated option
- Hand Drill
- 1/8″ drill bit
- Dremel
- Extension for Dremel– ideal, but not necessary
- Dremel carving bit #115- ideal, but not necessary
Materials -Automated Option
- Drill press
- Spade drill bit 7/8“
- Forstner drill bit – 1/2“
- 4 x 4″ pine lumber, at least 12″
If you are making these for your wedding or another event where you need to make a lot of these, this tutorial should help you make as many of these as you need, in the shortest period of time.
If you only need to make a few, skip ahead to Step 1 and scroll down to Semi automated.
You can easily make a small amount of these quickly enough by just using a hand drill or Dremel.
Important things to consider before making these- timing and planting:
How soon before your event do you need to start? Well, I recommend hollowing out all the corks early on.
You can do this at any point, the earlier the better. Corks, hollow or not, aren’t going to dry out or go bad.
As far as timing for planting goes, in theory, they can last a year or more in a cork.
I had some wedding guests who said theirs lasted more than a year. But to be safe, I would plant them a week before the wedding or party.
However, if you feel confident enough in your green thumb abilities you can make them about a month prior.
Keep them outside if temperatures are above freezing otherwise, they should be okay inside for a couple of weeks, but use a grow light if it will be longer than that.
Remember, you can ask me questions! Please see the comment section below.
DIY Wine Cork Succulent Planters Tutorial Steps
Step 1. Drill The Corks

Hollow out the corks.
This is the most time consuming part of this project, the rest moves quickly, but here are 2 methods to choose from. I recommend using the automated method if you have the tools.

Automated Step
Create a jig for the wine corks. Take a 4 x 4″ piece of wood and make it about 12″ long or longer.
Then use a 7/8″ spade drill bit with a drill press to drill multiple holes in the 4 x 4″ wood.
This you can use to hold all of your corks.
You only want to drill holes that are about 1 1/4″ deep so you have enough room to grab on to the cork to remove it.
We didn’t have the tools for this before our wedding, but it would have been well worth the investment.
We paid about $150 for it and have used it for lots of different projects.
Hint– Use a drill bit stop collar if you have one, to avoid drilling too deep, alternatively, you can just use painters tape to mark your stopping point by making a flag around the drill bit.
Semi-Automated Step
This method will use a hand drill and a Dremel (if you have the flex attachment, it will be easier to hold).
Use the hand drill to create a pilot hole, using a 1/8″ bit. Be careful to not drill through the end of the cork.
Hint– use painters tape to mark your stopping point by making a flag around the drill bit.
After your pilot hole is drilled, use the Dremel high-speed cutter bit #115, which does a good job of hollowing them out.
Carefully widen your hole. Carve it so there are no ledges and ample space for your soil.
The corks will be incredibly dusty, so be sure to rinse off the corks inside and out before planting.
Step 2. Cut Succulents For Planting
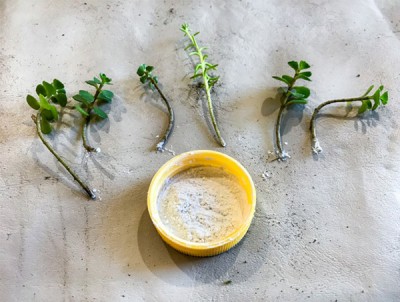

You can either cut the stems of the plants, or you can pull them loose from the pots and let them keep the roots. If possible, try to keep the roots.
Whether you can leave the roots will depend on the length and if it will fit the planter.
If you have to cut the stems, you should wait 3-5 days before planting so the ends have time to callous over.
If you have will be cutting these as stem trimmed cuttings, then cut the stem so that the length will fit the height of the wine cork.
Be sure you are at least 5 nodes below the top and not so far down the root and pick off some of the lower leaves.
Hint- You may want to consider dipping the ends in a root stimulating hormone powder such as Root Boost.
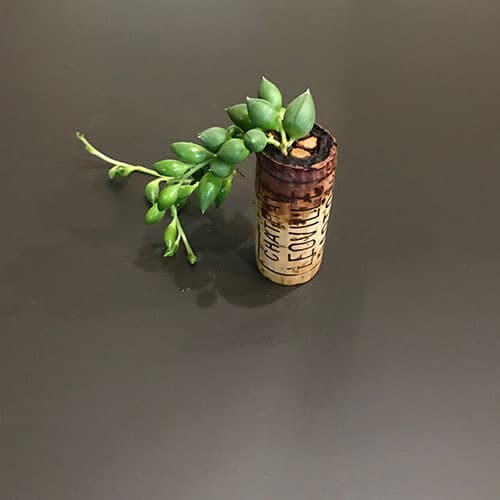
Step 3. Plant Succulents In The Wine Cork Planters
Now you should have either stems with roots or healed cuttings (post 3 -5 days).

Since the wedding, I have gotten better tips about planting the succulents, which have come mostly from Cassidy’s site, Succulents And Sunshine.
Her site is a great resource for everything to do with planting and growing succulents!
First, you will need a place to hold the corks as you plant each one because they can easily tip over and everything can spill out.
Just take them and flip upside down, and make an x in the center of each cup with a craft knife or X-acto blade, then push your cork into the hole.
If you are making a lot of these, dig up a bunch of small, short-sided cardboard boxes.
Try to find smaller ones because they will hold better. If you need to, cut the sides down.
Start by adding some pebbles to the bottom. Bonsai Jack is good for this, but I recommend that you crush it into smaller pieces by putting some of it into double-bagged plastic bags, and hitting it with a mallet.
The standard Bonsai Jack pebbles are too big for these small containers.
Next place your stem in the middle then add some succulent potting mix. You only need a little to help anchor the stem, so maybe half way or 3/4.
Tap the cork on the bottom to get the soil to settle some, then top off the cork with pebbles and pack it in carefully.
You want to pack it in enough that the stem to stay in place, but be very careful not too smush your stem, they are very delicate.
Using the metal probe that came with the Bonsai Jack is very helpful for this, but you can use anything small that you can poke it with.
Do not water these for at least a week. Then after that, unless they are inside with very dry heat, do not water these more than 1 every 2 weeks.
Inside, you may just want to spritz them with water a couple of times a week. I used an eye dropper.
Step 4. Secure Trio Of Succulent Planters Together
You have to be able to secure these together so that you can tie the bow without tipping them over.
I used washi tape that was made of lace and unfortunately it wasn’t very sticky, nor was any other washi tape I tried.
Cut the washi tape to 6″ lengths and cut one piece of ribbon to 6″ lengths and one piece to 11″.
Next wrap the washi tape around the trio of the planted corks and then add a daub of hot glue where the tape comes together.
Allow some of the glue touch the wine cork in order to hold the tape on.
Step 5. Tie The Bow
I’m not great at making bows and found this to be a bit difficult.
Wrap the shorter ribbon around the corks, making sure your seam is in back. Then add a drop of hot glue to secure it.


Take your longer length and tie it into a bow. To do this, form two loops.
Take those two loops, cross them over and then pull tight (the same way you tie a double knot in your sneakers).
Adjust your bow, make the middle neat and trim the ends at an angle. Then add some glue to the knot part of the bow and position in the middle of 2 corks, where it’s flat.
Now you’re done! Aren’t they gorgeous!
If you’re a succulent lover, then you may also love cacti. In that case, take a look at our fantastic coloring pages of cactuses.
Don’t forget to Pin it for later!


The Ultimate Guide To Making Wine Cork Succulent Planters
DIY tutorial for making your own wine cork succulent planters for wedding guest favors. A detailed tutorial for these adorable planters!
Materials
- wine corks
- ribbon
- soil
- power drill
Tools
- Please see the full materials list above the tutorial.
Instructions
- Drill The Corks To Hollow Them Out
- Cut The Succulent Plugs For Planting
- Add Soil And Plant The Succulents In The Wine Cork Planters
- Tie Three Wine Cork Planters Together With Ribbon
- Tie A Bow Around The Three Wine Cork Succulent Planters


Where did you get all the corks!?
Hi Linny,
I do drink wine and have lots of friends and family who drink wine. Some had been saving wine corks for a long time, figuring they would do something with them, but never did, so they donated them to me. You’d be amazed at how many people save wine corks. Ask around.
You can buy them too, just search wine corks on google. You can even get real, used corks. For cheap too.
How id you clamp the cork onto the drill press ? It’s so small…..
Hi Ann,
I’m so glad you asked me that because I see that my tutorial is missing a key part of the first step. I think this was my first post ever and I didn’t catch that I didn’t have the proper explanation in there. I think I copied and pasted that from an older version of the tutorial- before we figured out that we should make a jig! I have the photos on there of a jig we made. We drilled 10-or-so holes into a 4×4 and placed each cork into the holes. That saves us from dealing with trying to clamp it to the drill press. I’m happy you caught that. I will try to update the post tomorrow with that. You’ll want to make a jig and the size of the holes and depth will depend on the corks you are using since they all aren’t the same size. The 7/8″ paddle bit size is what worked for us. Does that help?
Dear Ellen!
I find your blog very useful and interesting. This is where I found most of the information about cement decorations.
In Romania, I would like to cover large pipes with a natural-looking material. It would be ideal if I could find a material like cement, but the plant could grow out of it. I should put this on the metal pipes somehow.
These are large plumbing pipes, about 30 inches in diameter. They are exposed to rain and frost.
Can you help me with this, where to start in this area?
Thank you in advance for your feedback,
Best regards,
Reisz Ildiko