DIY Round Cement Coat Hooks With Leather
These modern DIY cement coat hooks with leather accents will give you a warm, modern update for your hallway or foyer.
Are you ready to update those old wood plaque and metal coat hooks? You know the ones I’m talking about, they’ve been hanging there for years.
Well it was time for us to finally make wall hooks that match our more modern living spaces. When you’ve decor at an entrance to your house, you gotta think about the details, right?
I think the added leather gives these round cement hooks a cozy and classy twist. Don’t you?
Some of the links on this page have been provided as a convenience for finding materials. These links may also be affiliate links. As an Amazon Associate I earn from qualifying purchases, at no extra cost to you.
I only recommend products I’ve used and loved, unless otherwise stated. Click here to read my full disclosure policy.
DIY DIFFICULTY LEVEL | Easy
Materials List For Round Coat Hooks
- Rapid set cement
- Charcoal pigment –optional
- Disposable mixing bowls (2)
- Plastic cup for scooping mix
- Durable nitrile gloves
- Safety glasses
- Safety mask– rated for silica dust
- (4) Round cookie cutters – 1 each of 3”, 2 ½”, 2”, 1”
- Rolling pin
- Smooth, glossy mat or work surface (makes the coat hooks a smooth and shiny)
- Ruler
- Craft stick
- Small paintbrush
- Concrete sealer
- Painters tape
- Stretchy material*
- E6000 glue
- X-acto blade
- Leather strips
- Leather dye
- (3) Screws 2 ¼”, with flat top
- 220 grit sanding sponge
Materials Notes:
Stretchy material- The stretchy material is something like a stretchy ribbon, or fabric you can trim. I used lace. This needs to be 1” wide and will be cut to 3 pieces each less than 11” long. See Step 7.
Smooth, glossy mat or work surface- Dollar Tree has cheap plastic mats that are smooth that are perfect for creating the surface you’ll need to get a nice smooth and shiny sheen on the face of your hooks. If you want it smooth, but not shiny, you can use a silicone matt– like the kind you bake or roll dough on.
Optional Charcoal Pigment- I wanted these to be grey instead of off-white, so I added charcoal pigment. If you want your coat hooks to be off-white, then skip adding the pigment.

Steps For Making Leather Wrapped Cement Hooks
Note:
We will make the collars of the hooks first. The collars will create extra space needed to hang thicker items. The deeper this space, the thicker the coat you can hang.
I found the right balance for easy-to-find screws, standard ½” drywall thickness, and average coat thickness to leave an inch of space between the wall and the back of the cement circle hook.
This gives you an inch to work with for the drywall anchor and screw. You will add the color to the mix for both the collar and circle fronts at the same time so the color is consistent.
Even if you don’t add coloring to this, still follow this step, just don’t add the color.
Step 1. Make The Colored Cement Mixture

In one of the disposable bowls, mix about 2 ½ cups of dry cement and about two level teaspoons of charcoal pigment. This amount of colorant will make the cement light-medium grey. Be sure to mix the pigment in well, and do not add water yet.
Now separate the mix into two portions so that ¼ of the dry mix is placed into a second disposable bowl; this will be used for the collars (bases) of the wall hooks. Set the larger portion aside, this will be for your decorative hook circles.
Step 2. Mix The Cement For The Collars Of The Hooks
First, prepare by placing the 3 screws and the 1” circle cutter near your workspace.
Now add water into the ¼ bowl for the collars and ensure no lumps.

The consistency of the mix should be like moist dough, which you will then form into a ball shape.

Place the “dough” ball onto a smooth work surface. The collars need to be 1 ¼” thick, so roll it flat so it is 1 ¼” thick. If you accidentally make it a little flatter than 1 ¼”, then just cheat and push the cement together and in a little to boost it back up.
Now take the cutter that is 1” in diameter and cut only 1 hole, and leave the cutter in the cement to provide resistance when you push in the screw.
Next, take a screw with the flat head facing down and center it within the cutter. Push down until it reaches the work surface, be sure the screw is standing up straight.
Now, you can remove the circle cutter and repeat for the following two collar pieces. Push away the excess cement from the collars you just cut.
Since the head of the screw is bigger than the shaft, you will have a little gap around the shaft. Fill that in with a little extra cement by pushing it into the gaps.

If the cement is beginning to harden, making it difficult to fill in those gaps, you can dampen the cement – like making clay slip, if you are familiar with that.
Use a craft stick to even it out. If the cement has built up where the collar meets the mat or work surface, use the craft stick to push away the excess cement.

Ensure that the screws are still standing straight up, nice and level. Look at them at eye level and from a couple of different angles.
They do not need to be perfect. Just get them as straight as you can. Now let these cure for an hour.
Step 3. Mix The Cement For The Faces
Once the collars have cured, add water to the bowl containing the larger portion of the pre-colored cement.

Form the cement into a ball and roll it to ¾” thick. Now leaving space between each circle, use the small, medium and large cutters to cut three coat hooks.
Keep the cutters inserted in the cement and pull away the excess cement around the circle cutters.


Next, press the collars into the center of each coat hook a ¼” into the cement. The collars should be 1” above the wet cement circle inside the cutter.
Note: I created a graphic because I don’t have a photo showing the 1” protrusion. I made my collars too short and didn’t realize until I installed them on the wall.
I had to add corks to the backs to provide the additional space. This isn’t as durable as the cement collars, but this is how it would look.
As you did with the collars, if you have small gaps where the collars were inserted, just gently fill them in with a little of the extra cement.
Use the craft stick to push away any build-up from the edges of the coat hooks, where they meet the mat.
Use a paintbrush to clean the edges. Dip the brush in water and run it around the edge to remove any remaining excess cement. This will reduce the amount of sanding you’ll need to do.
Finally, let the decorative circles cure for a few hours to get that smooth, shiny sheen on the front surface. Longer cure times allow for a higher sheen, shorter may result in a more matte look.
Step 4. Sand The Cement

Once cured, remove the cement coat hooks from the work surface and sand any sharp edges/ corners. The actual sides of the coat hooks will be covered with leather so they don’t really need to be sanded unless you have any odd bumps.
Step 5. Seal The Hooks

Wait 24 hours for the cement to cure further before sealing them. Once they have sat for 24 hours, wipe them free of dust.
Then, stick them face up into something that will keep them face up. I used pink foam insulation, but you could use cardboard. The reason for placing these facing upward is to avoid getting drips on the face.
If you use the Stone Care sealer, then spray them liberally, but don’t saturate them. I sprayed the sealer on the face, sides, and back.
Now wait 3-5 minutes and spray again (this time I only sprayed the face). Then set a timer for 30 minutes and if you have any excess sealer just sitting on it, wipe it off.
The sealer must sit for 24 hours before you can apply the leather.
Step 6. Trim And Dye The Leather

You’ll need to know the hook’s circumference. So take a piece of string, wrap it around each cement coat hook, mark the string, and place it along a ruler to get the measurement for the length of leather you need.
Mine were 10”, 8 ½” and 7”. Then, measure each coat hook with a ruler at its thickest part. It’s okay if there is a slight overlap between the leather and the cement.
Use an X-acto knife to trim each piece of leather to the appropriate size.

If your leather isn’t pre-dyed, then follow the manufacturer’s instructions on dyeing the leather. If you haven’t done this before, it’s easy. It’s basically just like staining a piece of wood.
Leather with cement is a handsome combination. If you enjoy the look, you may want to check out my tutorial for this leather and concrete doorstopper.
Step 7. Glue The Leather To The Cement Hook Edges

Once the dyed leather has dried, use painter’s tape to mask off the face of each cement coat hook to protect it from the glue.
Now, set the sliding clamps to be about ⅓” wider than each coat hook. Next, use the stretchy material to help secure the leather to the cement.
Check how much material you need to wrap around the leather and circle hook and cut it to size.

I used Velcro to secure the stretchy lace together.
It’s possible to use blue tape to hold the material together and instead of Velcro, and wrap that around the entire outside of the material. However, it may make it a little more difficult to secure when setting it into the clamps.
If you choose to use the tape, ensure the tape doesn’t come in direct contact with the leather.

You only have 5 working minutes between applying the glue and needing it clamped, so only do one cement hook at a time.

Once everything is set up and ready for gluing, take the E6000, apply it evenly to the sides of the cement.
Keep the glue away from the face edge so that it doesn’t get on the face or front edge of the leather. I applied mine about ¾ from the edges, leaving about an ⅛” of unglued cement.
Now press the leather to it, starting from one end, and line up the leather’s edge with the coat hook’s front edge.I found it easiest to do this with the hook’s face down on the table.

Once you have wrapped the leather, keep your finger in the middle of the two ends and grab the stretchy material. It takes a bit of coordination to do this, but carefully wrap the material around the coat hook tightly so that the Velcro meets and pushes it together.
Alternately, wrap the stretchy material around it and hold it where it meets.

Tighten the sliding clamp where the leather ends meet and the opposite side. Let this sit a bit. The instructions say this dries in 15 minutes, but I would wait an hour or more to be safe.
Repeat for each coat hook.
Step 8. Paint The Collars –Optional
Depending on your wall color, you may want to paint the collars the same color to help them blend in. Or paint them a dark color to shadow them, or a warm brown color to match the leather.
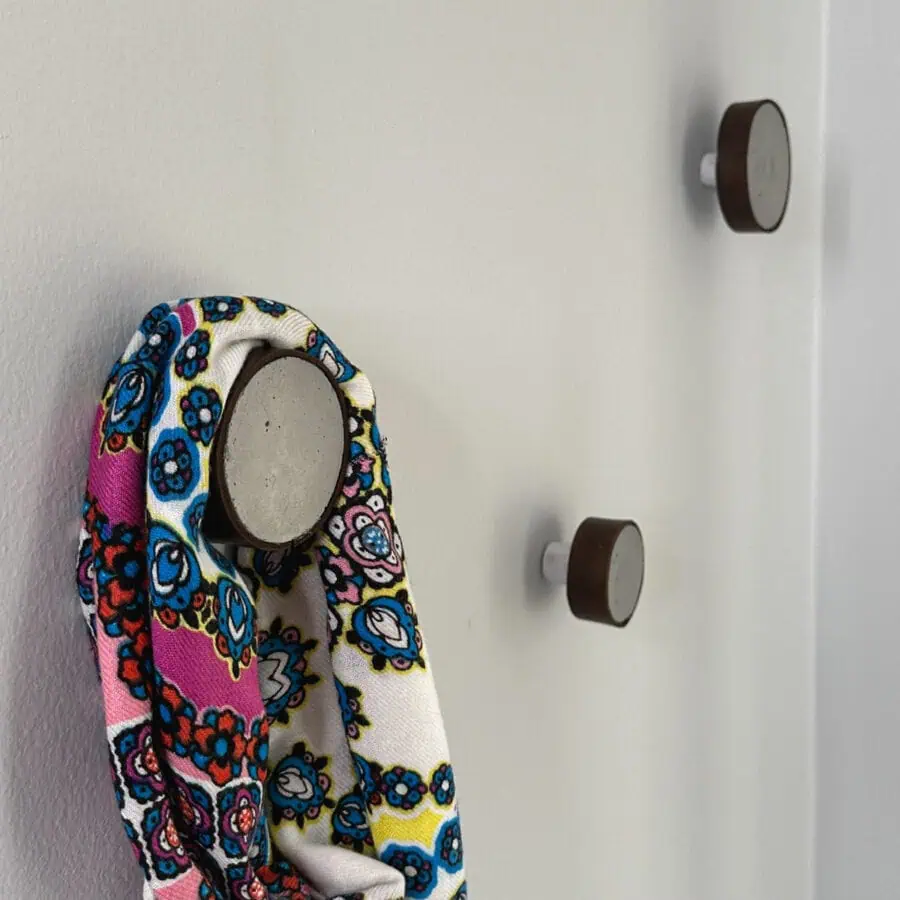
Step 9. Hang The Cement Coat Hooks

Once fully dried, remove the stretchy material. Screw these into a wall stud or use a drywall anchor if screwing into drywall.
Some other wonderful concrete home decor projects that you may also be interested in making are this magnetic key holder with a similar look to these hooks. And these mid century modern wall art tiles or this large cement floor vase in the shape of a cone.
Don’t forget to Pin it for later!


DIY Cement Coat Hooks
Make these cozy and modern round cement coat hooks with an easy DIY tutorial. A gorgeous way to upgrade from old wood plaque hooks or bore snore metal ones!
Materials
- Rapid set cement
- Charcoal pigment –optional
- Disposable mixing bowls (2)
- Plastic cup for scooping mix
- Durable nitrile gloves
- Safety glasses
- Safety mask– rated for silica dust
- (4) Circle cookie cutters - one each of 3”, 2 ½”, 2”, 1”
- Rolling pin
- Smooth, glossy mat or work surface (makes the coat hooks a smooth and shiny)
- Ruler
- Craft stick
- Small paintbrush
- Concrete sealer
- Painters tape
- Stretchy material*
- E6000 glue
- Small clamp (missing from pic)
- X-acto knife
- Leather strips
- Leather dye (if needed)
- (3) Screws 2 ¼”, with flat top
- (3) drywall anchors –optional
- 220 grit sanding sponge (diamond grit preferred)
Tools
- Please see the Materials above.
Instructions
- Make The Colored Cement Mixture, Ensure You Portion It Out Into 1/4 to 3/4
- Mix The Cement For The Collars Of The Hooks And Pack Into A dough Ball Shape
- Mix The Cement For The Faces With the larger portion
- Sand The Cement With a 220 Grit Block
- Seal The Hooks To Protect Them From Scratches
- Trim And Dye The Leather
- Glue The Leather To The Cement Hook Edges But Keep The Glue Away From The Edges
- Paint The Collars –Optional
- Hang The Cement Coat Hooks