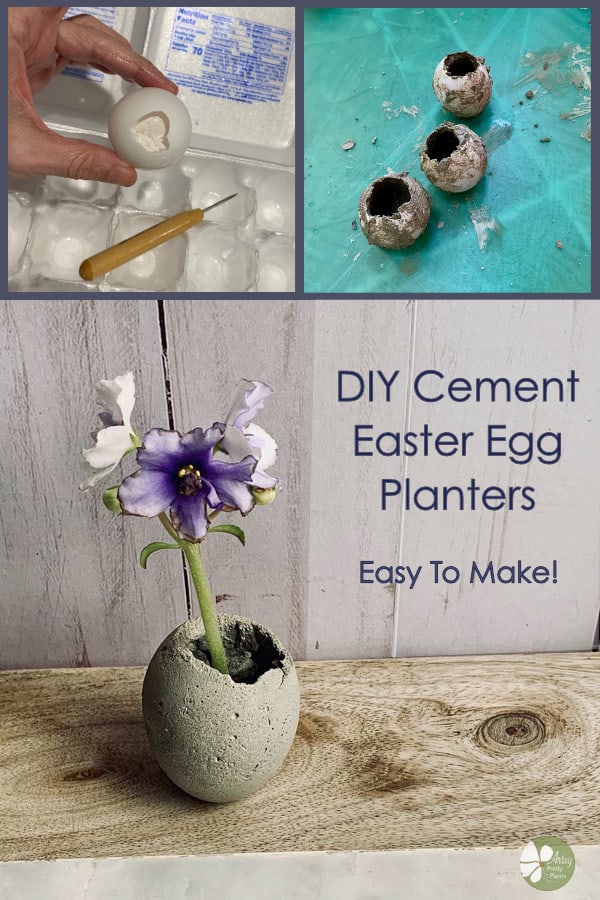
Cement Egg Planters for Easter
Here is a quick tutorial for how to cast these cute cement egg planters with drainage holes, using a real eggshell for the mold.
I created the idea for these planters and refined the tutorial so these are easy to make. I even figured out how you can easily separate the eggshells from the cement. You won’t be able to get the eggshells off of the cured cement without my handy trick. Read on to see how (there’s even a video).
DIY DIFFICULTY LEVEL | Easy** (see below)
Easter is around the corner and I have the hardest time knowing how to decorate for this holiday.
Truth be told, I’m not the greatest decorator anyway, regardless of the fact that I’m a kitchen designer in real life.
Decorating and design don’t seem to translate for me.

I’m starting to realize that my best bet is to go simple and just do what I like.
Well, if you’ve been here before, you know I like planters and we know I like concrete/cement, so- what else to do but to make egg planters!
I know you are probably thinking these will be a nightmare to make. However, for the most part, these are very easy and quick.
But I have a disclaimer! **How easy these will be to make, will all depend on the eggs you end up buying.
I made these egg planters three times because I was experimenting. And all three times I had a different experience with the eggs.
The biggest hurdle you’ll likely run into is the removal of the casing, which is critical to remove, or you can’t get the shell off.
I had one batch- my first, which was a breeze!
My second batch was pretty much a complete DIY fail because out of the 9 eggs I tried to hollow, almost all wouldn’t release the casing and ended up getting cracks everywhere.
Both cartons were the same brand eggs, with only a week difference in sell-by date. The older ones were actually the more difficult ones.
The third batch was nearly as easy as the first, and was a different brand, with a similar sell-by date as the others. Go figure.
To see another really unique planter project using egg shells, check out my durable concrete eggshell air plant planters.
And you may also love this unique planter that are wine cork-shaped cement planters.
Some of the links on this page have been provided as a convenience for finding materials. These links may also be affiliate links. As an Amazon Associate I earn from qualifying purchases, at no extra cost to you.
I only recommend products I’ve used and loved, unless otherwise stated. Click here to read my full disclosure policy.
Materials For Making Egg Planters
- Cement All, Rapid Set
- Disposable bowl
- Disposable cups- 2
- Nitrile gloves
- Paper towels
- #150-220 grit sanding block
- Cooking spray
- Plastic grocery bag
- Eggs
- Paper awl tool or similar
- Cocktail straws or toothpicks
- Craft sticks for mixing (or use your gloved hands)

Before starting the tutorial, it may be helpful to read my article comparing the different concrete mixes and sealers– Cement & Concrete Crafts Tests!
Another important article is Making Cement Crafts Techniques & Tips with info on cement materials, mixture consistencies, demolding, safety and clean up!
Steps For Making Cement Egg Planters
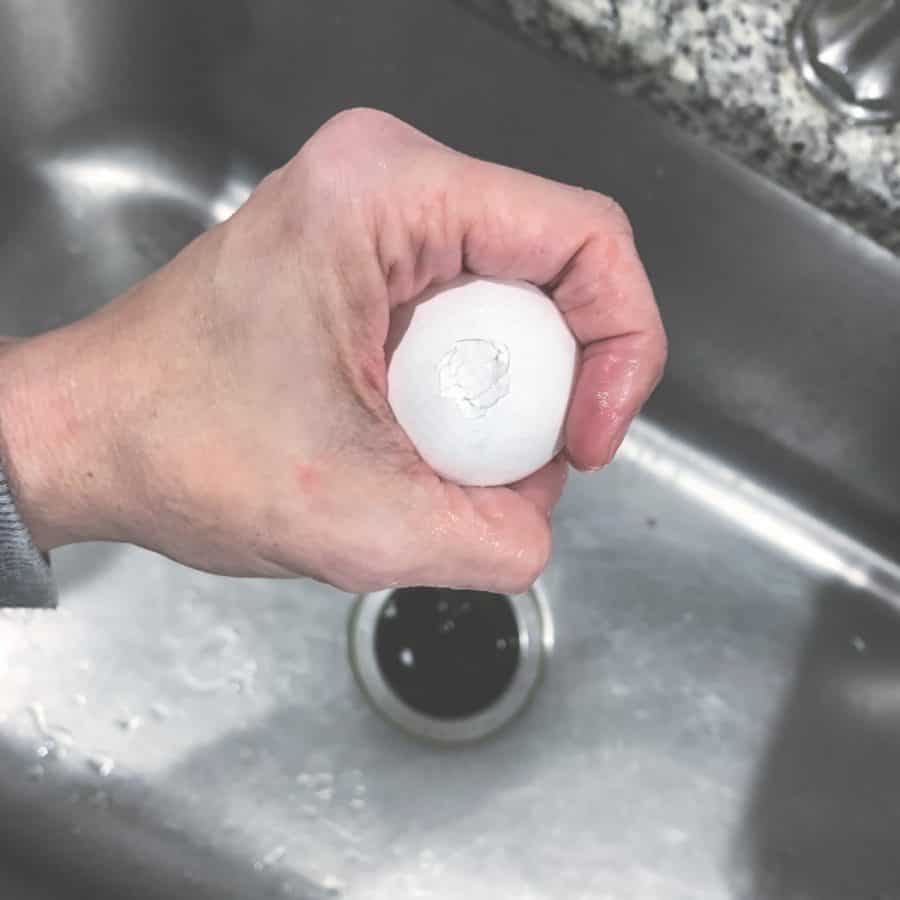
Step 1. Hollow The Eggs

Start by hollowing out the eggs. It’s important to begin at the pointy end of the egg. I’m not showing this in a photos, but I do have a video for this technique below.
Take the sharp end of the awl and tap and pierce the pointy side of the egg first.
Now take the rounded end of the paper awl tool or anything with a dull, rounded tip and gently tap at the egg point until you breakthrough.
You’ll want the hole to be the size of penny or nickel.
Break the edges of the hole by peeling back on the shell to create a wider opening. Then empty the egg out by shaking it upside down and rinse it.
Step 2. Remove The Casing
Trust me, this part is important, or you’ll never get the shell off of your cured cement egg.
Take the rounded, flatter side of the egg and do the same. But be very careful because you only want to crumble the pocket area of the shell and not break through yet. (Hint: I have a video for this at the bottom of this step).
Chip away at the sides from and angle until your hole is large enough that you are able to plant something inside.
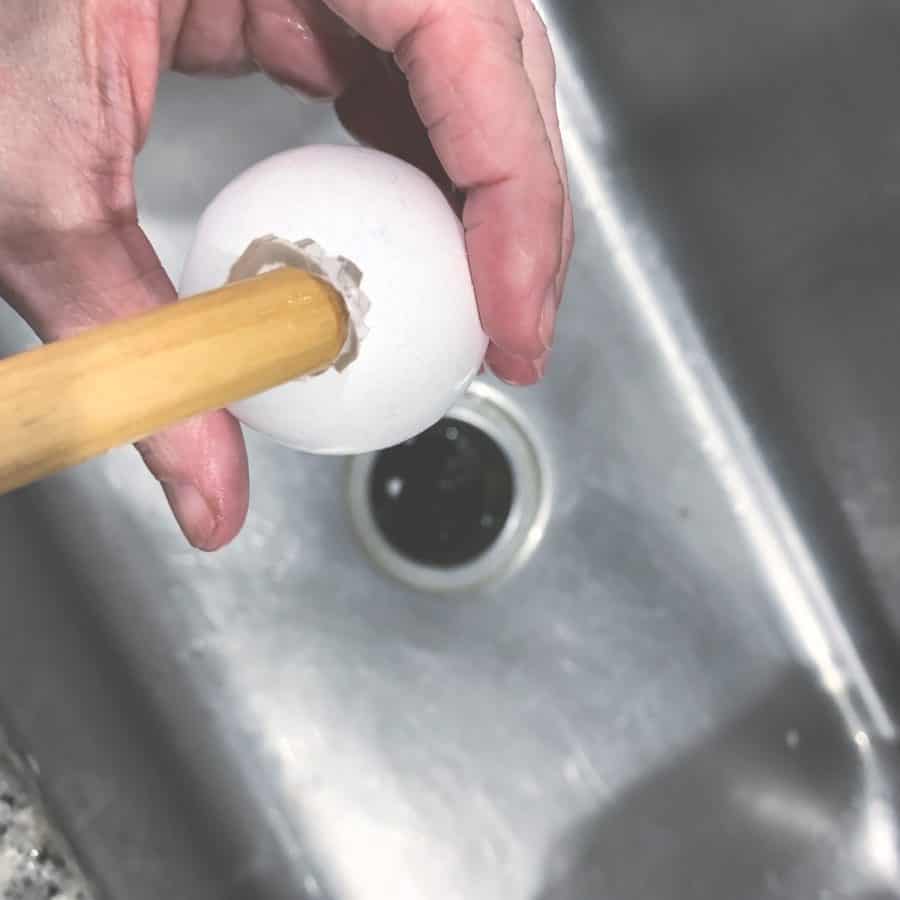
Next, take the rounded end of the bookbinding tool and gently push at the egg casing.

Removing the casing is the whole key to ever being able to de-mold the eggs, so make sure you get all the casing out.
Just think about pushing it through the other end, rather than punching it.
Here is a video for how to create the openings for the egg planter, and the trick to removing the casing from inside of the eggshell.
Step 3. Lubricate The Egg Shells
Spray the insides of the shells with cooking spray.
Step 4. Mix The Cement
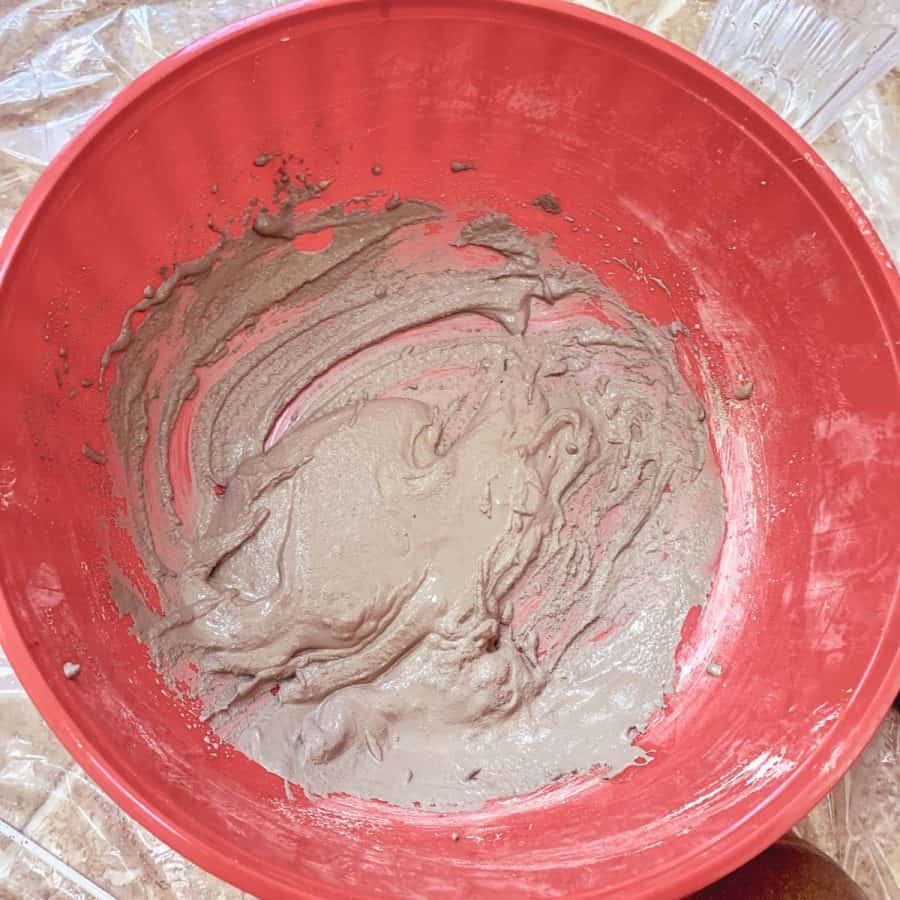
I use my gloved hands to mix the cement, but you can use crafts sticks.
I recommend these gloves (also linked to in the materials) because they are nice and thick.
You will want the mixture to be the consistency of a milkshake.
It needs to be thick enough that it’s not too watery, but thin enough it goes through the hole without lumps.
The smoother the cement is and thinner it is, the smoother the eggs will be. But if the mixture is too thin, it will just run out the bottom.
Hint: Whenever I have a little cement leftover, I just dump it into the plastic back and wipe out the disposable bowl with a paper towel, so it’s ready for the next batch.
Step 5. Fill The Mold
Scoop up some cement with your gloved hand and squeeze it into the egg.
Use your other hand to hold the egg from the bottom so it doesn’t flow out.
Carefully use your finger to smooth the cement around inside the egg.
Rolling the egg around also helps. It doesn’t need to be too thick, most of my walls were between 1/8 and ¼” thick.
Once you are sure all the sides are covered, you can set the egg on a hard surface so it will cure with a flat bottom and stand up straight.
Step 6. Create Drainage Holes For The Planters
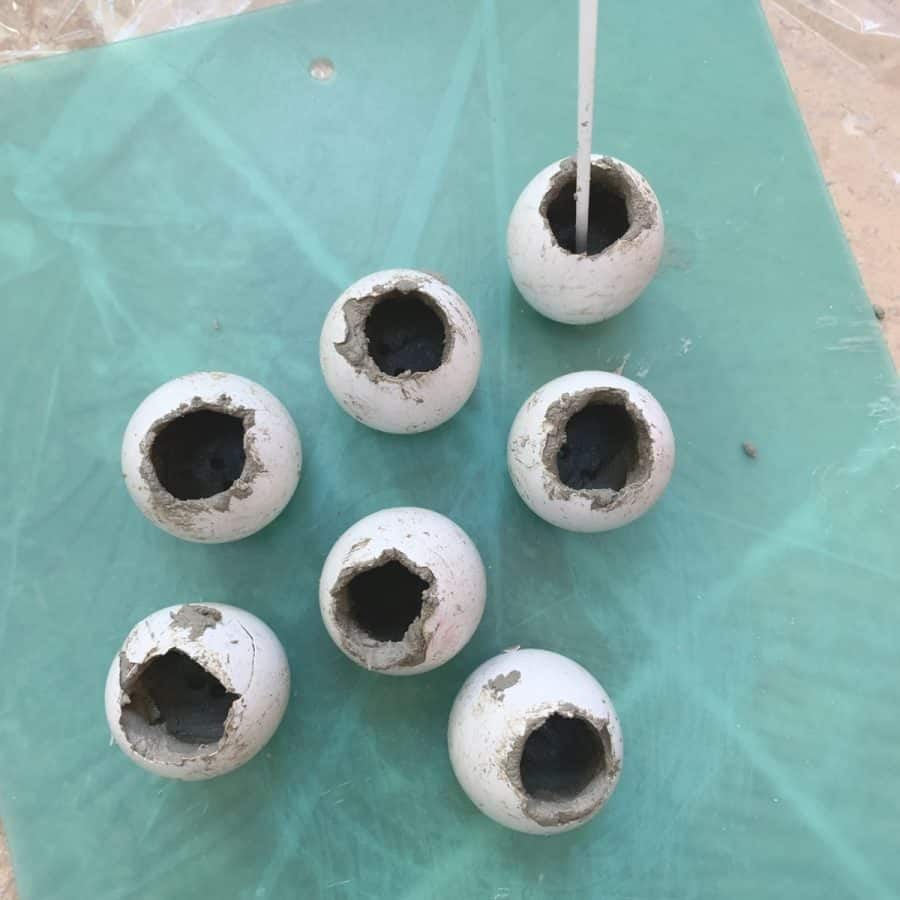
Take the cocktail straw and create 2 drainage holes in the bottom of the egg by pushing the straw into the bottom.
Step 7. Cure The Cement
Wait approximately 45 minutes for these to harden.
You must not let them fully cure (about an hour) otherwise you will have a heck of a time getting the shell off, otherwise you may not be able to remove it at all.
45 minutes from when I started molding these was the sweet spot.
I did these inside the house and temp in that room was probably 66-67 degrees and low humidity. Your times may vary.
Touch the egg. It should be pretty hard, not rock hard and not warm to the touch.
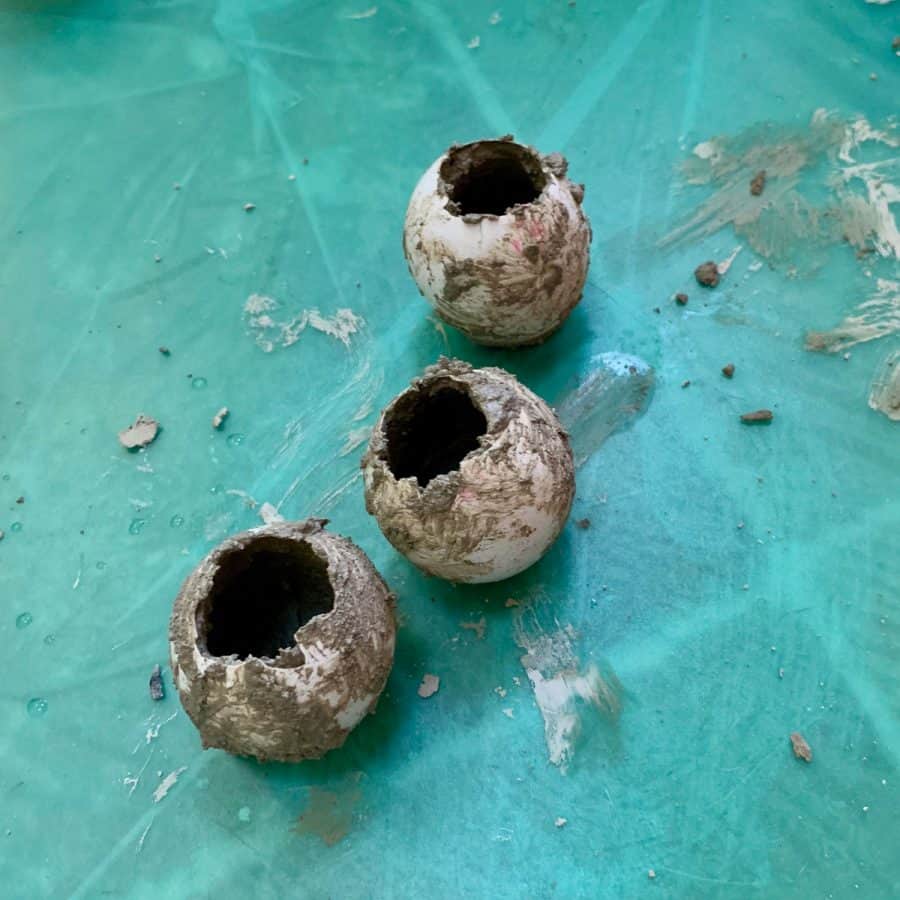
Step 8. Remove The Shell
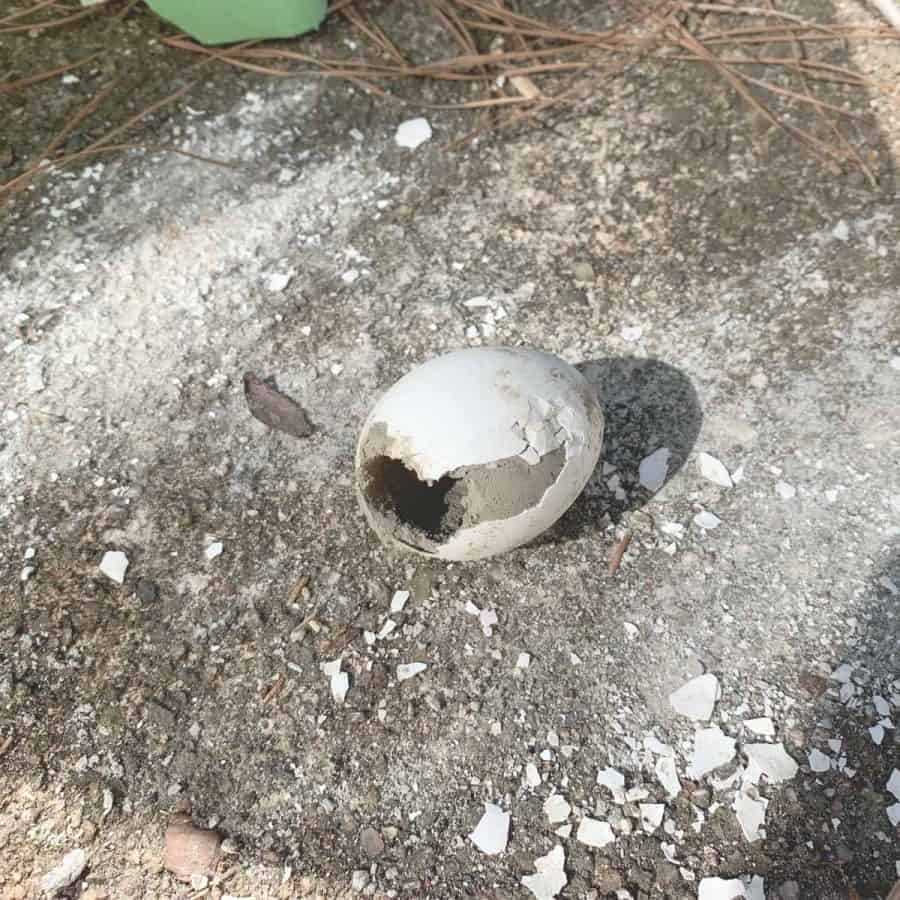
When they are ready to de-mold, roll them on something with a hard, rough surface. An outdoor concrete patio or bricks are ideal.

Very gently tap and roll and you should hear the shell crack. Rub the egg where it cracked on the rough surface and the shell should start coming off.
I had some that came off nicely in large pieces, others I had to fuss with by peeling off the small pieces with my fingernails.
Step 9. Finishing The Cement Egg Planter
The rough surface is perfect for evening out the bottoms and/or tops if necessary. Treat the surface as a sanding block –carefully.
The rough surface can be harsh so just lightly rub the top or bottom on it until it looks even.
After the concrete Easter eggs have cured a minimum 4-6 hours, you can sand them with the sanding block.
I only lightly sand them to basically get the powder and main rough spots off.
Next, rinse them and then add some plants to your egg planters!
For more planter inspiration, here are 21 of the most unique concrete planters you can make.
And here are 10 fantastic ideas for concrete decor you can make for Christmas.
Don’t forget to Pin it for later!


Cement Egg Planters For Easter
These cute little cement egg planters are easy to make. Perfect decorative table decor accent for Easter. These even include drainage holes.
Materials
- Eggs
- Book binding awl- or similar
- Cooking spray
Tools
- Please see the full materials list above the tutorial.
Instructions
- Hollow Out The Eggs
- Remove The Casing From the Egg Shell
- Lubricate The Egg Shells With Cooking Spray
- Mix The Cement To A Milkshake Consistency
- Cast The Mold With Cement
- Create The Drainage Holes For Cement Egg Planters WIth A Q-Tip
- Let The Cement Egg Planter Cure
- Remove The Shell From The Concrete
- Finish The Cement Egg Planter By Sanding


Love these so much!
Thanks Arlene!
These are adorable! How creative!!at make them this year! Thank you!!!
Thank you Tara! If you do make them, let me know how they turn out.
Bellissimo materiale il cemento molto versatile grazie