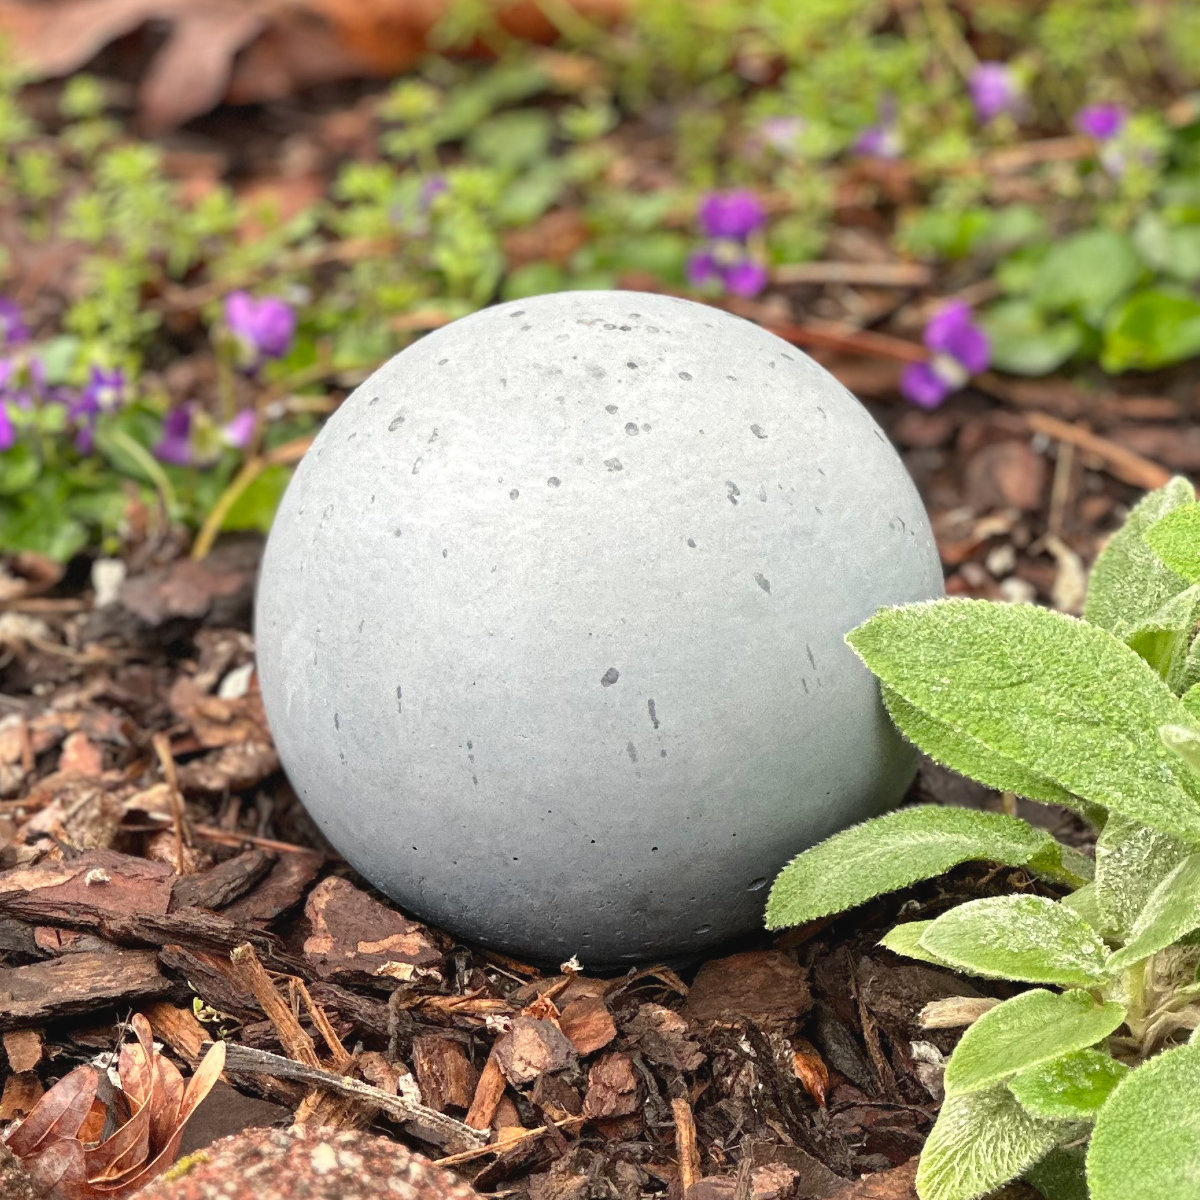
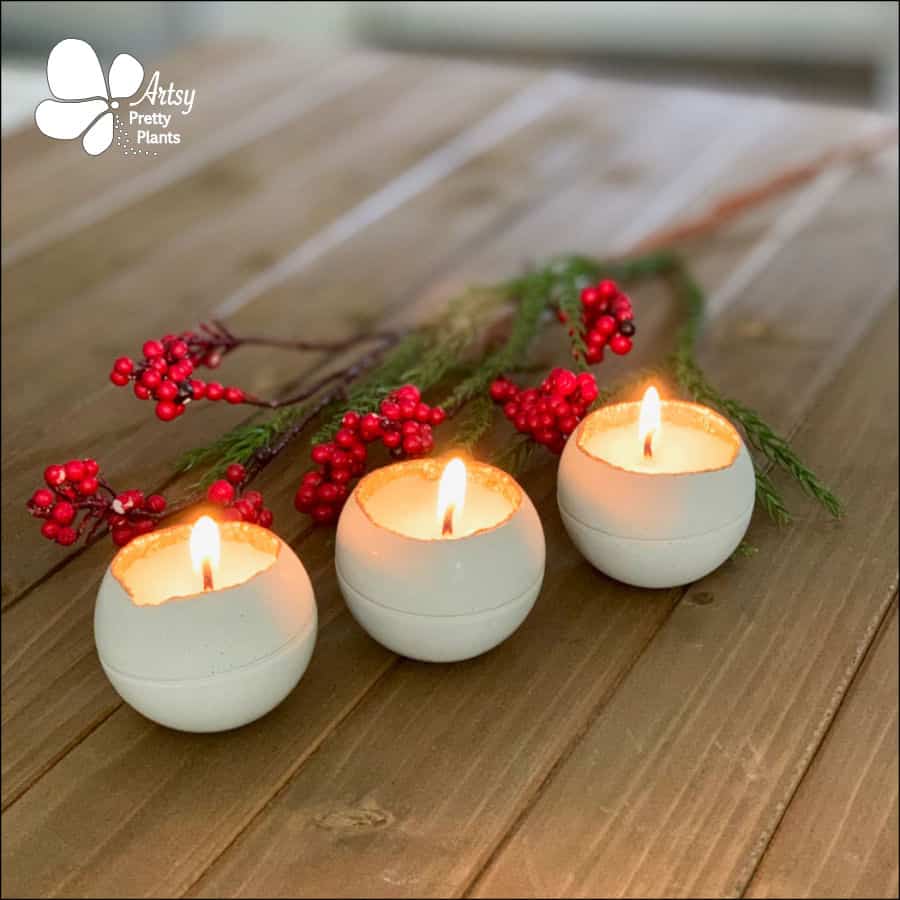
Easy DIY Concrete Sphere For Your Garden
Make this DIY concrete sphere for a stunning statement piece for your garden or lawn. I’ll show you how in just a few simple steps.
As a bonus –you’ll also be able to customize it in many colors. With easy-to-find materials, you’re minutes away from creating a unique and eye-catching garden sphere.
And the best part? You don’t have to be a professional concrete craftsperson to do it!
I’ve had concrete balls on my list for a while, and now that I have some gardens to put them in, it was time to check this one off.
I have seen DIY tutorials for this project where people used glass globes. And I saved a plastic one from a light fixture I replaced years ago just for this specific purpose.
I wondered if there was a reason I couldn’t do it with the “plastic” ones. By the way, the “plastic” ones are actually acrylic.
At first, I worried that this would be one of those concrete projects where I would need to do crazy magic tricks to get the concrete demolded.
These tricks often involve using a heat gun and/or hot knife to slice through the thick rigid plastic.
But I sat at my desk with it in my hands, spinning around the ideas. With the globe in my hand, I realized it is not true plastic; it is acrylic!
This is good news because acrylic is easy to crack. It made demolding the concrete sphere from an acrylic globe safer than a glass globe and much easier!
The glass ones are generally cheaper, or you can get them on Amazon for a little more. You may also be able to find them at a thrift store or garage sale.
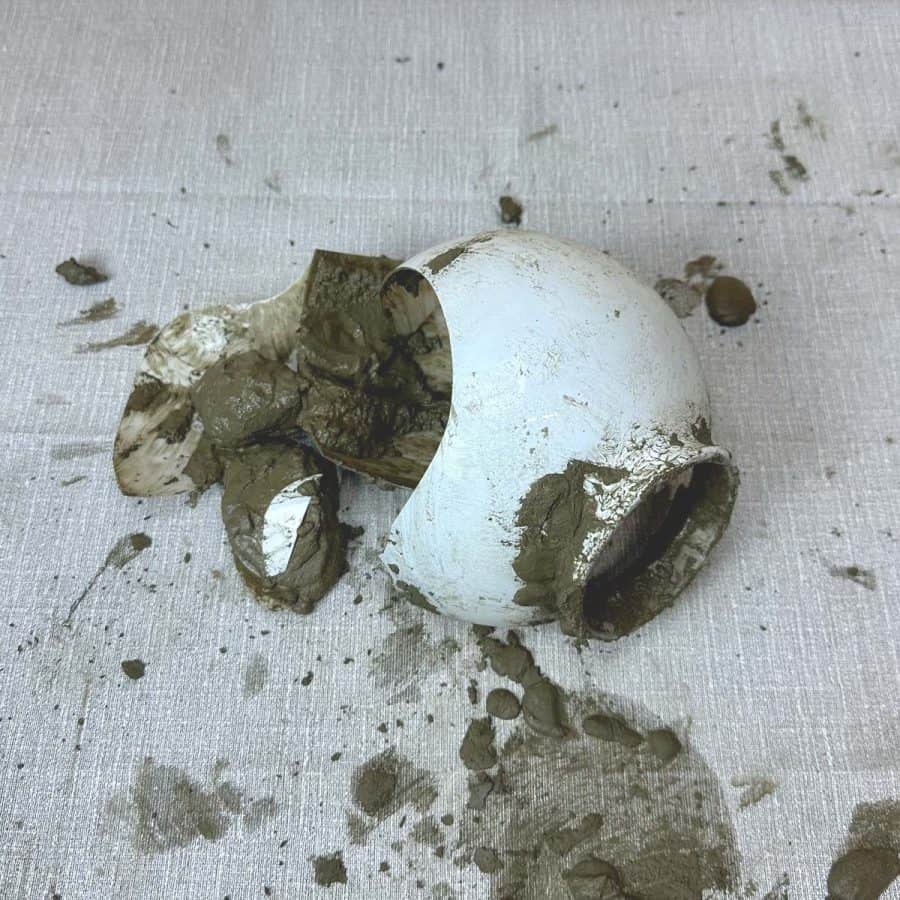
The other bonus to the acrylic ones is that they are far less likely to break. Here’s what happened to the first one I cast.
Without experience, I can’t say for sure, but I’m pretty confident that you can cast a big soccer to basketball-sized one and not have an issue with breaking.
When demolding, the glass shattered into shards. The acrylic broke into small pieces at the neck.
But once I opened the neck, I had one nice big crack and could pull it apart into just two pieces easily. Ultimately, the acrylic worked great as the concrete mold.
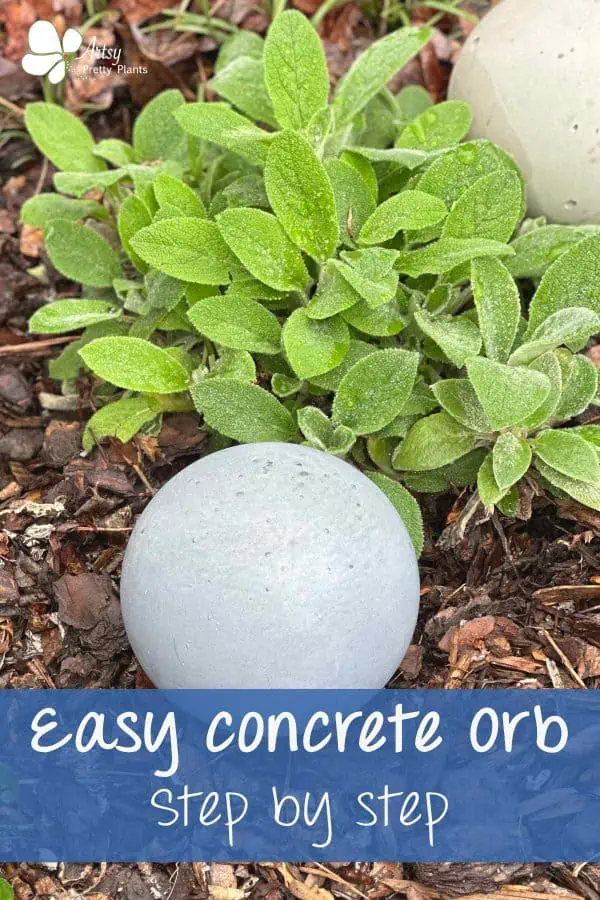
Other ideas for where you can put your concrete orbs are bird baths, inside a concrete fountain, flower beds, or even large flower pots.
Another DIY project for garden spheres are these concrete rock solar light covers. You may also like garden ornaments like this large cement mushroom, stepping stone with mosaic glass, and a cute lady gnome.
DIY DIFFICULTY LEVEL | Easy
Some of the links on this page have been provided as a convenience for finding materials. These links may also be affiliate links. As an Amazon Associate I earn from qualifying purchases, at no extra cost to you.
I only recommend products I’ve used and loved, unless otherwise stated. Click here to read my full disclosure policy.
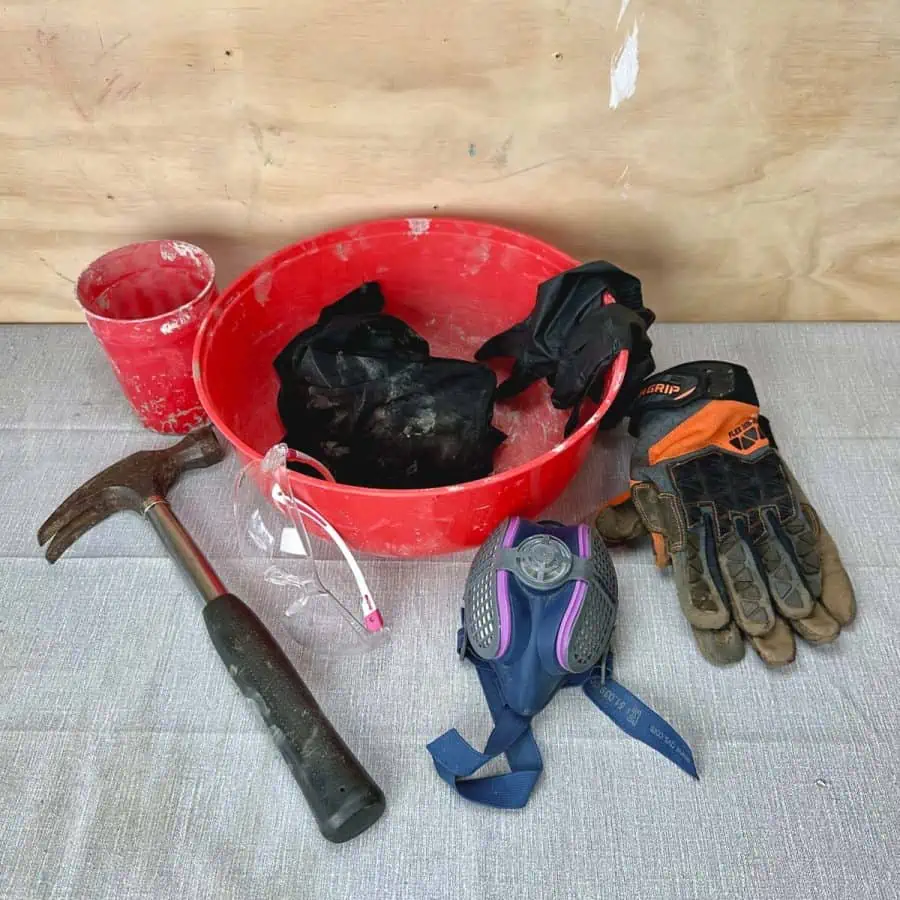
DIY Concrete Sphere List Of Materials
- Round light fixture cover 6” -plastic*
- Portland cement*
- Play sand or All purpose
- Disposable cup (for scooping mix- measures 3 actual cups)
- Disposable bowl
- Durable nitrile gloves
- Safety glasses
- Safety mask –rated for silica dust
- Hammer
- Work gloves or gardening gloves
- Old towel or cloths
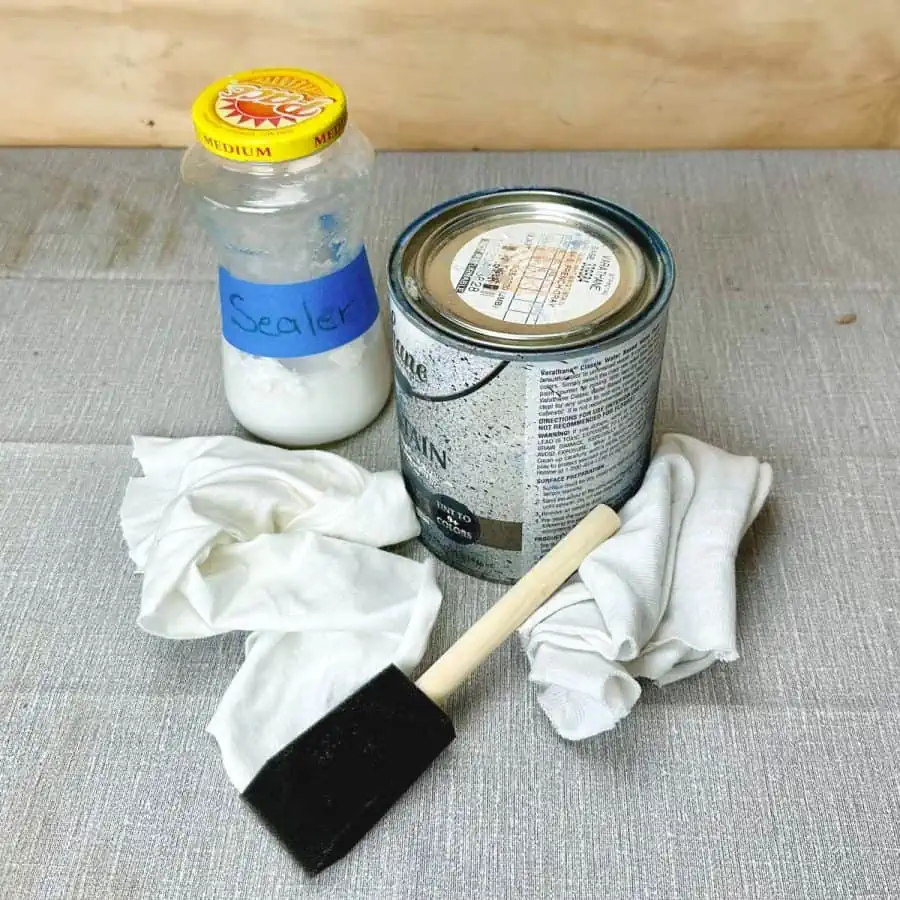
Optional:
- Wood stain– water-based*
- Foam brushes
- Staining rags
- Concrete sealer
Materials Notes:
Round Light Fixture Cover

These come in plastic or glass. Please read my statements during the introduction above regarding why I much preferred working with the plastic/acrylic fixture covers.
A glass globe is okay to use, but you have to be careful that it doesn’t crack when you cast it.
Do not vibrate it to release the air bubbles. Just let it be. Also, take extra care when demolding.
Also, a globe with a threaded neck may be more challenging to demold. Try to find one that doesn’t have threads.
A note about sizing: the globe light covers come in different sizes, and often the listed size refers to the size of the neck- like 3″ +/-.
However, there are different diameters of the actual globe. The most common is 6″, like mine.
Portland Cement/ Concrete Mix
I made two concrete spheres and used a different mix for each. I used my trusty rapid setting Cement All mix for the glass one.
And with the acrylic one, I used portland cement and sand. I don’t love dealing with mixing ratios because I can easily confuse myself.
So if you are like me, I recommend choosing Quikrete’s Sand Topping Mix.
It will be the same color as the portland cement and doesn’t require adding any sand.
Wood Stain
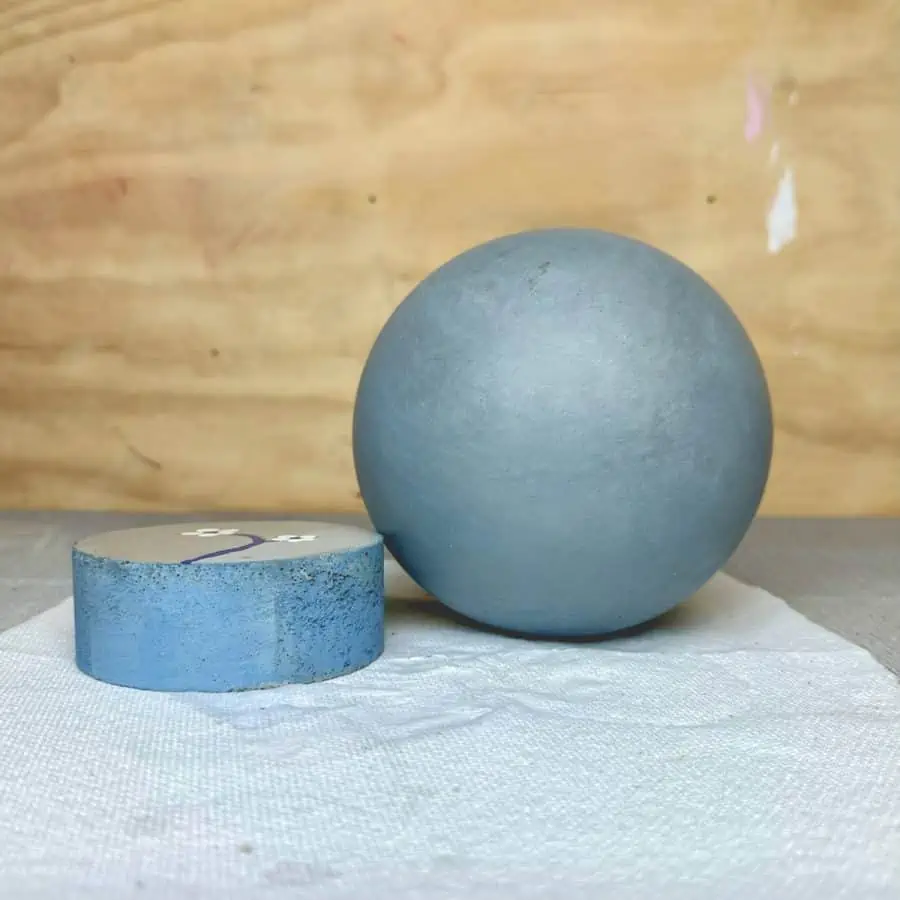
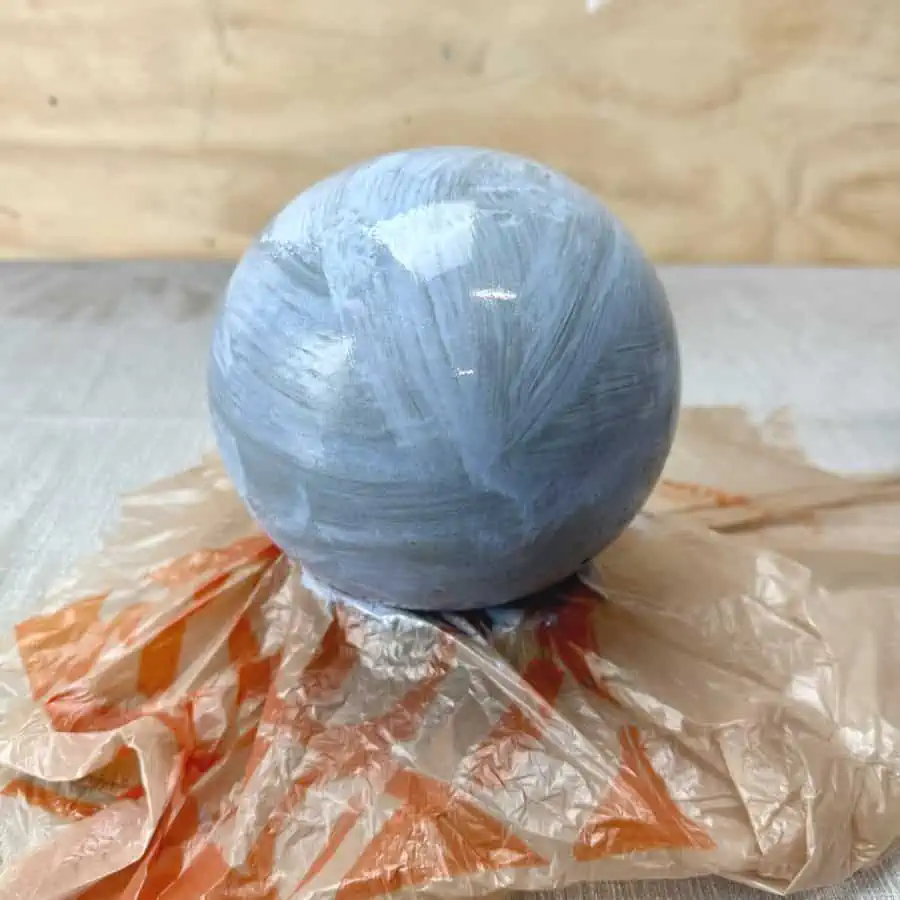
The wood stain I used was old, and its pigment wasn’t mixing well with the base.
This caused the coloring to be less concentrated. I have a test piece from the first time I used the stain fresh from the can.
You can see how it is a brighter color. Also, please take notice that the concrete orb I stained is the grey one, not the off-white one.
The off-white orb will have a brighter result. The stain example above is also applied to grey concrete.
In other words, you can expect your concrete to take the color better and be slightly brighter. Oh, and the color was French Grey, but they don’t make it anymore. However, you may be able to get it still as a custom color.
You may be able to get it as a custom color though. Varathane doesn’t make as many pastel colored stains as they used too, but I saw recently that Minwax does.
Step By Step Instructions For How To Make A DIY Concrete Sphere
Step 1. Prepare The Mold
Place a towel or cloth underneath the globe to keep it upright. You can also use a roll of blue tape underneath it to support it.
Do not use a roll of tape if your globe is glass. This will apply too much pressure against it and likely cause it to crack.
Step 2. Mix The Cement or Concrete
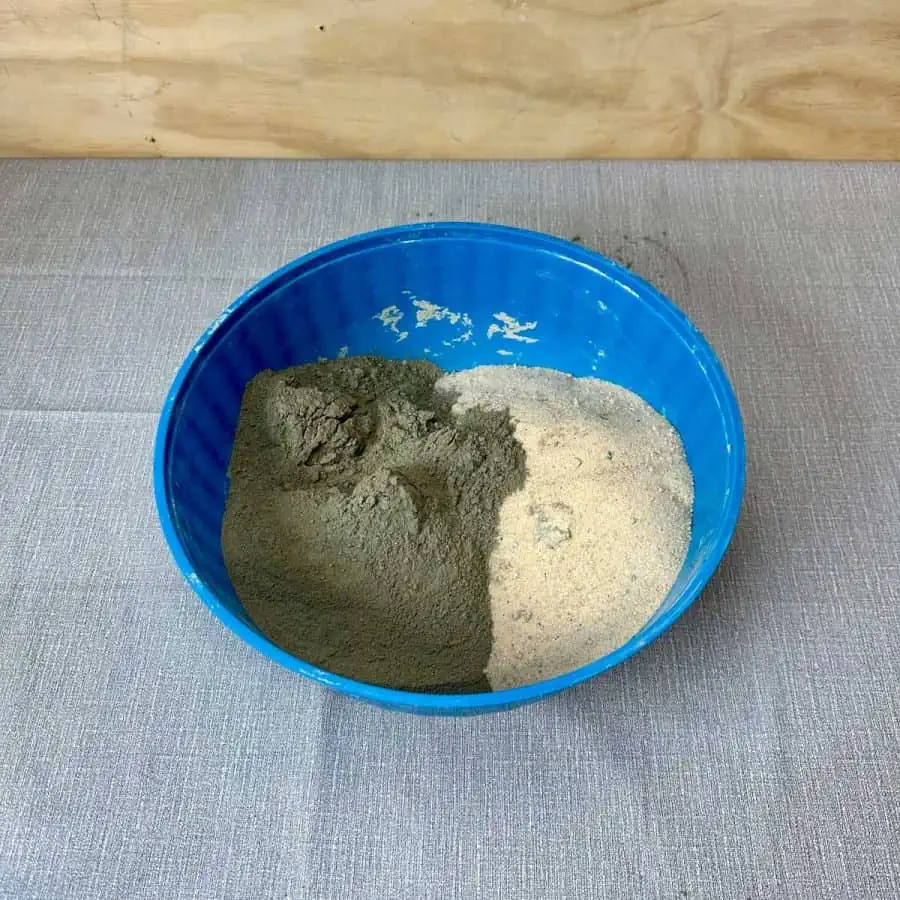
For portland cement: You can use different recipes for this, but the 2:1 ratio of cement to sand worked great.
First, scoop 6 cups of portland cement into a bowl, then add 3 cups of sand. This is your 2:1 ratio. This should be more or less how much you’ll need.
You may need a cup more of each. So to be safe, scoop one more cup of each and set the cups aside separately- not mixed together.
This way, you won’t waste any mix, and you can add more if needed.

Now mix the large bowl of cement and sand. Once combined, add water.
The mixture should be like thick brownie batter. It should move easily (with some flow) but not runny.
For the rapid setting mix: Just mix the cement with water. You’ll need about 12 cups of dry mix.
When mixed with water, it should be the texture of brownie batter and have some flow but not be runny. See the photo above for the consistency.
Pour or scoop this into the globe.
If your globe is acrylic, gently vibrate by tapping the sides with your fist.
The reason for vibrating is to help make the concrete sphere smooth and help eliminate air holes on the finished surface.
While vibrating, you will see the air bubbles rising to the surface. Do this for 1-3 minutes.
If your globe is glass, do not vibrate it! This is what happened when I very gently vibrated my glass fixture.
Let the portland cement mixture cure for a minimum of 48 hours.
Let the rapid-setting cement cure for a minimum of 18-24 hours.
Step 3. Remove The Concrete Sphere From the Mold
First, wear work or gardening gloves to protect your hands from sharp edges. Then put on safety glasses.
Acrylic globe:

Cover the globe with a cloth, an old shirt, or a rag.

Start at the neck of the globe and hammer the neck off.
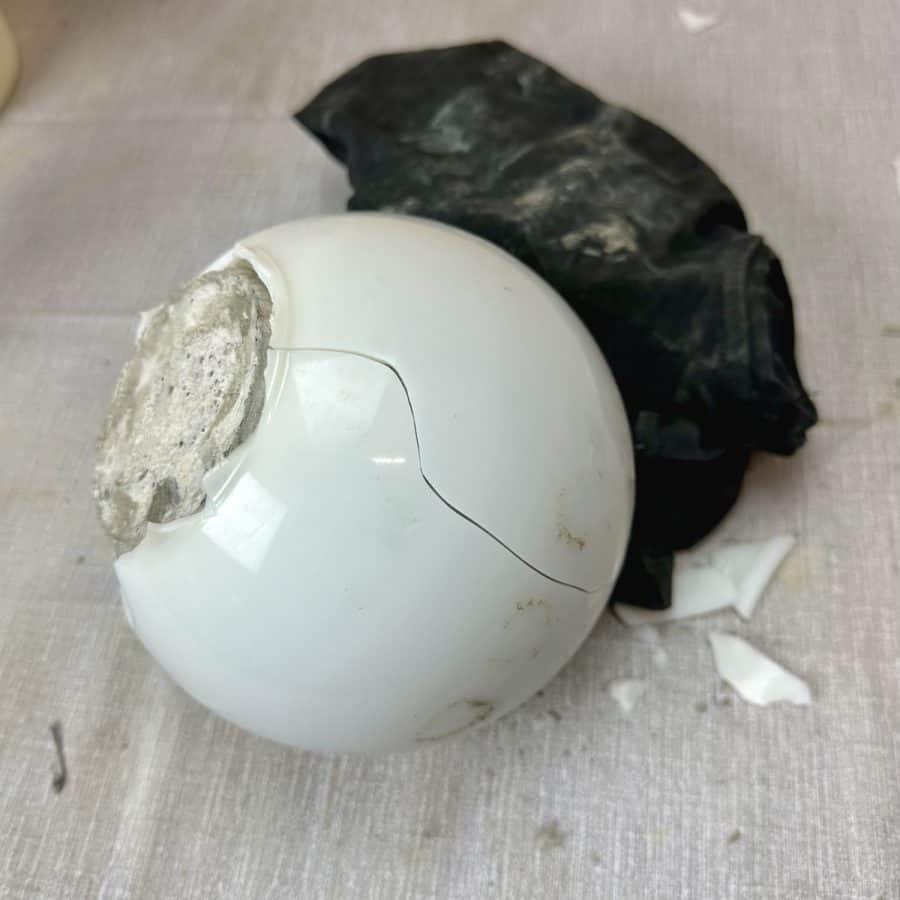
Once most or part of the neck is off, it should reveal an opening at the edge of the concrete, and hopefully, a long crack has appeared or is starting.

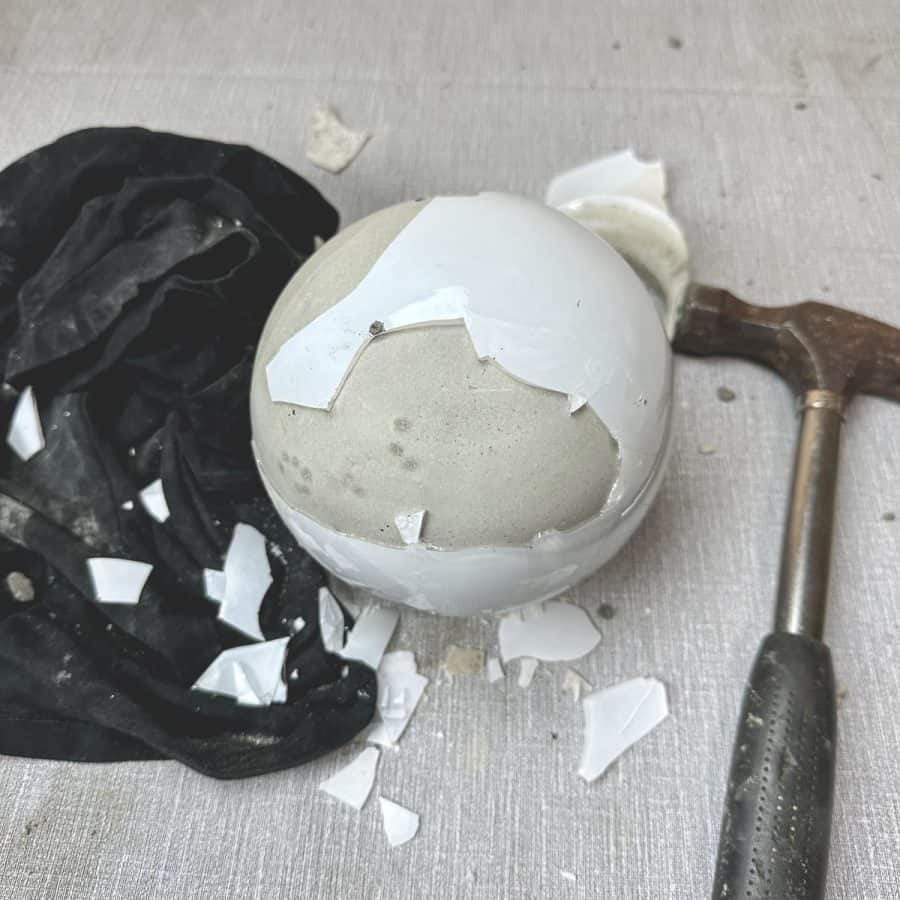
At that point, you want to use the hammer to tap and push that piece away from the concrete sphere.

Doing that should widen the crack and opening. And now you will be able to easily pull the pieces apart.

Glass globe:
You’ll do the same for a glass globe as above, but after hammering the neck, you will just continue around the globe.
You may have better success than I did, and the broken glass may come off in larger pieces.
Also, you may have to keep removing your cloth to see where to hit the glass next, but keep working your way around until all the glass is off.

Take care when cleaning up the glass. I used a couple of paper towels to slide the glass into my mixing bowl and then dumped it in the garbage.

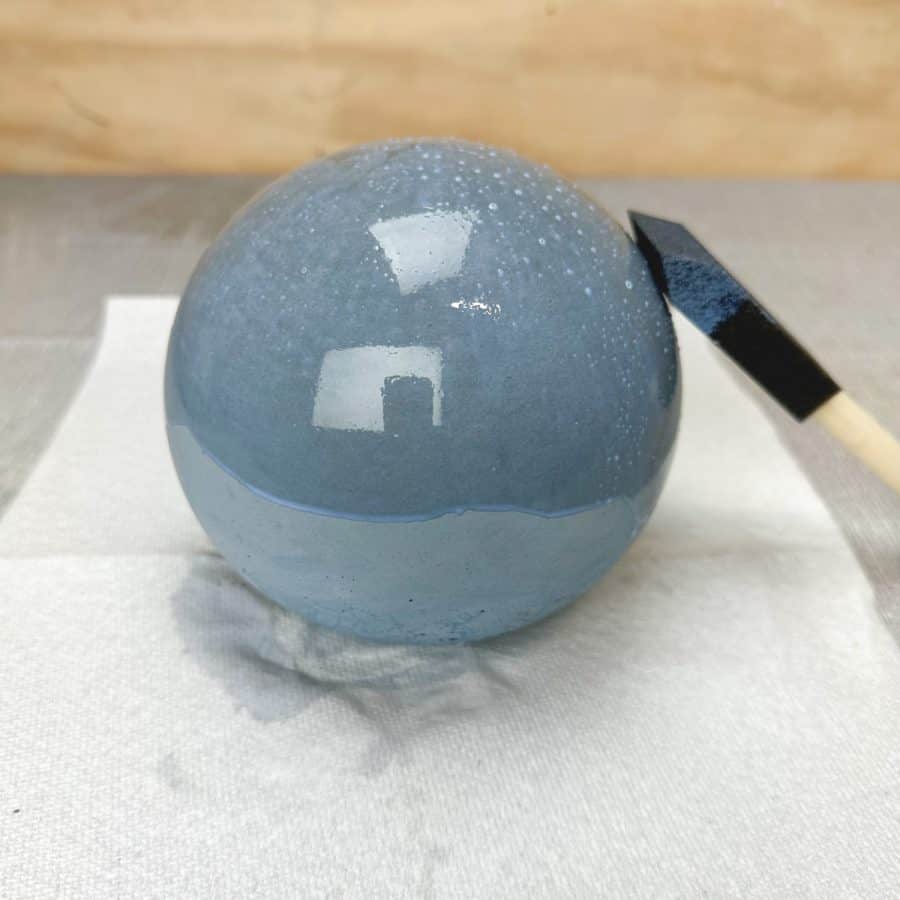
Step 4. Stain The DIY Concrete Sphere -Optional

Note: This stain is about 3 years old, and when I mixed it, the pigment wouldn’t mix in thoroughly, so the result was less concentrated. Usually, the wood stain will have a brighter effect. See the materials note* for details.
Let the concrete sphere sit for another day so that it dries completely.
When it is dry, use a cloth to wipe away concrete dust.
Then use a foam brush to stain it with the wood stain. Let the stain sit for about 3 minutes, then wipe away the excess.
To darken it, you can reapply immediately or wait 1 hour for deeper results.
Step 5. Seal The Garden Orb -Optional
I had great success using this stain in the past on a concrete planter.
The coloring held up great outdoors without using a sealant to protect it, but sealing it will offer better protection from fading.
To seal it, just add some sealer to a cup and use a foam brush to apply the sealer to the DIY concrete sphere.
For added protection, wait 15 minutes and add a second coat.
When you’re finished, place your concrete sphere in your favorite outdoor space to enjoy.
For other ball-shaped concrete projects, check out the cement ball planters, and tiny sphere planters, from a two-part silicone mold I made.
And an awesome thing to do on a rainy day is to color! Here are coloring pages of gardens and gardening, and also for plants.
Don’t forget to Pin it for later!

Easy DIY Concrete Garden Sphere
Create a unique concrete sphere in less than an hour. Learn the easy DIY steps on how to make your own cement orb, sphere or ball with this tutorial.
Materials
- Round light fixture cover 6” -plastic*
- Portland cement*
- Play sand or All purpose
- Disposable cup
- Disposable bowl
Tools
- Please see the full materials list above the tutorial for details and links.
Instructions
- Prepare The Mold By Cratering It In A Towel
- Mix The Cement or Concrete To A Brownie Batter Consistency
- Remove The Concrete Sphere From the Mold Carefully With A Hammer
- Stain The DIY Concrete Sphere With a Foam Brush And Stain -Optional
- Seal The Garden Orb To Protect It From The Elements -Optional


I am confused with the ratio of cement to sand that you specify.
“First, scoop 2 cups of portland cement into a bowl, then add 2 cups of sand. This is your 2:1 ratio. ”
This is a 1:1 ratio. A 2:1 ratio would be 2 cups of cement to 1 cup sand.
The photo appears to have similar amounts of cement and sand, which would mean there is a 1:1 ratio.
Please clarify.
Hi,
Thanks for the catch! I was supposed to go back to my notes and update this part before publishing-in part because my “cup” is not a true cup. Anyway, it is a 2:1 ratio, but it’s 6 cups of cement to 3 cups of sand- this is approximate, but it was pretty close to that. The tutorial is now updated to reflect the correct amounts.
There’s a lot more cement in the bowl than sand- the cement is higher. Equal amounts would have made this mix unworkable for this project- and too heavy for sure if you are using a glass globe. I did it twice, both times with double cement.
I have all the supplies/materials, and anxiously waiting for spring to do this project. Have you ever tried mixing latex household paint into the concrete mix for color? If so, did it turn out well?
Hi Edie,
I have. It works similarly to acrylic paint. It does an okay job at pigmenting the concrete, but you kind of have to use a lot, which makes the concrete brittle. So you have to balance it carefully. I never pursued it past the first test because for the cost, acrylic was a better option. And the left over house paint colors I had weren’t appealing options for concrete.
Also, many acrylic paints are made with different ingredients and some make the concrete more brittle than others. I have two articles about this. The original about coloring concrete: https://artsyprettyplants.com/concrete-crafts-pigments/, and a follow up: https://artsyprettyplants.com/best-concrete-colorant/. I recommend reading them in that order.