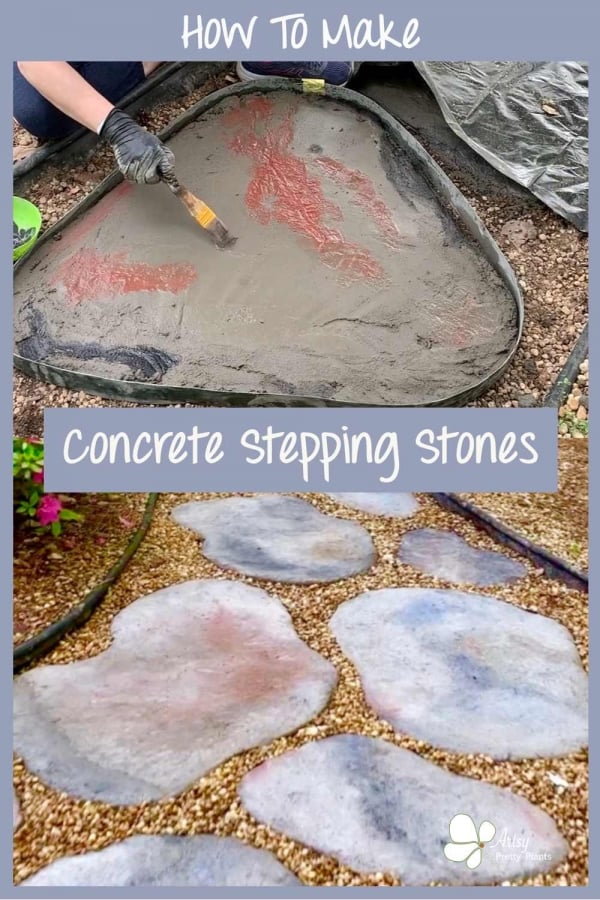
DIY Concrete Stepping Stones: To Mimic Natural Stone
Here’s how you can create concrete stepping stones that mimic the look of natural fieldstones or flagstones. Not only do they add charm, but they’re also practical! After going through the process of making these, I know they take a bit of work, so I’ve made sure to provide lots of details to help make it easier for you.
DIY DIFFICULTY LEVEL | Moderate
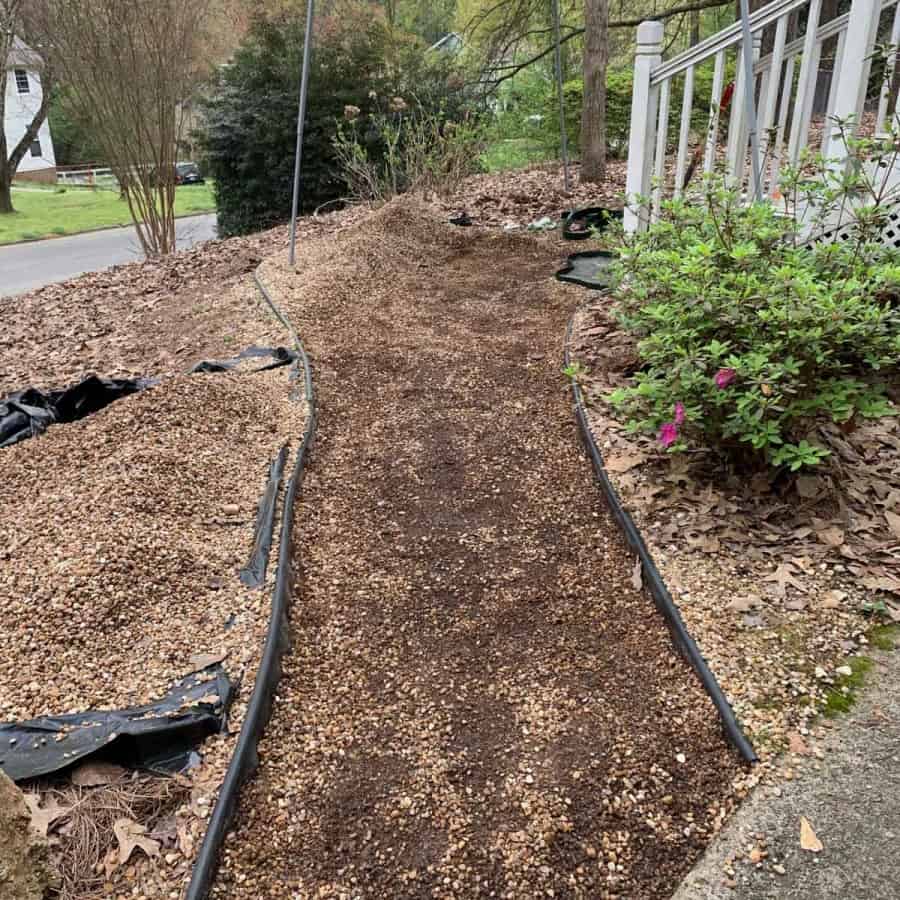
When we first moved into our rental home, using the front door was challenging.
The existing path, a 6-inch deep sea of pebbles, felt more like trudging through quicksand –I kid you not. Clearly, the path needed a rethink.
Enter the need for functional stepping stones. These are sometimes called garden stones, paving stones, or pathway stones.
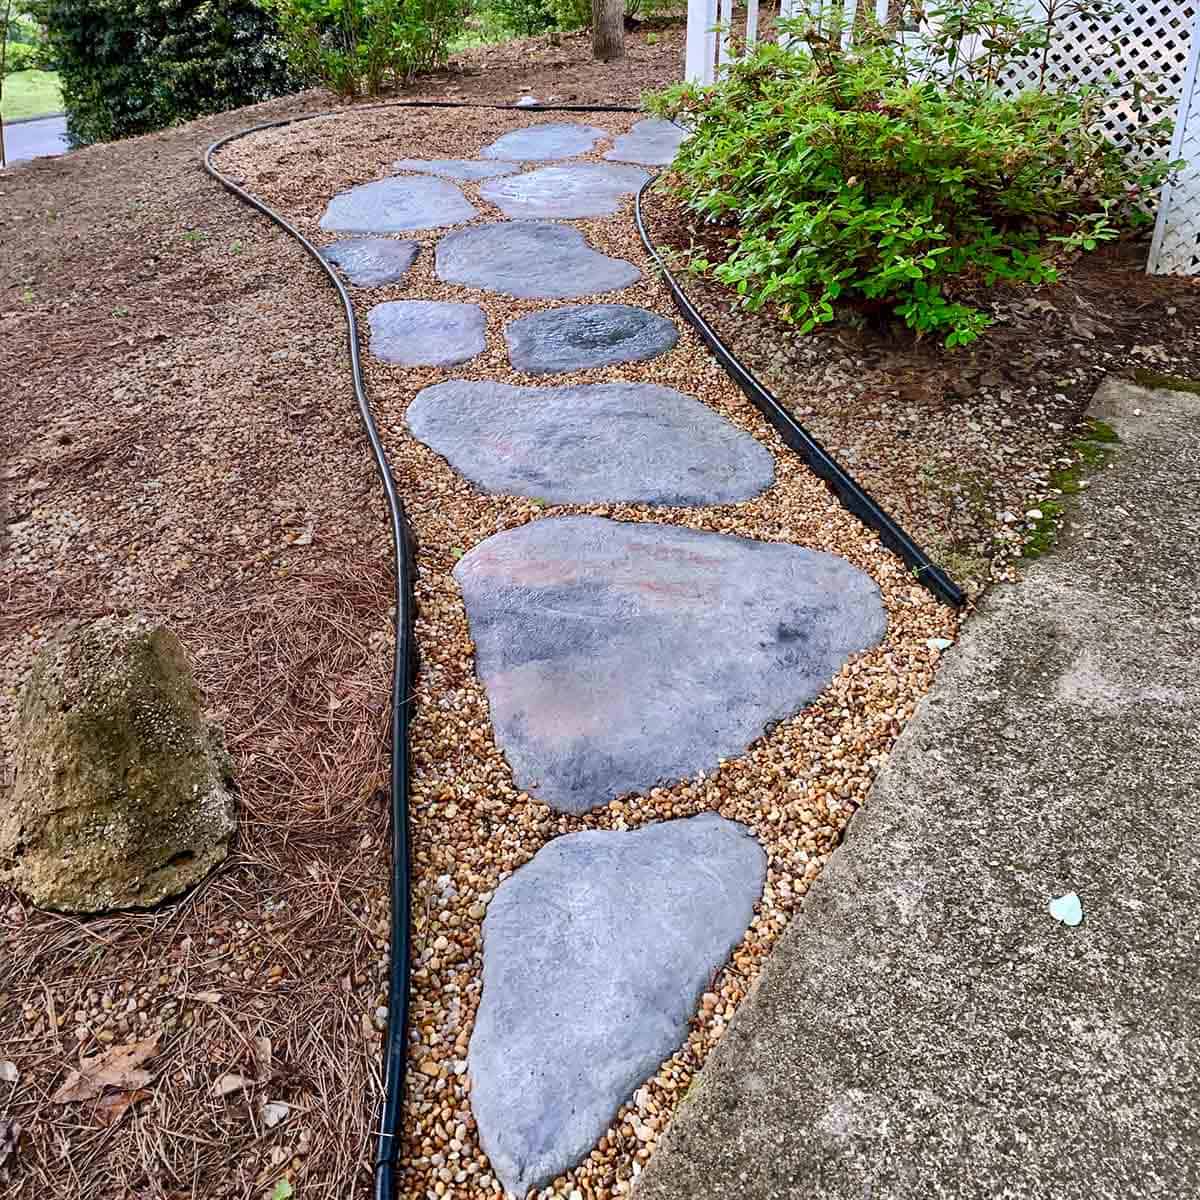
Regardless of the term, they have one important objective –to help get you from spot A to spot B. And so I set out to make my own that look natural.
Why Make Concrete Stepping Stones Instead Of Buy Them?
Opting for making stepping stones over buying them offers a cost-effective and custom approach. I chose a pour-in-place method for ease and efficiency.
It also minimized ground prep due to the self-leveling nature of concrete.
The pour-in-place method and using the right concrete mix (more on this below) laid the foundation for durable and aesthetically pleasing stepping stones.
If you’re not up for DIY’ing your stones, you might want to check out my tutorial on installing a concrete paver patio, where I purchased pavers instead of making them.
What’s The Best Stepping Stone Mix?
Selecting the correct mix is crucial for your success.
For stones with a 2″ thickness, Quikrete’s Sand Topping Mix is ideal. It’s specifically designed for up to 2″ thicknesses, ensuring durability without the need for reinforcement.
If your stones are thicker, you’ll need a different mix, so always read the labels and stick to the recommended thickness from the manufacturer.
No Reinforcement Needed
Contrary to what some might think, these stepping stones don’t require reinforcement like chicken wire or rebar, provided they don’t exceed 2 inches thick.
This insight, confirmed by Quikrete’s customer service, underscores the strength and resilience of the chosen mix —even in freezing conditions.
DIY Stepping Stones That Look Natural Video
Please click the button to subscribe to my YouTube channel and be notified when I have a new video tutorial!
A Lasting Impact: UPDATE 1 ½ years later
Fast forward 1 ½ years, and the stepping stones still look great, with only minor natural wear and staining from leaf debris. This project remains a highlight for its practicality.
However, if DIY seems too daunting, my article weighing the pros and cons of DIY versus professional installation may help steer you in the right direction.
Some of the links on this page have been provided as a convenience for finding materials. These links may also be affiliate links. As an Amazon Associate I earn from qualifying purchases, at no extra cost to you.
I only recommend products I’ve used and loved, unless otherwise stated. Click here to read my full disclosure policy.

The techniques are actually quite easy, but since the concrete is heavy to deal with, and this project will require a lot of crouching and squatting on the ground. Due to the physicality of it I’m rating this project as moderate difficulty.
Materials For Stepping Stones with Concrete
- *Sand Topping Mix – I used (7) 60lb bags- see Materials Details below
- Dust mask
- Fabric pegs/stakes
- Vinyl furniture strapping or vertical vinyl blind slats
- Large mixing bin or wheelbarrow
- Trowel
- Hoe
- Black, red and blue colorant
- Yellow or blue tape
- Mask
- Coarse paintbrush – 1″ or 2″
- Disposable cups or bowls
- Plastic bags
- Rubber gloves or durable nitrile gloves
- Work gloves
- Sealer –optional but recommended
- Wheelbarrow –if you have one (for carrying the concrete to the stone location)
Preparing for Your Project
Before making these, I recommend watching my video tutorial above for visual guidance, especially for molding and coloring techniques. This written tutorial will provide a lot of additional, important details I couldn’t fit into the video.
Calculating Material Needs
To estimate the amount of concrete mix you’ll need, consider the size and number of stones you plan to make.
My aim was to create a mix of large and small stones, totaling 9 large stones (or 5 large and 4 small to medium-sized ones), each approximately 3 feet by 2 feet and 2 inches thick.
I used Quikrete’s online calculator initially, but it wasn’t very accurate, so you can skip it. Each stone used slightly less than a whole bag of mix, considering that existing pebbles in the ground took up some space.
Keep in mind; you might need more mix depending on your project’s size.
As a safe bet, assume one bag of concrete mix per large 3′ x 2′ DIY concrete stepping stone. Determine how many stones you’ll need for
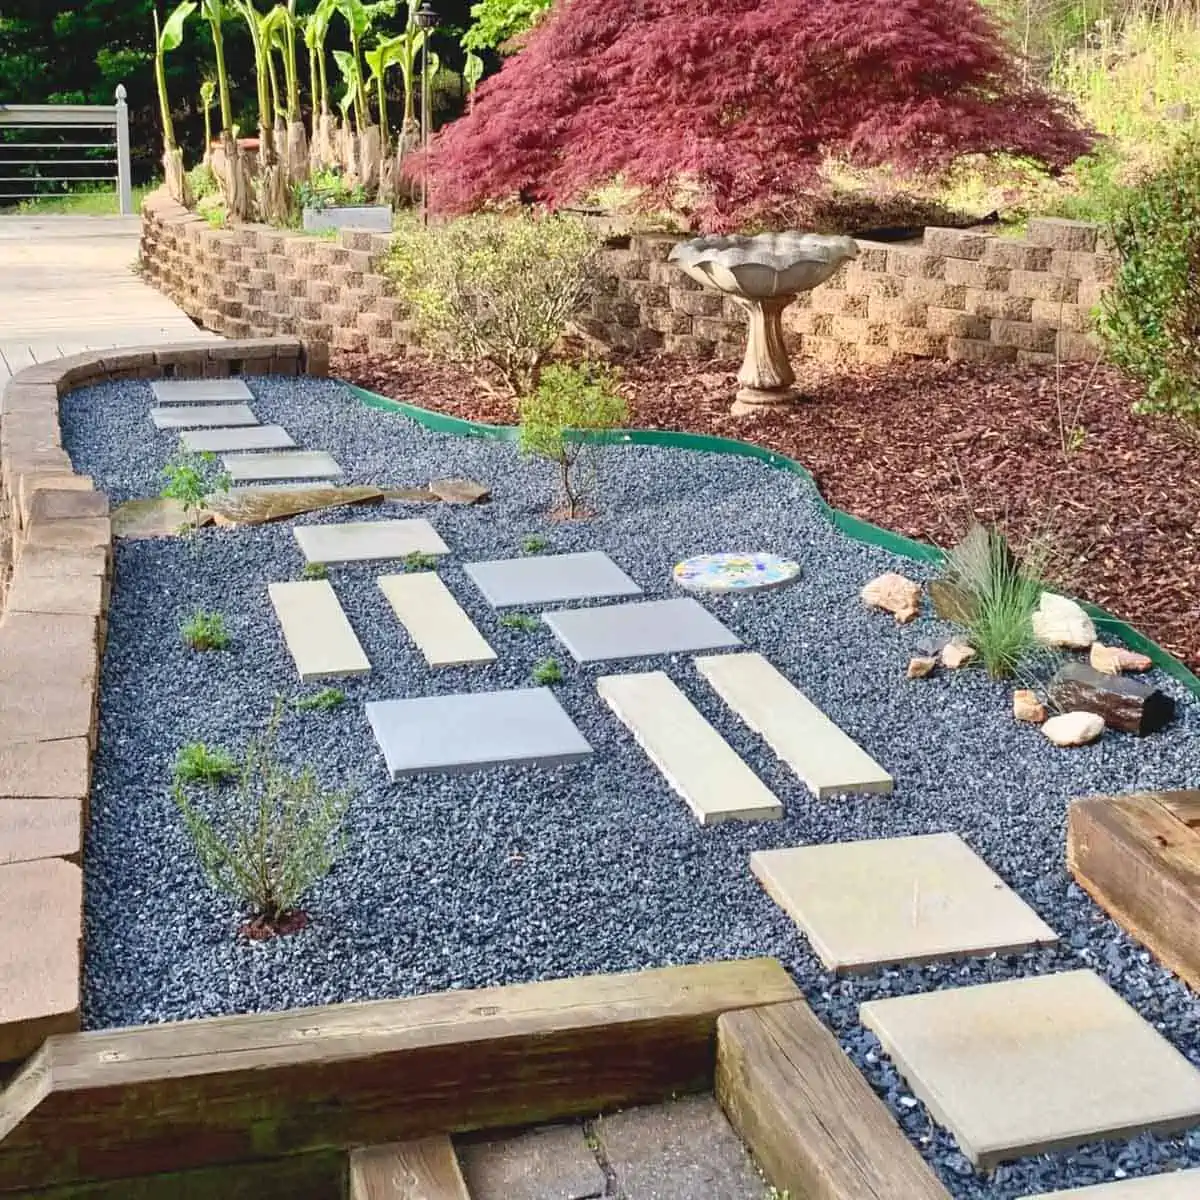
Creating A Layout Template For The Stone Path
To plan the layout for your stepping stones, start by sketching out how you want them to look. Then, use ropes as temporary molds.
Garden Planner!
Printable PDF Download
$2.99
Everything you need to plan your garden.


This will subscribe you to my newsletter where you’ll get updated when I have a new post, or tips and tricks. You are free unsubscribe at anytime.
Lay pieces of rope onto the path and shape them into the desired sizes for your stones. This will help you visualize the layout and number of stones you’ll need.
Choosing the Right Mold
For my reusable stepping stone molds, I used vinyl chair strapping, the kind typically used to repair vinyl strap outdoor chairs.
Alternatively, you can consider using vertical vinyl blind slats as a more budget-friendly option.
These straps are versatile and can be molded into different shapes, making them a great choice for this.
Since concrete sets in about an hour, working on three molds at a time was manageable, as removing the straps and moving on to the next stone was feasible within 10-20 minutes.
Pro Tip: If you buy concrete mix from a big-box store, you can return unused bags. So, it’s wise to purchase an extra bag just in case.
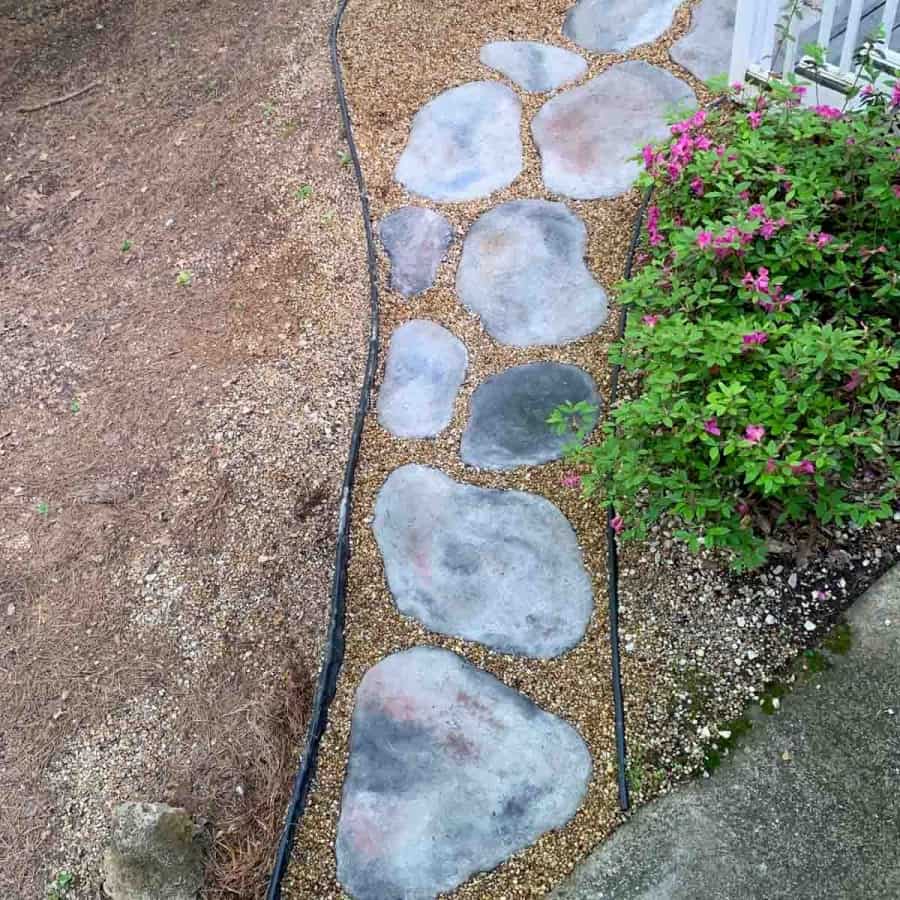
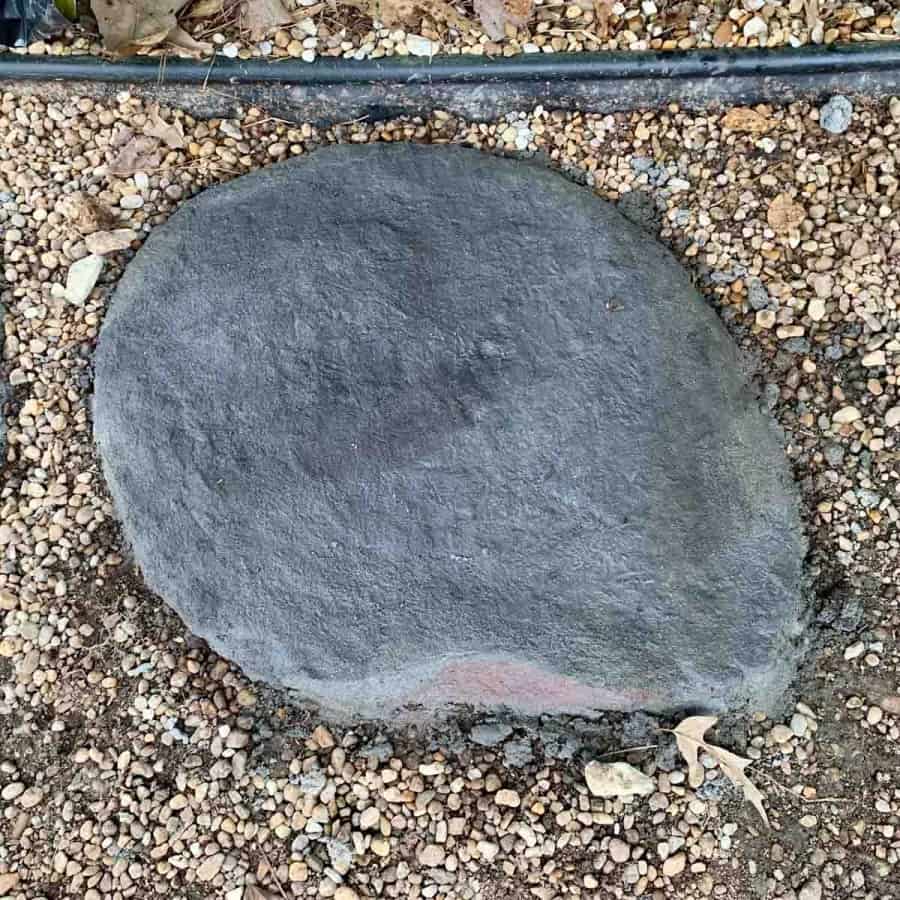
Tips For Achieving Natural Stone Color And Texture

My goal was to give the stones a natural appearance, similar to real fieldstones. Fieldstones come in various sizes, shapes, and colors, so it’s essential to find the style that appeals to you.
I recommend you do a Google image search for fieldstones or flagstones to get inspiration.
Keep in mind that the Sand Topping Mix typically cures to a frosted pale grey, almost white. It’s different from the color it appears when wet, which looks much darker.
To avoid surprises, make two test pieces before starting your stepping stones project. Create one test piece that’s approximately 1’x1′ and 2″ deep. Test the coloring by brushing colorant on one side and leaving the other side natural for comparison.
For the second test stone (approximately 6″ x 6″ and 2″ deep), add charcoal colorant into the mix instead of brushing it on.
A starting point would be about half a tablespoon if using liquid colorant. Refer to Steps 4-6 for detailed instructions on coloring the test pieces.
Let these test pieces cure for at least three days or longer to see the final color. This will help you avoid costly mistakes and adjustments when working on your stepping stones.
Don’t let this process intimidate you; making the stones is easy and enjoyable, especially when coloring them. You’ll have plenty of opportunities to fine-tune the color as you go along.
Before diving into the tutorial, you may find it helpful to read my article comparing different concrete mixes and sealers, titled “Cement & Concrete Crafts Tests.”
Another valuable resource is “Making Cement Crafts Techniques & Tips,” which provides information on cement materials, mixture consistencies, demolding, safety, and cleanup. These resources will help you achieve the best results in your concrete stepping stones project.
Tutorial For Making Concrete Stepping Stones
Step 1. Prep The Space
Now that you have a good understanding of the coloring, you can prep the space.
I didn’t have too much prep to do for this path.
The path was already there but was covered in pebbles, so I shoveled all the loose pebbles out the areas I would be placing the stones.
The ground was not in the least bit level, but I didn’t worry about leveling because I knew the concrete would self-level to some extent.
Plus I didn’t mind if they weren’t perfectly level. You can always do the leveling at the top of the concrete stones.
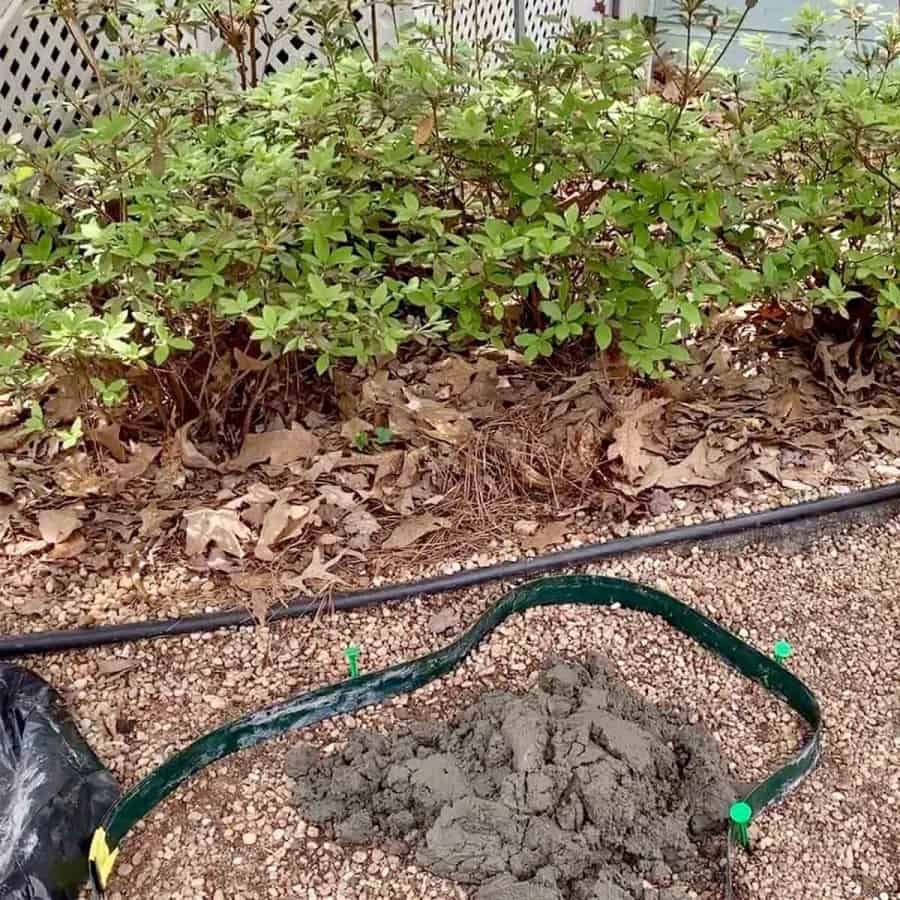
Step 2. Put Together The Stepping Stone Mold
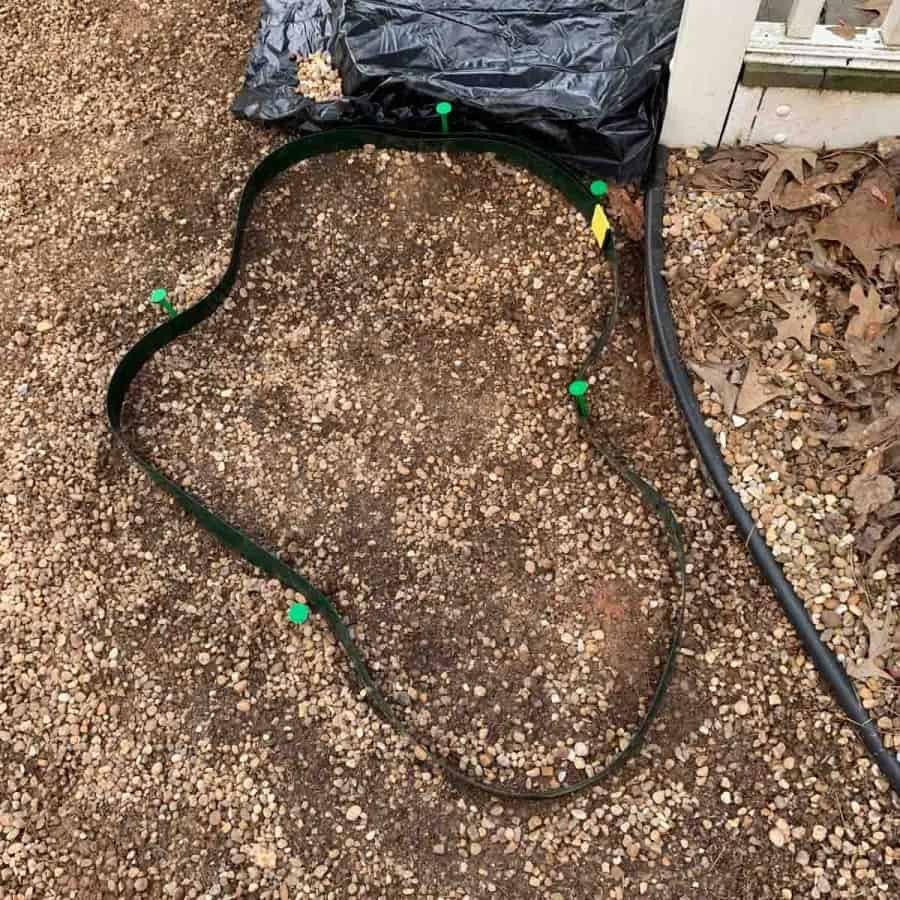
Use tape to join the ends of the vinyl straps together.
Depending on the size, I sometimes overlapped the straps rather than butting the ends into each other.
Toward the end of my stone making, I skipped taping the ends together. The reason is that the mold held its shape without the tape.
This is because I was able to push some extra pebbles up against the sides.
I even started pulling the mold off right away. It’s up to you and how comfortable you feel.
Take the garden stakes and push them into the ground. Place them around the outside of your mold wherever you feel it needs support.
These are what you will manipulate to get the general stone shape.
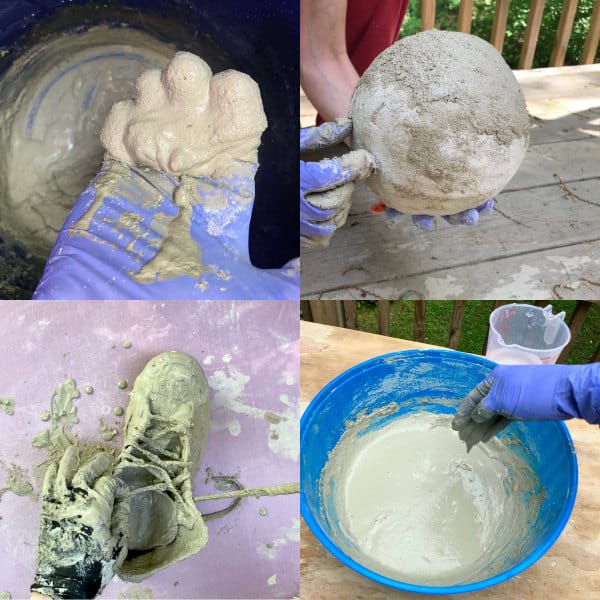
Step 3. Mix The Concrete
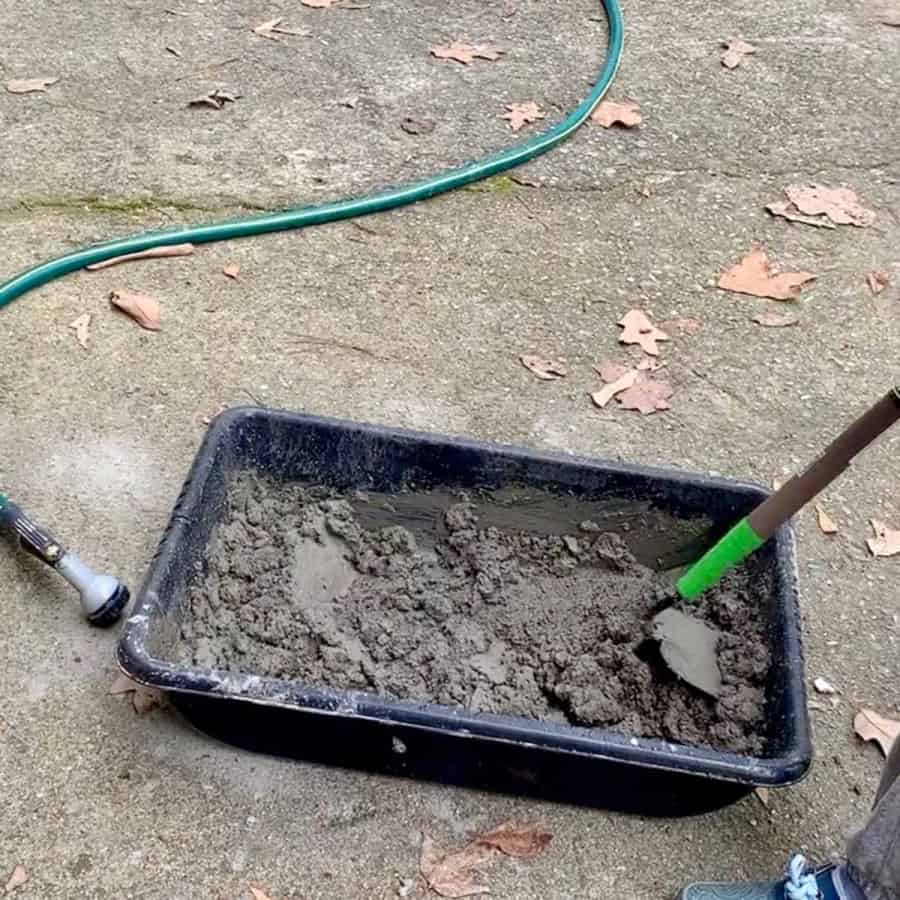
Using the hoe, mix the concrete with water. It will be easier and less dusty if you first add some water to your mixing bin or wheelbarrow.
Then pour in the dry concrete mix –but do this in small batches.
If you try to do it all at once, it will make it very difficult to mix in such a large amount.
Mix the concrete and adjust by adding more water or concrete. The right consistency to aim for is a peanut butter-like consistency.
It will probably be easiest if you mix what you think you’ll need for the whole stone, but separate a section that will be the top ½”.
Just don’t color it yet, you’ll do this after the base layer is in place.
Step 4. Cast The Concrete
My methods evolved over time. I finally decided that just dumping the concrete into the mold was the best way to go.
If this is easiest for you then go ahead and just pour it directly into the mold.
Otherwise, you might find it easier to use a shovel to place the concrete.
Only pour in the mix that is reserved for the 1 ½” base layer.
Spread the concrete around with your gloved hands first, and be sure to get it right up to the strap edges.
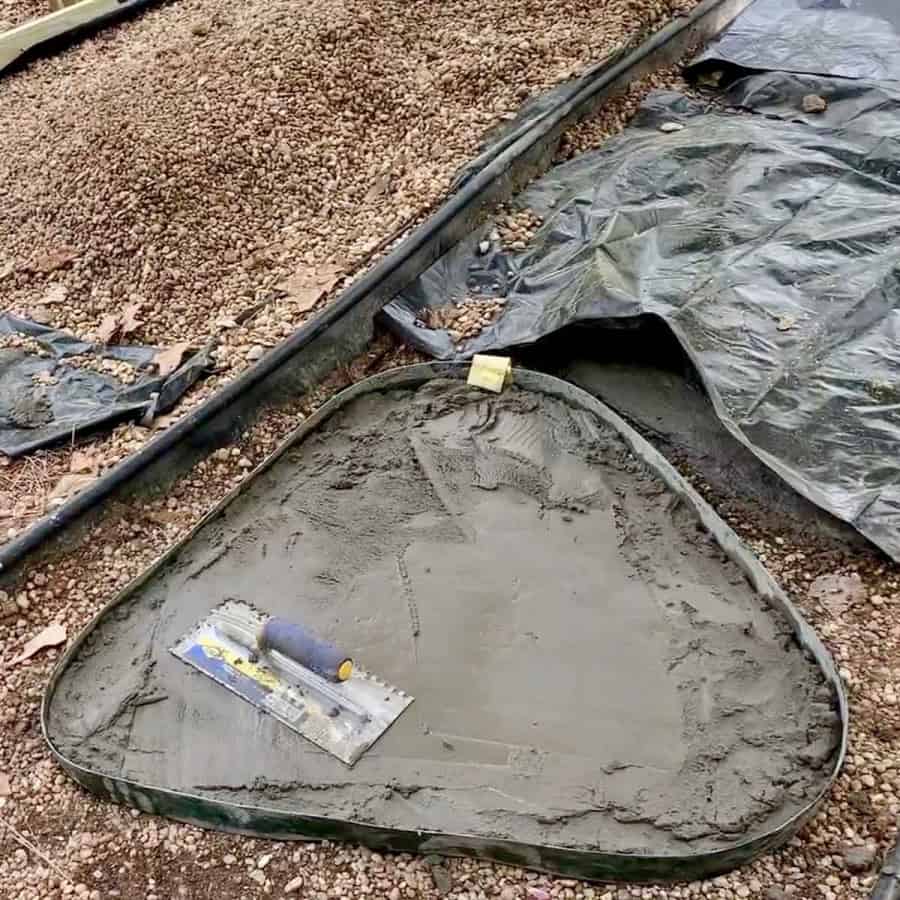
Next, use the trowel to level the concrete. Keep the trowel at a slight angle and just sweep it back and forth.
Step 5. Coloring The Base Layer
Now go ahead and add the charcoal colorant to the remaining mix you had separated and mix it in well.
The amount you add will have been determined from the two pieces you tested before beginning the project.
Once the coloring looks even, pour it on top of the base layer.
Use the trowel again to get it level and smooth. Hold off on applying the brush on color for now.
Your timing will be more efficient if you start your next stepping stone.
Since I did most of this project by myself, I found it was easiest to go mix another batch and set up the next mold, pour it and lightly level it.
Then come back to the previous mold and remove the strap.
The reason for my timing on this is because the concrete will have started setting and will be moldable enough. The set time should be about 15-25 minutes.
Your workability time (the time before it becomes too difficult to mold or add colorant) for these stepping stones should be about an hour, depending on climate conditions.
Step 6. Fine Tune The Shape And Prep For Accent Coloring The Concrete
After you have started the next stone mold, feel the concrete to see if it has some form to it. If so, then remove the vinyl strap.
Now use your gloved hand to shape the edges. Round them a little, and push them inward to create more of a curve if you want.
You may also want to slant to the edge.
Now you will want the following supplies near the stone you are coloring.
Plastic bags; a coarse paintbrush; a small bucket of water; a rag for clean up and various colorants of your choice, along with a bowl or cup for each.
In addition, for each color you have, you should also have one cup of water, plus you may find it helpful to have one more extra cup of water.
Pour some of each colorant into its own bowl/cup. If your pigment is a powder, then mix some water in with it.
Place the extra bowl/cup of water next to each color.
Accent coloring the stones is kind of like painting watercolors, they require lots of blending.
This is why you have extra cups of water. The small bucket of water will be for cleaning up the brush and your hands.
The main colors I used for this brush-on coloring technique were charcoal, red and a little blue.
Step 7. Artistic/Accent Coloring Of The Top Layer
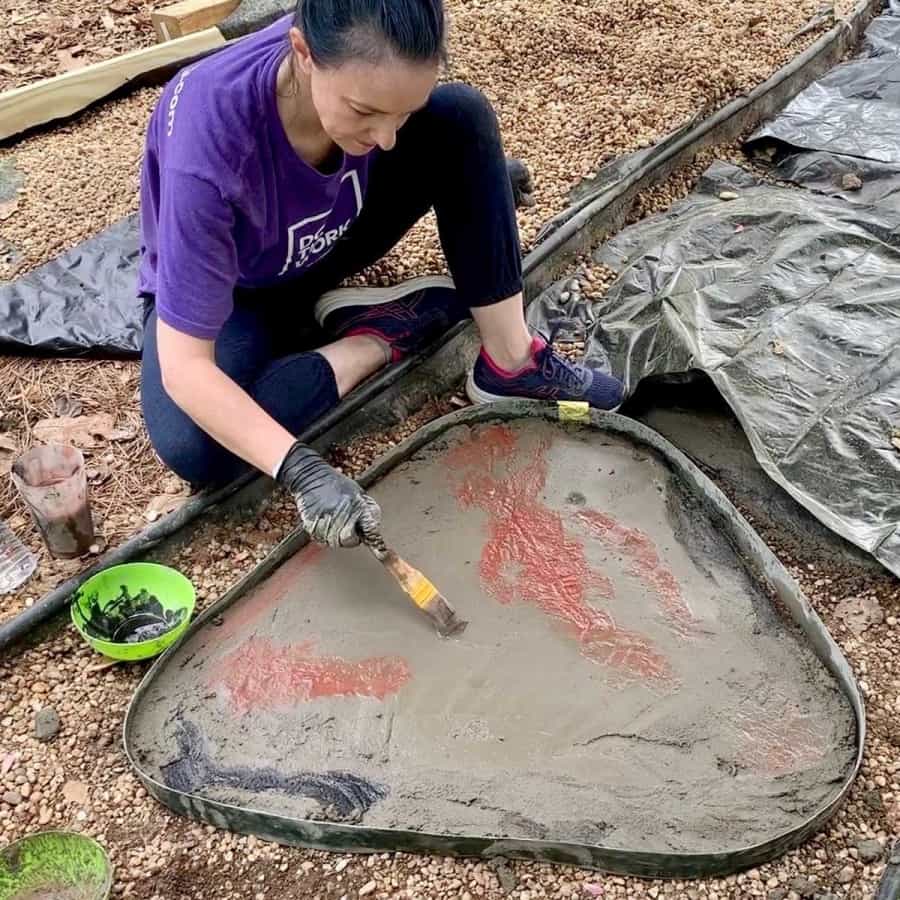
Take the coarse paintbrush and dip it into the first color and then into the water.
Apply this in a brushing motion to the stone where you want to add color. Blend it into the top layer of wet cement and just play with it.
If you are using red, then go lightly with it because it tends to be highly pigmented and you only need a little to get the color to come through.
Blend these colors into the stone and into each other the way you might with a watercolor painting.
You can dip your brush back into the water to help with blending. Don’t forget to get the edges.
You can play with this by adding water to help mute the color.
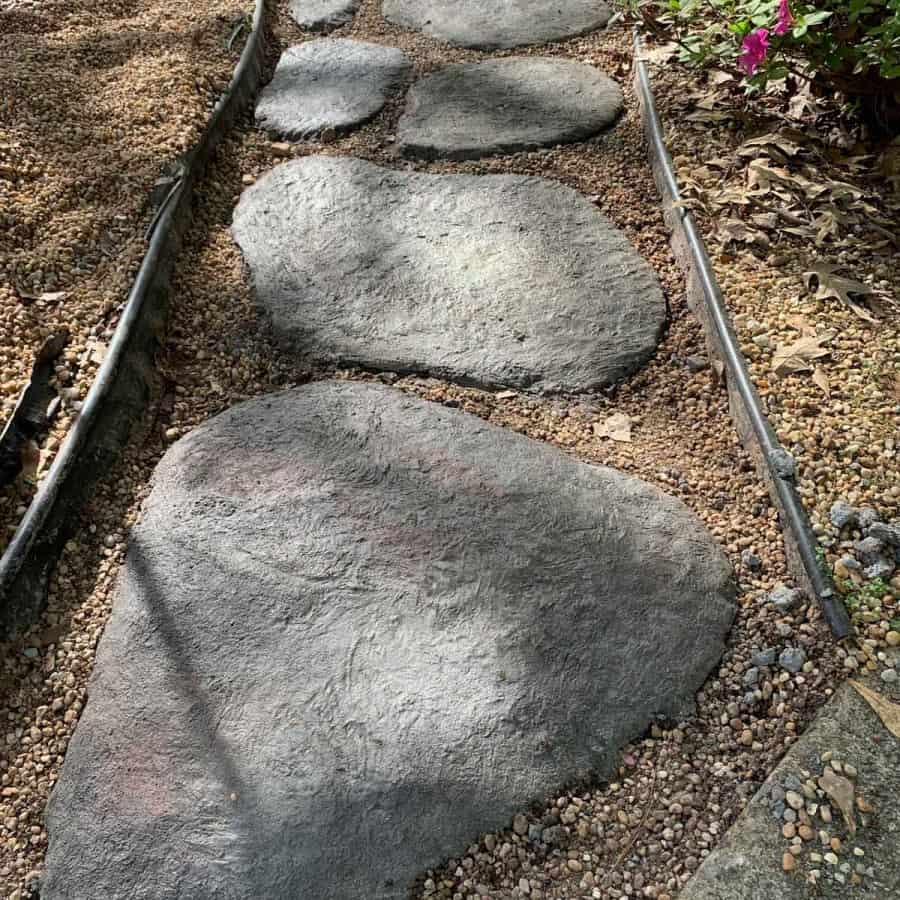
Step 8. Apply A Stone Texture To The Top

Now you will use the plastic bag to achieve two things, one is to blend the colors more and the other is to create the stone-like texture.
Place the bag on your hands and pat the top of the concrete. Keep patting until you like the way the texture and blending look.
The bag really ended up being a great way to get a nice rippled texture of natural stone into the wet cement.
Step 9. Let It Cure
Now continue these steps with the rest of the stones. Technically, the stones will reach their full cure in 3-4 weeks- meaning their full strength.
I was able to carefully walk on them after about 24 hours, but you should wait 3-5 days before you allow any foot traffic.
If you are wondering about needing to cover these with plastic while curing, per the concrete representative at Quikrete, it is not necessary.
You also do not need to water cure these.
I had my concrete covered because it was the height of pollen season and I didn’t want the yellow pollen staining the stones.
I only left the plastic on for one day. They were dry enough that I wasn’t worried about color permeating them.
You may want to check out my pigment testing article for detailed information on how to color/pigment concrete crafts.
You may also be interested in this post with 21 unique ideas on using rocks and stones in your landscape.
Step 10. Seal The Concrete -Recommended
I didn’t seal these -in part because I didn’t want to add an extra expense for a home I don’t own.
They are porous, so you will likely encounter staining if you don’t seal them.
One month post-project I can see stains from berries and other foliage, and when scrubbing them, some of the stains go away, but not all of them.
It would also help protect against fading.
Look for an outdoor concrete or stone sealer.
And be sure you do a test patch first to make sure it doesn’t change the color or darken the concrete stones in any undesired way.
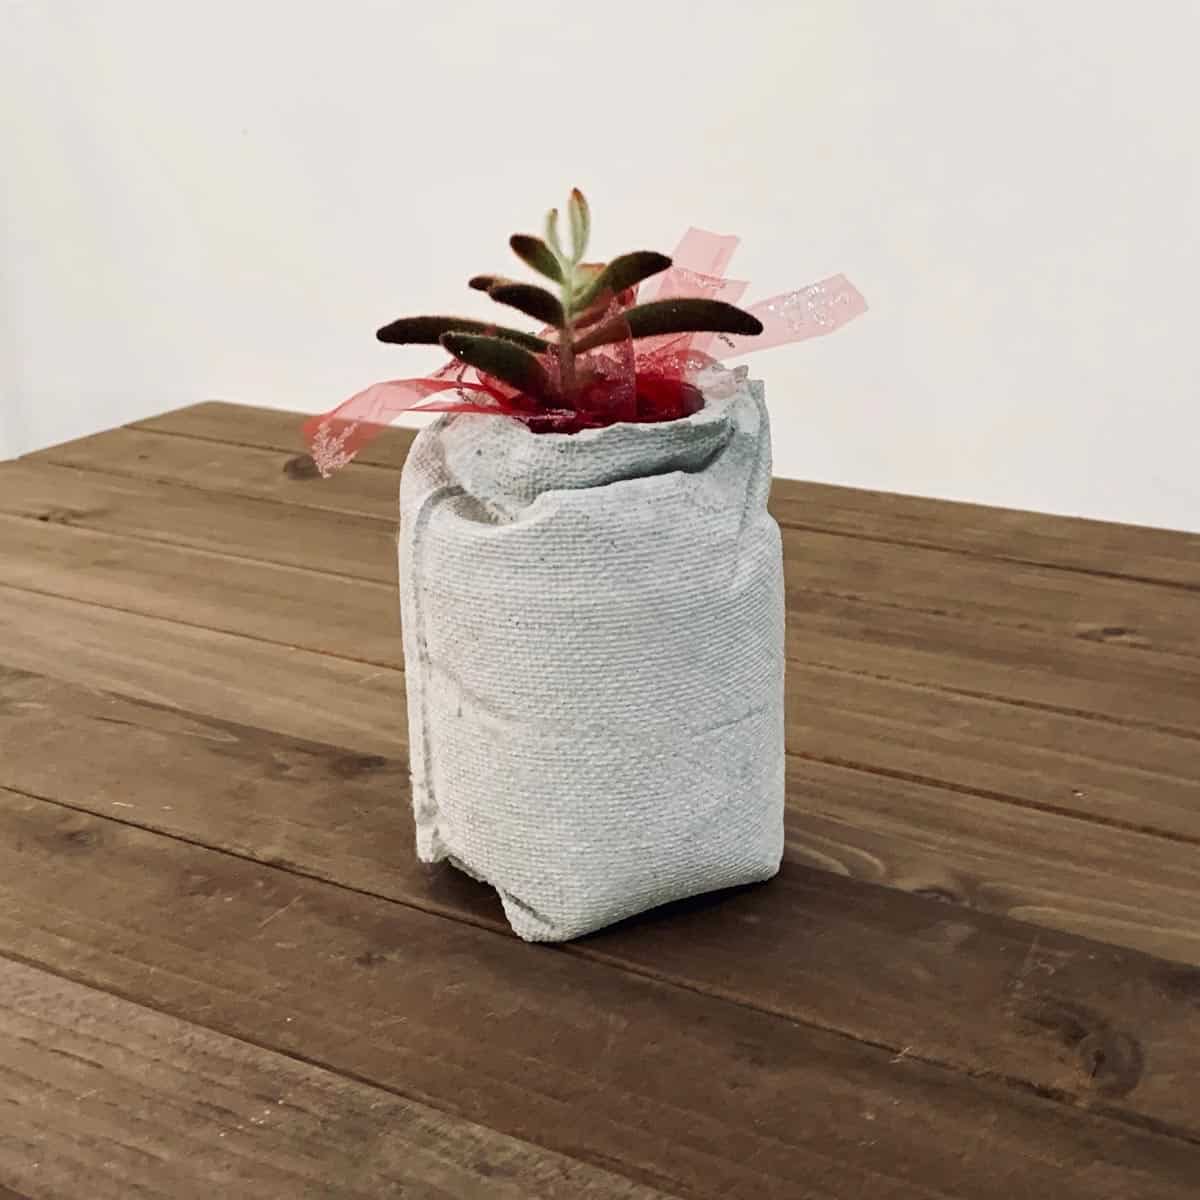
If you want to make your own stone that’s personalized, consider adding decorative elements to the top. Items you can embed would be:
- sea glass
- pebble mosaic
- glass beads
- mosaic tiles
- pieces of china
Here are 15 other ideas on different types of garden paths and walkways you can make.
You may also love these stamped concrete pavers.
FAQ for Making Concrete Stepping Stones
How thick do stepping stones need to be?
For durability, concrete stepping stones should be 1 ½” to 2 ½” thick.
However, you will need to make sure the mix you use can cast to a thickness between those two numbers. Most mixes will support casting to a thickness of 1 ½”, but 2” is better.
The information on the bag of the concrete mix should provide this information, but if not, you can usually find that information on the manufacturer’s website.
Just look under the general instructions or the Data Sheet.
How do you mix a stepping stone?
When it comes to mixing concrete for a stepping stone, ideally you mix it with a rotating concrete mixer.
But most of us don’t have one of those laying around and they are pricey to purchase for a one time job.
So the next most efficient way of mixing the concrete mix is to use a bucket and a drill with a special concrete mixing bit.
Otherwise, good ole fashioned hand mixing with a hoe and wide bin will work.
How do you make large stepping stones?
There’s not really anything extra to do to make large stepping stones. The most important thing is just to make sure you have the proper concrete mix.
You need a mix that allows for the largest size stone you plan to make and can meet the thickness you need.
For these natural looking stones, I went as large as 3’ x 2 ½’ and a max of 2” thick.
The Sand Topping Mix I used was specified for these sizes and thicknesses.
What kind of concrete do you use to make stepping stones?
The best concrete mix to use for path stones will be based on the thickness and size. The three types of mixes you can use are:
GFRC mix that contains fiberglass fibers, for reinforcement
Sand Topping Mix from Quikrete
Crack-resistant- fiber reinforced, this can contain either fiberglass or nylon fibers
Should I seal a stepping stone?
I definitely recommend sealing a stepping stone. Concrete is porous and is susceptible to stains like leaf stains.
The sealer will help prevent some of it and also make it easier to remove.
If you do end up with leaf stains, a pressure washer and some OxiClean, or perhaps tsp will help remove them.
Don’t forget to Pin it for later!
Don’t forget to Pin it for later!
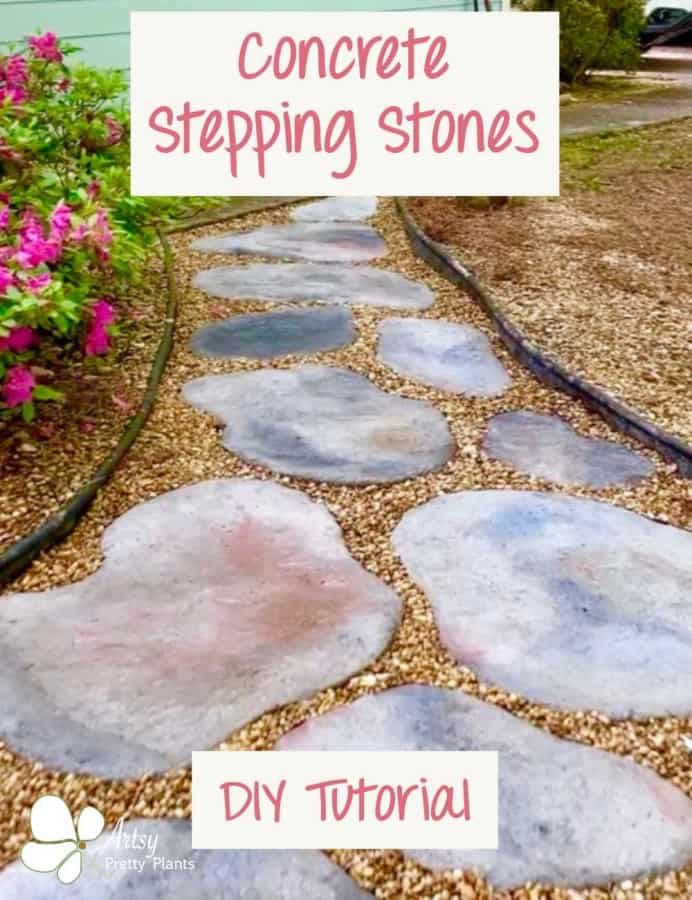
DIY Concrete Stepping Stones That Look Natural
How to make your own DIY stepping stones that look natural, using concrete and coloring them. This is an in depth step by step tutorial- with a video for making these neat garden path pavers.
Materials
- Sand topping mix- Quikrete
- Vinyl straps for the mold
- Concrete pigment
Tools
- Please refer to the FULL materials list above the tutorial steps.
Instructions
- Prep The Pathway Area
- Create The Stepping Stone Mold With The Straps
- Mix The Concrete
- Cast The Concrete Stepping Stone Molds
- Add Color To The Concrete's Base Layer
- Fine Tune The Shape By Molding It With Your Hands And Prepare For Accent Coloring For The Concrete Stepping Stones
- Now Color The Conrete's Top Layer For The Artistic/Accent Coloring
- Add A Stone Texture To The Concrete With The Plastic Bag
- Let The Concrete Cure
- Seal The Concrete Stones -Recommended
The detail and info you provide is unbelievable to me ! Great project . If I was in NH I would make the stepping stones , and of course I love the pebbles . Love, Mimi’s owner
Thank you!
Thank you for your exceptional tutorial. You “own the space” on diy stepping stones. Truly well-done.
I would say, though, that the charcoal colorant is meant to be mixed into the water that is used to wet the dry concrete. This might explain why your finished stones were not as dark as anticipated.
I learned an incredible number of useful techniques from your written and video instructions that I’m using now to build a lava rock project in my front yard. A great big wheelbarrow load of thanks to you!
Hi Bruce,
I’m so glad you got some useful tips from the tutorial. The lava rock project sounds really cool!
Yes true, when using the liquid colorant it should be mixed into the water and then the mix. It’s what I normally do if I make a planter and use the liquid colorant (but I use the powder form more often). But for the stepping stones, I just should have added it to the mix Period, rather than coating topically. ?
I just got so used to using the off-white Cement All mix, that I was thinking the concrete would come out darker grey even without coloring it. But I know better than that, I just wasn’t thinking.?
Ellen
You did an EXCELLENT job. I will definitely be trying this!!!
Hi Wendy,
Thank you! Let me know if you run into any questions.
i’m DEFINITELY going to do this! THANK YOU for the great idea and excellent descriptions!
Hi Kara,
You are welcome!
Hello! Thank you for taking the time to leave detailed instructions and for making a supplementary video! You are so thoughtful to have done this! I really want to try this project and follow what you did. I am wondering how your stones have held up. Have you experienced cracking? I plan on sealing mine, but I am curious how they have held up since you made them. Do you have any lessons learned that you didn’t already mention in the instructions/video?
Thank you very much!
Hi Sammie,
Excellent question. Yes, a new lesson- which really isn’t new because I suspected this before I started, but since I wasn’t getting help paying for this from my landlord, I went the easier and cheaper route. The lesson is, make sure you have the path leveled properly and that you use packing sand or packing gravel to fill in every little dip before you lay the stones.
Since my path was anything but level and I let some of thoselarge pebbles remain underneath in some spots, one of the stones had air gaps underneath and was thinner than 2″ in that spot and has cracked. I just saw the crack the other day. However, I’m confident that if the stones are 2-3″ thick and the ground is level that they won’t crack.
Quikrete recommended the Sand Topping Mix that I used for this project, but using a glass fiber reinforcement would surely be an even safer bet. There are concrete mixes with GFRC in it that would make it more durable, or you can buy glass fibers and add it yourself, which would probably be less expensive.
Thank you for your reply! I’m sorry to hear of the cracking! Hopefully only one stone will crack and the others will stay intact. Bummer you didn’t get your landlord’s support for this project! The stones look a million times better than the quicksand path.
I will make sure to remove all gravel in my area beforehand, and I will try to level as much as possible. Thanks for the tip!
Regarding the concrete, do you think something like this would be better: https://www.homedepot.com/p/Quikrete-80-lb-Crack-Resistant-Concrete-Mix-100680/100318448? I own my home, so I am happy to invest the extra money to ensure my stones don’t crack.
One last question, you mentioned early in the video that you were estimating about two days to complete the job. Did everything take you the full two days? Or, roughly how many hours do you think you spent on the project? I have some other yard projects I’m trying to do on weekends within the next month or so, and I’m trying to plan accordingly so I don’t bite off more than I can chew. I feel so empowered to do this project, though, after seeing you do it. Thank you!
Hi Sammie,
You crack me up. Lol, you’d think he’d be happy the quicksand was gone and willing to invest.
I know the crack resistant mix does have synthetic fibers in it, so probably it is better. But, Quikrete has really good customer product support. They have a 1-800 number and you can ask them directly. They told me to use the Sand Topping, but I’d be interested to know why they didn’t recommend the crack resistant mix. I wonder how different the coloring would be.
Yes, the stepping stone portion did only take me two days. It took me a bit to clear out the existing large pebbles, I did it in small doses and there was as much as 6″ of pebbles to deal with in some spots. I did this mostly alone and I think it ended up being two full afternoons. try to get some help if you can, mixing the cement and then carrying it without a wheel barrow was where I suffered.
I’m so glad you feel empowered to do this. Good luck on this and your other projects! And let me know how the crack resistant mix works, if you end up going with that.
Hey there, Ellen! I ended up finding some beautiful flagstone to fill my 100 sq ft walkway area. I got such a good deal and paid $200 for it! So, I will not be doing your project afterall, but I wanted to thank you so much for the tips and guidance! I appreciate you!
Hi Sammie!
Thanks :0}
Well, I can’t say I blame you, that’s a great price. Good luck on all your projects!
I learn new information from your article , you are doing a great job . Keep it up
The content in this article is really good and helpful for us.
thank you so much for sharing your techniques.
Many thanks Ellen for the great video and detailed instructions. I’m now inspired to take on this project in my back yard.
You are welcome. Good luck!
Hi! Your tutorials are very informative- thanks! I thought I’d share this with you as it might be something that you’d like to investigate!
Part One: I live in Ontario, Canada, in what is known as the ‘snowbelt’- so you can imagine the cold and snow we get! Things (posts, etc) generally need to be dug down 3-4 feet to avoid shifting with freezing & thawing.
So on the flagstone path I’ve started, we dug it out and put 4 inches of ‘A’ gravel. Then we packed down about 2 inches of stone dust (the small ground-up gravel, that you wet and pack down and it gradually turns really hard (almost like concrete) but allows good drainage. Then I lay a few stones and level them together using loose stone dust, packing it around the stone, misting it and packing as I go.
Part Two: Now…I live on a floodplain, and when I installed my above ground pool I was considering pouring a concrete base, but was worried about the frost line and cracking. The solution pool guys use for this is to add Vermiculite (there are different grades, & I think they use food grade but I can’t recall for sure). It is primarily used in potting soil- (looks like little styrofoam balls) . (And it’s not Permiculite – that is different). What the vermiculite does is that it allows the concrete to have a tiny bit of ‘flexibility’ so it can ‘move’ without cracking! If you want more details, I’m sure you can find mix ratios etc online if you Google ‘concrete/cement pool bases for above-ground pools’).
I would like to do two test rocks – one with & one without vermiculite and see how they compare under daily use. It would also be interesting to use a mold for one and free pour directly onto the ground the way you did.
If I did that here- especially without any gravel and stone dust for a base underneath, I’m pretty sure they would be cracked within a couple of years, so It will probably take a few years observing the test rocks to see if there is any difference. But if it does save stones from cracking, it would be worthwhile to try it out! (Btw, If you can’t find the info online, message me and I’ll dig mine out and forward to you! Patti ?
Hi Patti,
I grew up near Rochester NY, so I understand the snow belt!
Your packing and sublayer/bedding material types sound perfect. I’m doing a patio now and doing the same- but this time I’m actually using pre-made pavers.
:0|
I don’t think you need to worry about cracking. I know people in Canada who made stepping stones 2” thick and haven’t had cracking years later- using Sand Topping Mix.
The pool foundation is a whole different story as it’s such a large slab and it would make sense that you need movement in large slabs. That’s the purpose of line breaks in sidewalks, but stepping stones are different and don’t require space for expansion and contraction. I see your thinking on this, but I would advise not using vermiculite for this.
If you want to be safe, call Quikrete’s help number and confirm that the best mix for your climate is the Sand Topping Mix and that you won’t need reinforcement.
Has anyone tried this with water preamble concrete? I live in the Pacific Northwest of the United States so water/rain is an issue
Hi BD,
If I’m understanding your question correctly, I don’t think the concrete from the stepping stones themselves is the issue, it’s the way you do the gravel and slope for drain off that will be important. We don’t get the rain you do in here in the Atlanta area, but we do get tropical amounts all in one sitting and it’s not an issue with this concrete, but it’s only because of the gravel around it and then the fact that the path is immediately adjacent to a hill.
Hello!
Love love LOVE your page! I’ve learnt so much. Thank you so much!
May I ask if your stones ended up being slippery? Or does the plastic bag bit give them enough texture? If you have made any with a rougher finish, do you have any tips?
Thanks in advance!
Anna
Fremantle, Western Australia
Hi Anna,
Thank you!
The stepping stones aren’t slippery whatsoever. The texture is quite rough and it’s not because of the plastic bag texturing. When concrete isn’t cast up against something- like a mold, it’s always going to rough. I live in the southeastern US where it’s very wet and these stones are under lots of trees where it retains moisture, yet they are as stable of a surface you can ask for- like sand paper. Open cured concrete will always produce a rough surface. Concrete cured against smooth surfaces (like silicone or plastic molds) and left to cure in them will be slick. I also removed the vinyl straps after the concrete started to set, so the sides were rough too. I hope that helps!
Thanks for this great tutorial. I used cardboard for my forms (no vertical blinds lying around). The nitrile gloves saved my hands — I use them now for all sorts of projects. I did a 25′ x3′ path for a fraction of what pavers or real stone would have cost and I got a lot stronger from mixing all that concrete, too, as a bonus!
Hi Dawn,
Awesome! I’m glad the cardboard worked for you. That sounds like a long path, I bet that was quite a workout.
Ellen
Thank you so much for sharing! I have been making concrete boulders to add to my landscape and will be incorporating some of your techniques into my next ones. I also plan on doing the stepping stones some day! Thank you again!
I read your tutorial before laying my cement “flagstone” pathway and it gave me the confidence I needed to proceed. I am thrilled with the results and so is my husband! Thank you!
I can’t wait to try this as collecting free broken pavers,bricks etc is taking a really long time. Especially getting all the same thickness. If you have some going on grassy areas without packed gravel under them, will they sink?
Hi Bev, I think that will depend on the type of soil underneath. I have flagstones I placed directly on soil that haven’t moved, as well as pavers in a separate location. However, in the location where these DIY stepping stones were, there’s a small chance there’d be some movement. I think you might experience a small amount of movement, but probably not enough to cause a problem.
Creating your own DIY concrete stepping stones shaped like natural stones is not only a fantastic way to enhance your garden but also a fulfilling project. I found the concrete calculator mentioned in this blog incredibly helpful for precise measurements, ensuring my stepping stones turned out perfectly. The step-by-step guide provided valuable insights, making the process easy even for beginners. Now, my garden path boasts custom-designed stones that mimic the beauty of nature. Kudos to the blog for simplifying the DIY concrete process and incorporating a useful tool like the concrete calculator: https://concrete-calculator.org/
This is exactly what I want to do in my yard to make a natural looking patio. Thanks for the tutorial! I was also wondering if this concrete “recipe” would work well to make my cinder block retaining wall look more like a river rock retaining wall. Thoughts? I’m thinking it would need to be more of a clay consistency to sculpt with.
Hi Rebecca,
You’ll want to use a different mix, you will need some gravel for it to hold. Use CTS Rapid Set Mortar Mix. Here’s a great video from Michael Builds that will help you a lot! https://youtu.be/XO8wyQfjpt4?si=QV-wNBp7N1BA-Xfv
Thanks so much for this detailed DIY! We have some gorgeous slate we want to lay on our property, but don’t have enough for the space – this is the perfect solution to ‘fill out’ what we’ve got! Roughly how much of the charcoal colour did you end up using per bag of concrete mix? I have to special order it since we’re rural and I’d like to (try) to get the correct amount the first try! Would you still recommend mixing it into the top layer of concrete, or just paint it all over the top and then add the other colours?
Hi, I didn’t end up using any charcoal in the mix. It came a natural very light grey. I would have preferred the overall color to be darker, so if doing it again, I would add some to the mix, in addition to the top to get the very natural stone effect with the multiple colors. Adding colorant to large batches will be a little labor intensive though.
If you use the same mix I have linked to, you may want to add colorant to the mix before pouring. I think 1 box of black/charcoal would be enough. Sakrete brand used to have boxes, but I haven’t seen them in years. Amazon has some of other brands, but make sure they are specified for concrete, not anything else. For adding to a mix, I prefer boxes of powder over liquid. To do this, add dry colorant to dry mix. Then mix it together dry, then add the water. Or add liquid to the already wet mix.
I only used a small amount of liquid colorant to the tops. I doubt I used more than 1/4 of a bottle for all of them total, for each color. Good luck!
Thank you for sharing. Your sidewalk looks great. Can you tell me what kind of straps you used to make your molds? I hope I didnt over look it, I re-read twice and just saw, “straps”. Where did you order your straps that you used to make your molds. Thanks again.
Hi,
Sorry, I missed your comment. I linked to the straps in the materials list. Those are the exact ones I used.