Make A DIY Concrete Tray: Detailed Tutorial, Expert Tips
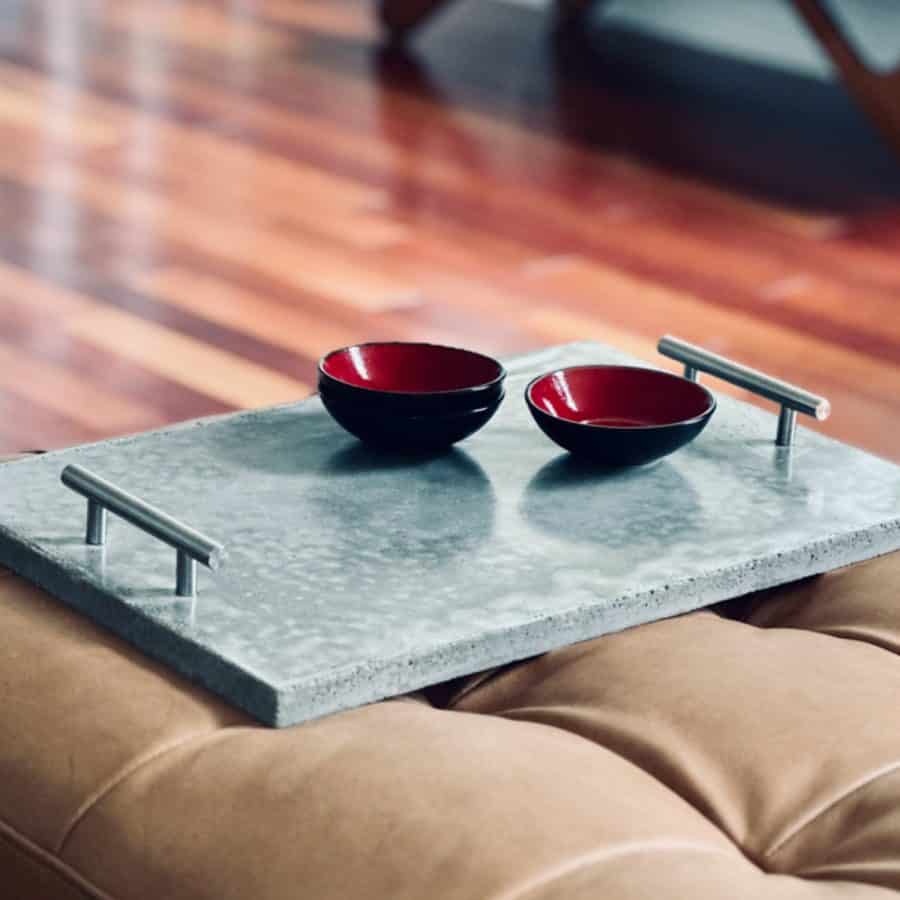
Not everyone can make their own home decor, but today I will show you how you can easily create a great-looking DIY concrete tray using reverse casting.
This process allows for perfectly straight handles and a very smooth tray surface.
And the bonus is that once you know how to reverse cast, you can use these skills to make many slick-looking concrete home decor pieces.
I’ve always wanted to make a concrete serving tray, and now that our TV area and kitchen are on different levels of the house, we could really use one.
However, I’ve had it on hold for a bit because the engineering was challenging.
Since this is a functional piece I plan on getting a lot of use from, I wanted the tray to have a smooth surface and nice and straight handles.
Now, if you’ve ever made anything with concrete, you know the result of the concrete that is open to the surface of the air while it’s curing will be rough.
And you can guess that sticking a handle directly into the concrete while it’s curing also has its challenges.
It will tend to push upward or tip, so you’ve got other things to engineer to prevent that.
Don’t forget to Pin it for later!

So the typical cement tray wasn’t the solution I was looking for. I needed a way to screw handles into a concrete tray cast against a smooth surface, in reverse (upside down).
Well, I put my pencil on paper and came up with the wood dowel solution!
You can learn more in this article about mold materials for concrete, and how to go about choosing them.
Now you might be looking at this tutorial and thinking, holy cow! It’s a DIY concrete tray tutorial and it’s got 12 whole steps!
True, but this is actually a relatively easy tutorial. And there might even be a few steps you can skip. Take a look at the Materials Notes, the What Not To Do’s in the Steps, and my tips to see where you might save time.
Making this tray is pretty quick. There’s a bit of a waiting time for curing and sealing. Also, remember to read what not to do!
By the way, I also did this reverse casting process with my concrete coasters and like with the gorgeous marbled concrete candle.
Keep on reading to get started making your own sleek and modern concrete tray!
For another modern cement project, here’s a tutorial to check out after, gorgeous round cement and leather wall hooks.
Some of the links on this page have been provided as a convenience for finding materials. These links may also be affiliate links. As an Amazon Associate I earn from qualifying purchases, at no extra cost to you.
I only recommend products I’ve used and loved, unless otherwise stated. Click here to read my full disclosure policy.
DIY DIFFICULTY LEVEL / EASY
Make A DIY Concrete Tray Materials List
The Tray Mold
- These 5” handles*
- PVC casing 2 ¼” *
- 1” Foam insulation board*
- Dowel ¼” diameter
- (8) Wood screws 1 ¼” #8 or 10
- Power drill
- Phillips screwdriver
- ¼” Forstner bit*
- Scissors
- Acetate film sheet*
- Snap-off razor knife
- Painter’s tape
- 12″ Ruler
- Orbital sander
- Level -9″
- Dremel Multi-tool or flush trim saw*
- Chisel
Concrete Materials
- Concrete mix
- Disposable bowl
- Disposable cup
- Durable nitrile gloves
- Safety glasses
- Safety mask– rated for silica dust
Sealing and Finishing
- Orbital sander
- 180 and 320 grit sandpaper
- Sealer
- Foam brush
- Silicone bumpers
*Materials Note:
Tray Thickness and Handles: Initially, I thought the screws for the handles kept me limited to making the tray ¾” thick. They come supplied with long screws, but there are issues with them.
However, the short screw will work with a 1″ thick tray. I have adjusted the tutorial so your tray can be 1″ thick which is less likely to crack.
Mine feels quite sturdy, but 1″ is much better. And it won’t be much heavier. Even the ¾” is lighter than it looks.
PVC Casing: This is my favorite thing to use for making molds. Now that I know which big box store carries the sizes I need to make molds, I will make this a staple material. It cuts like butter, and concrete won’t stick. It’s just so dang easy to work with. It’s a concrete maker’s dream.
Foam board: You can substitute ¾” plywood for foam. I was hesitant to do this because I wasn’t sure if the concrete would seep into the plywood where the dowels were, making it difficult to demold.
The benefit to doing this is that you can make the base overlap the sides and screw the bottom to the sides. This will make it easier to vibrate.
If you use plywood, I strongly recommend using acetate, or you will have trouble demolding, plus you will have the imprint of the plywood on the face of your tray. Please adjust the dowel sizes since the plywood is ¾” instead of 1″.
Forstner Bit: The Forstner bit allows the holes for the dowels to cut so cleanly in the foam. A regular drill bit makes a mess of the foam. You want them to be clean so concrete doesn’t drip into them and the dowels have a tight fit.
Acetate: This may be optional. I have always used acetate as a layer between the foam board and concrete. I do this because the concrete will pick up every little line or dimple in the foam.
As you can see, the acetate will also provide a shinier and smoother surface and better seal.
I’ve done this trick three other times, and this one turned out too shiny, and I ended up lightly sanding it to bring down the sheen.
I haven’t experimented much with casting directly against the foam, so I’m not sure what sheen result you’ll have.
But if your foam has no flaws, it could be worth skipping the acetate. However, sanding it took only a few minutes and worked great.
Dremel Multi-tool or Flush Trim Saw: A multi-tool will make this super quick and easy, but the trim saw will also work but require a little more work. (See Step 9)
Timing: This should be less than 2 hours of working time and 2-4 days of waiting between curing and sealing.

How To Make A DIY Concrete Tray Tutorial Steps
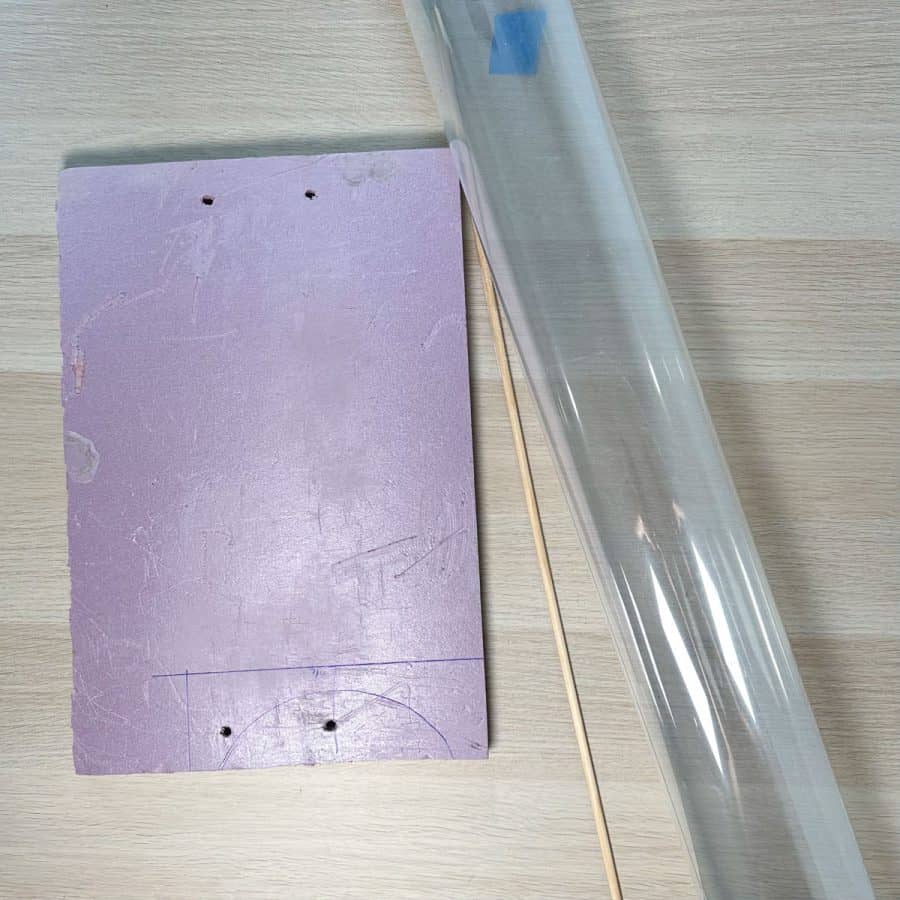
Step 1. Cut Your Base Mold Piece

Use the retractable snap-off blade knife to cut the foam board to 18×12″.
It is easiest to score the board with a pencil first, then again, lightly, with the blade before cutting.
Use the two factory-cut edges for the best results, and then just make two cuts. Let the blades come out long, and hold the knife as perpendicular to the board as possible.
If you have trouble cutting all the way through, you should be able to cut much of the way through and then snap the rest off. Do your best to get as clean and straight of a cut here.
By the way, this foam material can be used for many molds. I used it for both the hypertufa planter and the handmade bricks.
Step 2. Cut Dowel Pieces

Use a hand or miter saw to cut the wood dowel into 4 pieces, each 2″ long. Try to get these exactly the same length.
Step 3. Cut The Sides Of The Concrete Tray Mold

Next, cut the PVC molding to make the sides. You’ll need two pieces at 18″ and two at 13 ½”.
Step 4. Cut Acetate To Fit The Base

What Not To Do: Don’t accidentally cut the acetate larger than the foam base. If it is wider in any area, you’ll end up with wrinkles in the tray, which will cause little rivers, lakes, or ponds- charming but probably an undesired effect.

Lay a piece of acetate film on the table and the foam on top, then carefully trace around the base and cut it to size with scissors.
When trimming the acetate, I recommend cutting just inside your line to avoid the wrinkles mentioned above. It’s okay if it’s just slightly smaller than the base.
Step 5. Fasten The Sides Of The Concrete Mold Box
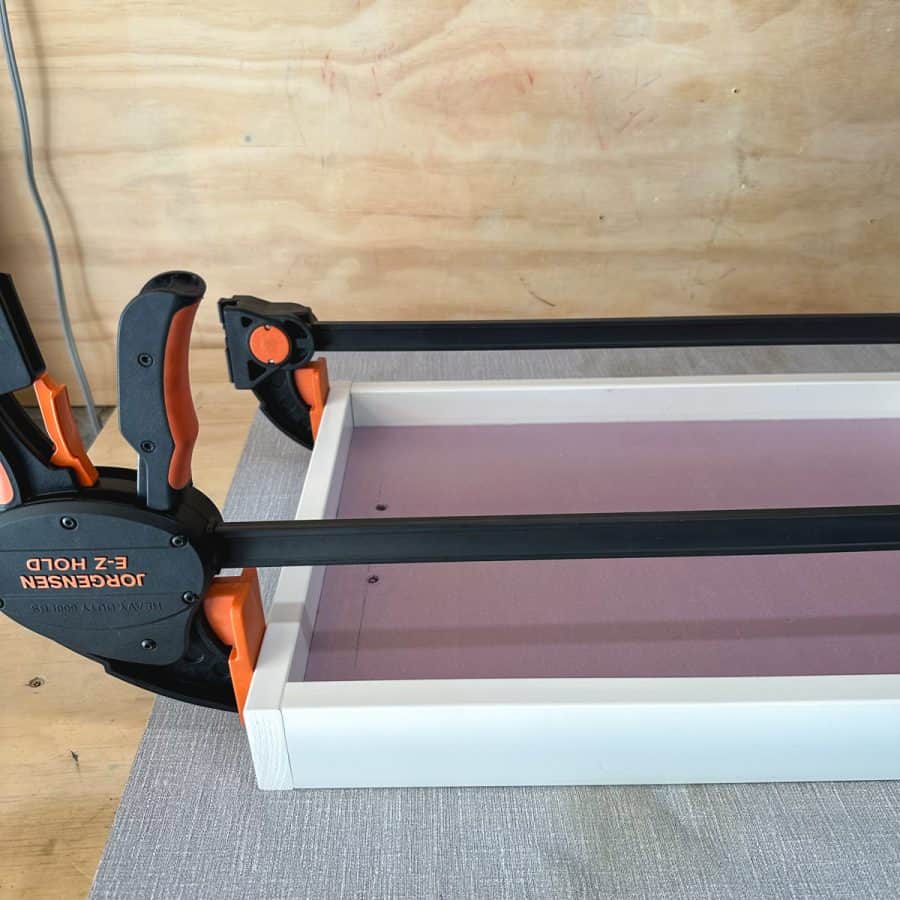
Wrap the PVC boards around the foam base and use clamps to hold them.
You’ll attach the short ends to the long ones. First, drill two pilot holes and the screw in each screw.
Step 6. Cut The Holes For The Handle’s Screws
Place the acetate on top of the foam and ensure it fits and doesn’t have air bumps underneath. If it does, trim it to fit more closely.
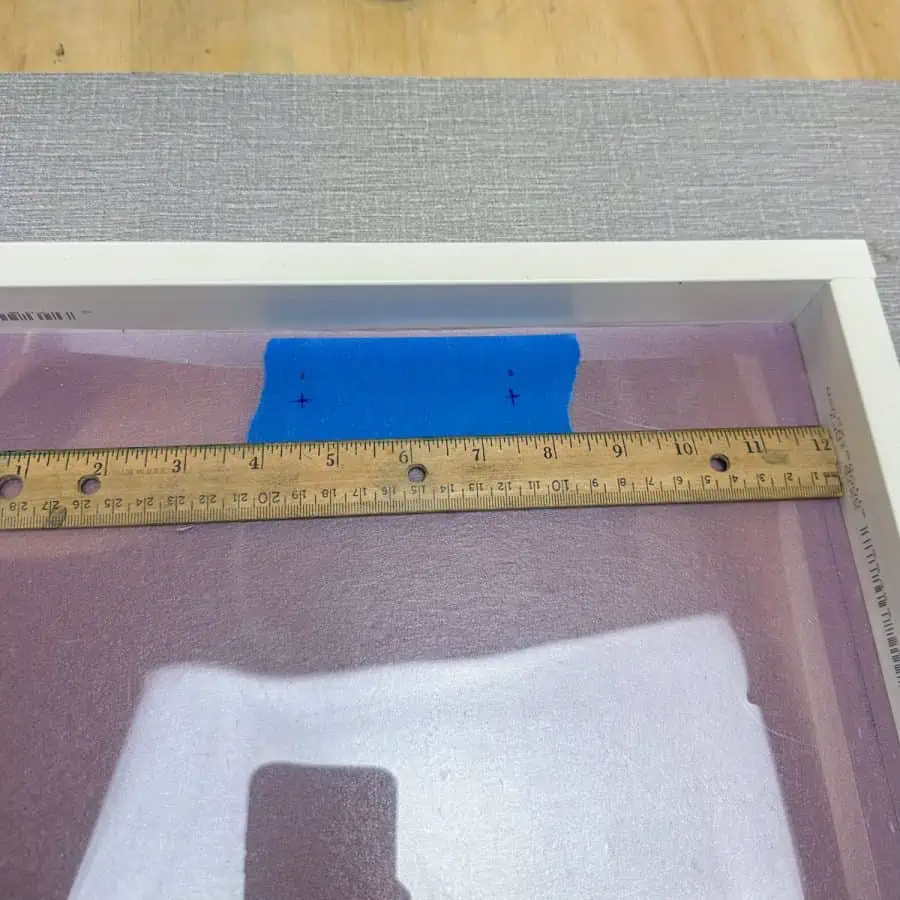
Place the blue tape at each end. This will help keep the dowel holes nice and clean.
It is important because you don’t want the screw hole to be visible when the handles are attached.
The handle screw holes are 3″ apart, so to center the handle on the tray, measure from the left and right edges at 4 ½” and 7 ½” (or 4 ½” from each edge).
Now measure 1 ¼” from the edge and mark an X where these measurements meet. This is the center for your screw hole.
Double-check that everything lines up by placing the handle next to it and that the holes line up. Take your time with this. You need the holes to be dead center with the handles.

Place the concrete tray mold on top of some scrap foam board or similar so you don’t accidentally drill into your table.
It also helps to use blue tape to make a flag-stop so you know when you have drilled through the base.
Now drop the torque number of your drill down to a low number. I had mine at 6.
You need to drill these holes slowly to not tear up the foam or crack or melt the acetate.
Your drill should make a low, slow whirring noise, keep it steady, slow, and straight and you should end up with a clean hole drilled.

Now just press the dowels into each hole and stop when they are flush with the bottom of the foam base.
This will leave the exposed dowels 1″ above the foam, which is your fill line for the concrete mix.
Step 7. Mix the Concrete And Cast The Tray Mold

Expert Tip: Be sure that the work surface you cast and cure your tray on is level. If it’s not, your tray won’t be either.
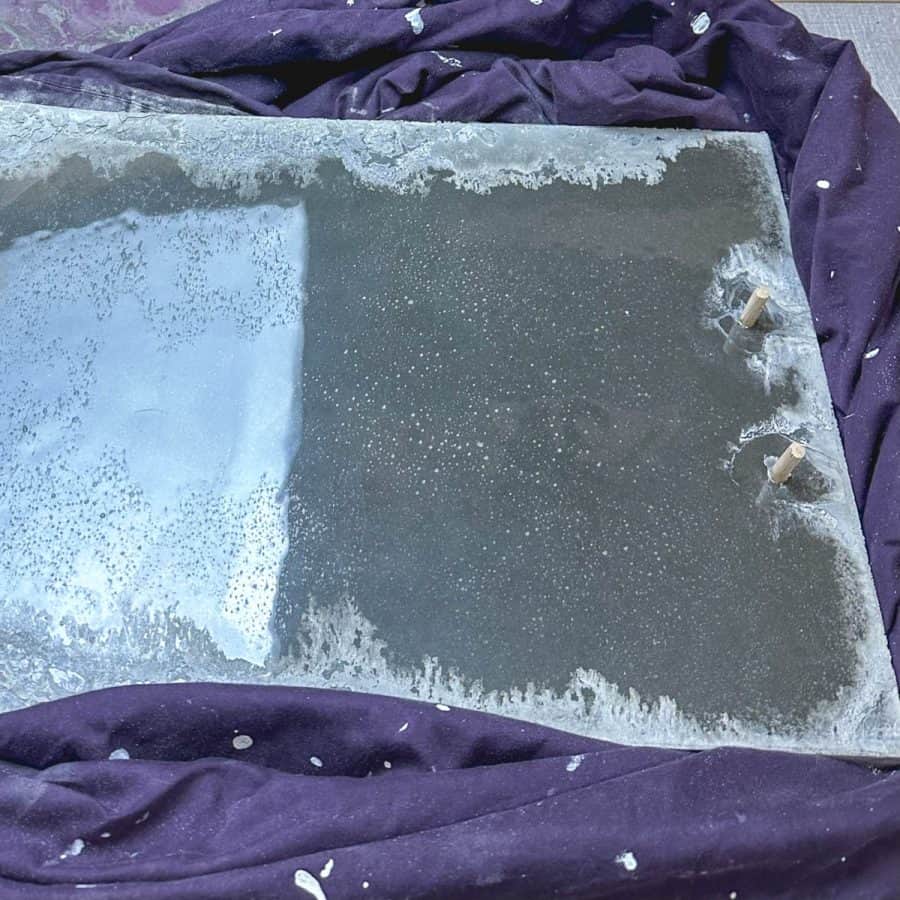
My tray has a mottled look- with darker spots scattered on the surface. The mottled appearance in my tray may have come from not mixing the two batches together before casting.
The slightest difference in the amount of water between batches is likely the cause.
I actually like how this turned out, but it was a happy accident. However, you may not care for this. If you do not want the mottled effect, here’s–
What Not To Do:
The concrete mix is heavy, so it is easier to mix it in two batches, which I recommend. But don’t mix it in two batches and then put them directly into the mold.
When you have the two batches, combine them in a bowl first, then add them to the mold.
When you have the two batches, take them and combine them together in a bowl first, then add them to the mold.

Mix the concrete to a mud pie consistency (two batches, then combined).

Scoop all the mix into the mold so it is flush with the tops of the dowels. It should not fully cover the dowels, but a little is okay.
If your dowels are a different height, make sure you only take the concrete so that it’s flush with the shortest dowel.
Just ensure you can see them when the concrete has cured so you can see where to drill for the handles.

Vibrate the mold. The reason for vibrating the mold is that you don’t get tiny holes from air bubbles on the tray’s surface.
Vibrating it will help release air bubbles and result in a smooth surface.
Since the base isn’t secured to the frame, you won’t be able to pick up the mold box to assist with vibrating.
So instead, slide the box back and forth on your work surface to get the mix to self-level. Once it is level, use an orbital sander –without the sandpaper to vibrate along each side of the box.
I did this for about 7 minutes, but plenty of bubbles rose to the surface when I stopped, so I should have continued.
It probably needed closer to 15 minutes. I did end up with a fair amount of bubbles still at the edges.

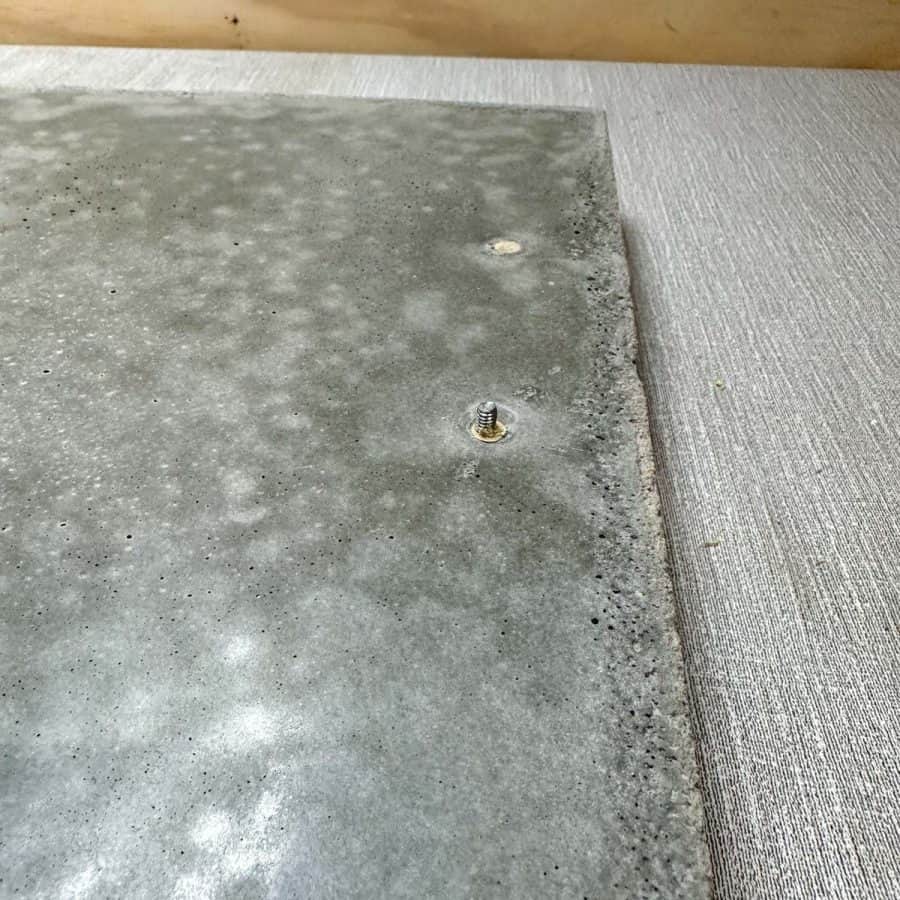
Now, one more little step before letting it cure. The heads of the screws are not flat Now, one more little step before letting it cure. The heads of the screws are not flat heads.
Use a screwdriver, pen, or anything shaped like that to carve out a little bit of the concrete around each dowel.
You just need to remove a little bit so the screw head will sit flush. If it is not enough, it will be easy enough when it’s cured to chisel this away with a chisel or screwdriver, but doing it now is still easier
I took this photo of the carved area after the concrete had cured.
Now let the tray cure for 1-2 days before demolding.
Step 8. Demold The Tray
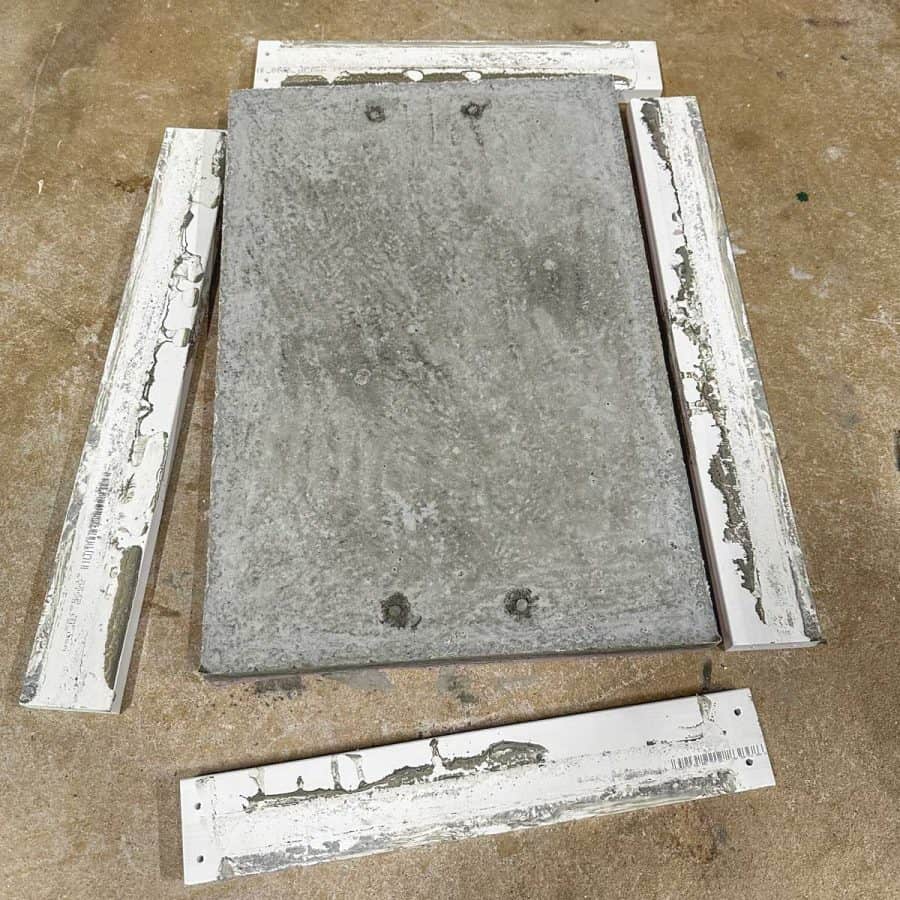
Unscrew the sides of the mold. The bottom of the tray (top as you are looking at it) has a whitish, frosted appearance.
If the sides are more brown and you see moisture, it may be too early to remove from the mold. Just leave it with the sides off and wait until the sides are frosted-looking before moving on.
I removed the sides at 24 hours but was able to remove the bottom at 36 hours. Your times may be different depending on humidity and temperature.
Place a towel on your work surface and flip the mold over so the towel cushions the concrete tray. Then pull off the foam board and acetate. Hang on to the acetate sheet. You may need it for the next step.
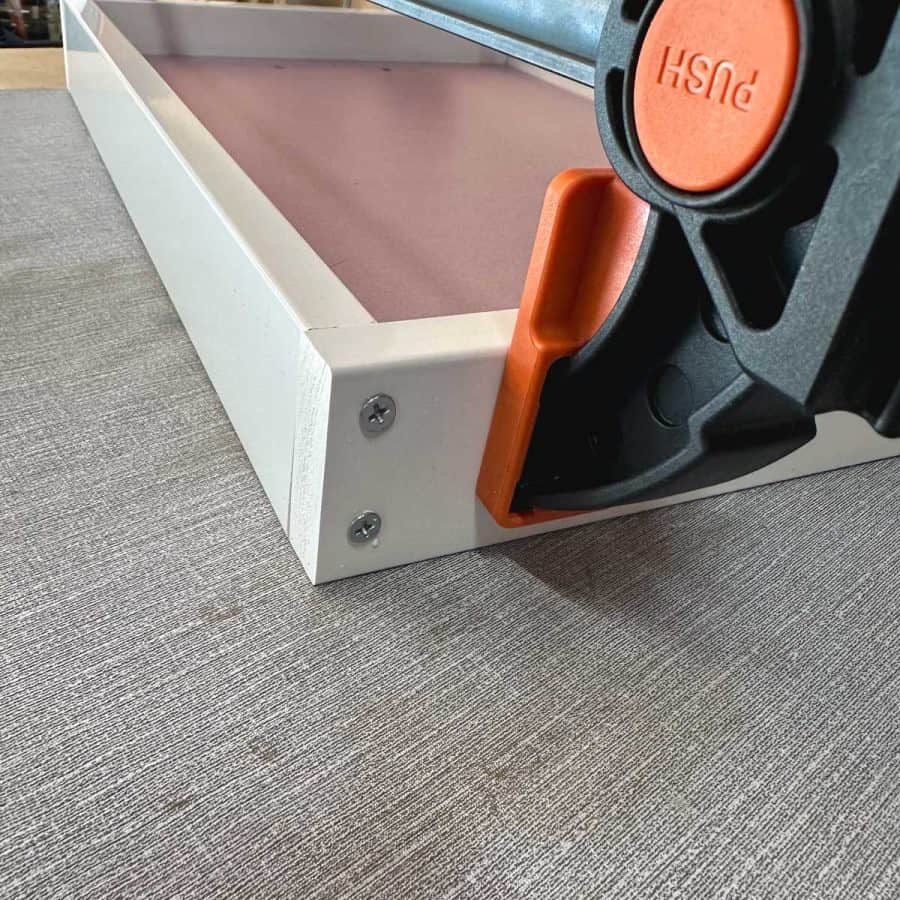
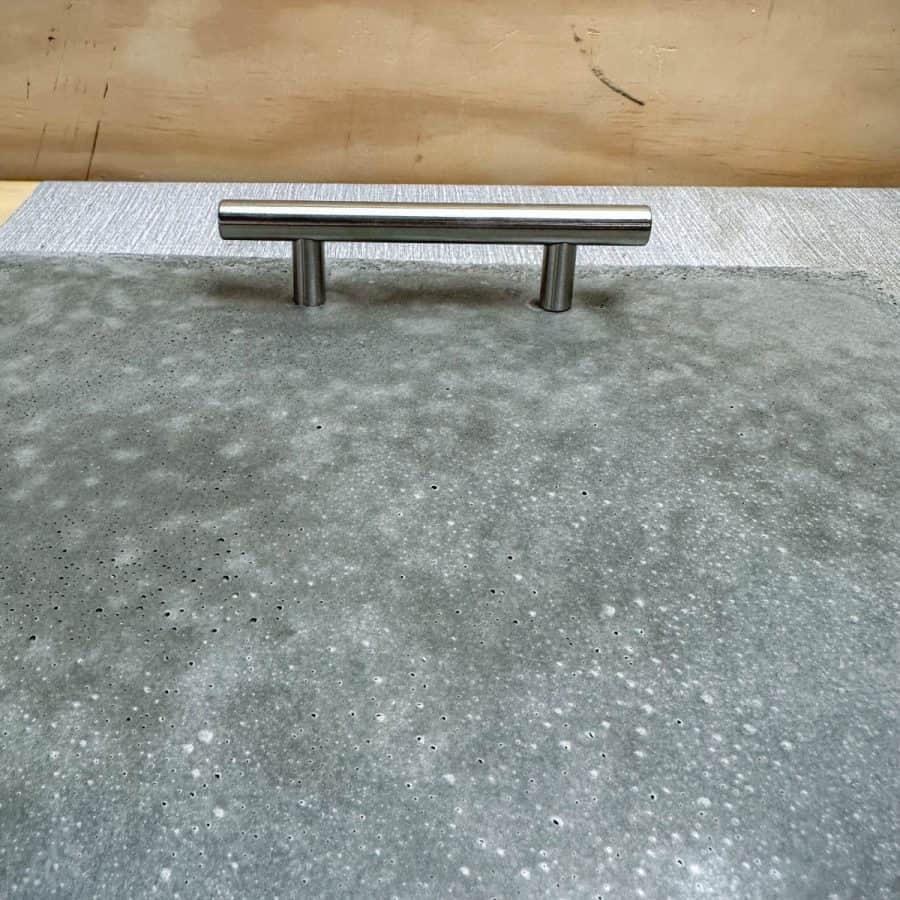
Step 9. Fasten The Handles To The Concrete Tray
I recommend waiting another day, or even 2, before adding the handles.
The concrete will gain more strength each day, and you will exert some pressure on the tray when adding the screws. This will be safer and make it less likely to crack.
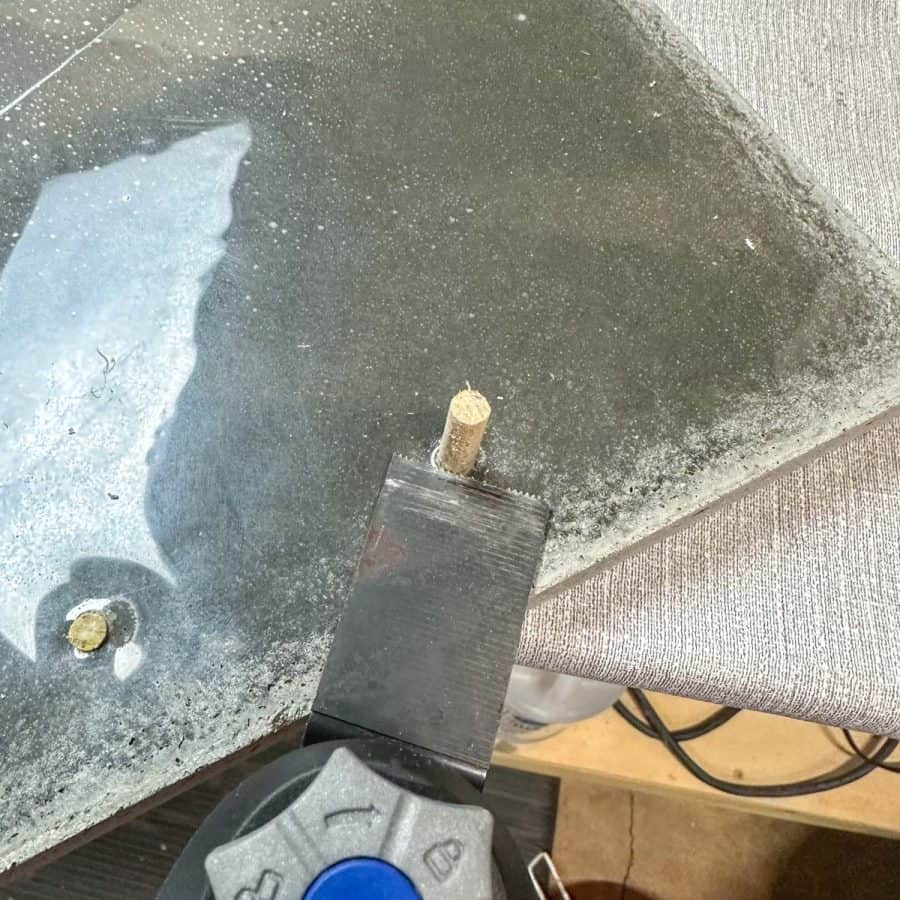
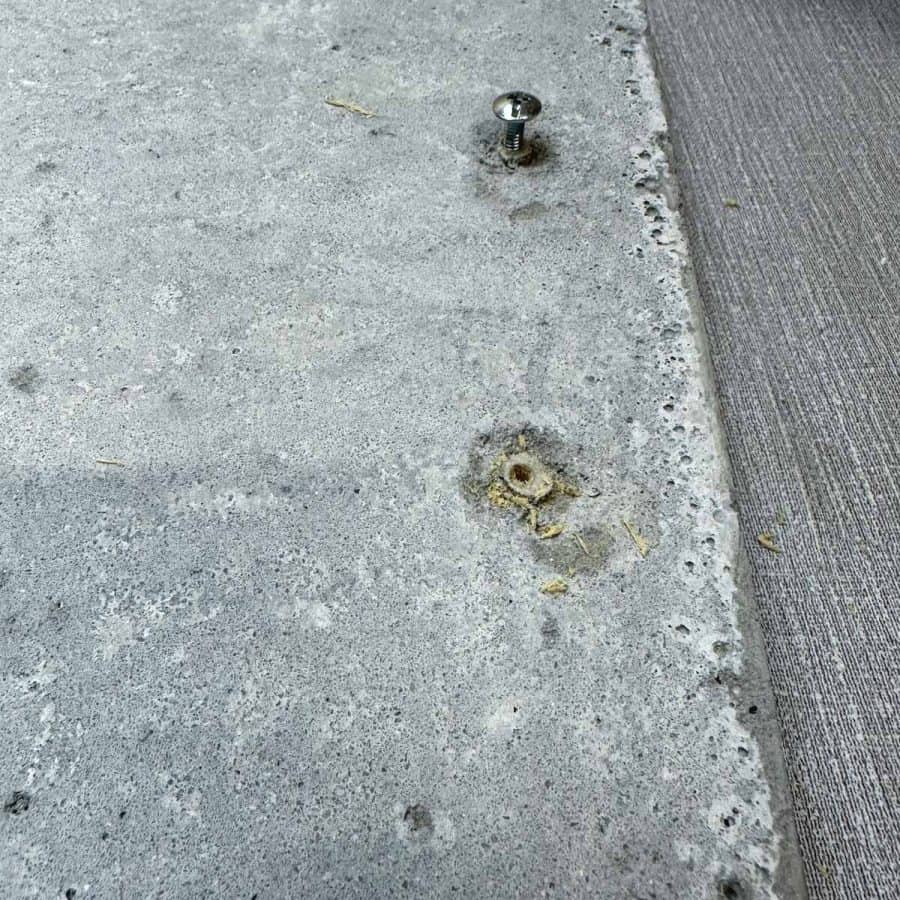
First, cut the dowels so they are flush with the tray. The easiest way to do this is with a Dremel multi-tool, using the wood flush-cut blade, which comes with it (MM480).
Just line the blade up with the bottom of the dowel and push it through.
What Not To Do: Don’t come at the dowel from this angle. The bolt holding the blade bit protrudes under the dial and will hit the side of the tray and scrape the concrete. I have a small divot on this corner edge because of that.
Be sure the wood is flush.
You can use a flush-cut trim saw if you don’t have a multi-tool. I had you save the acetate sheet in case this helps protect the tray from being scratched.
You can place the acetate back on the tray over the dowels. But if it just gets in the way, remove it. I didn’t use the saw, so I’m unsure which will be better.

Pre-drill a pilot hole for each handle screw when the dowels are completely flush.
This next part will be a little easier if you can have someone help you.

To do this, turn the tray on its side and drill the screws until they peek through the wood on the front side.
Then have one person place the handle over the screws so they catch. And the other person will finish screwing the screws into the handle.
If you have a screw that won’t align with a handle, you may need to use a larger drill bit to redrill the pilot hole.
Note: If you have a screw that sits higher than the others, read this: My tray was not level, which I expected.
One corner was a little high, and because of this, I had to cut back the top of the dowel to get the screw lower because it was sticking out more than the others.
If this happens, a chisel helps to get both the dowel cut away, and a little bit of the concrete scraped away from the area where the head sits.
Once I chiseled both, it was nice and flush.
Step 10. Sand The Serving Tray
Use the orbital sander and sandpaper, either 180 or 220 grit to sand the bottom of the tray. Then switch out the pad to 320 and sand the top and the sides.
Even if you like the high gloss sheen, this will scratch easily, so you should still lightly sand it. The sheen will come off quickly. Also, go over the back again with the 320 grit.
Step 11. Seal The Tray
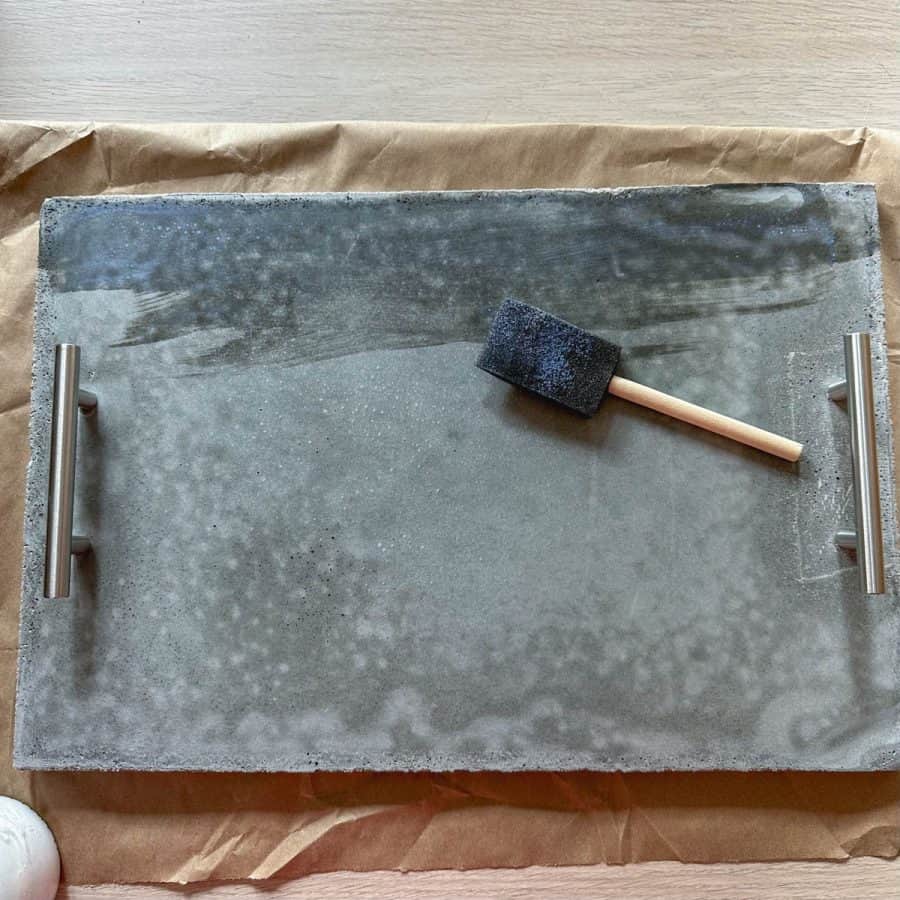
Apply the sealer to the top of the tray with a foam brush. Then just flip the tray over by its handles, let it rest on the handles, and seal the sides and back.
If you have rough edges, push the brush into them to get the sealant deep into the holes.
I recommend applying a second coat. You should do this around 24 hours later. The tray will be usable in about 6-8 hours after sealing.
Expert Tip: Rinse the foam brush off with water in between applications. Otherwise, it will get sticky, and you’ll need to use a new one.
Step 12. Add Silicone Bumpers To The Bottom Of The Concrete Tray
Add silicone bumpers to the bottom to ensure the tray doesn’t scratch your table. Place one at each corner, about an inch in.
For other concrete decor DIY projects, check out these coasters with fall leaves and this round candle made with concrete.
Don’t forget to Pin it for later!

DIY Concrete Tray: Detailed Tutorial, Expert Tips
A detailed home decor tutorial for how to make a beautiful DIY concrete tray. This process uses reverse casting to get a unique, smooth tray surface that looks professionally made.
Materials
- These 5” handles*
- PVC casing 2 ¼” *
- 1” Foam insulation board*
- Dowel ¼” diameter
- (8) Wood screws 1 ¼” #8 or 10
- Power drill
- Phillips screwdriver
- ¼” Forstner bit*
Tools
- Please see the full materials list above the tutorial for details and links.
Instructions
- Cut The Foam For Your Base Mold Piece With A Disposable Blade Knife
- Cut Dowel Pieces With A Saw To 2”
- Cut The Sides Of The Concrete Tray Mold To 13 ½ and 18” With A Saw
- Trim The Acetate Film To Fit The Base
- Assemble The Sides Of The Concrete Mold Box With Screws
- Cut The Holes For The Handle’s Screws Carefully, Using Low Torque
- Mix the Concrete And Cast The Tray Mold In Reverse
- Demold The Tray After 2 Days
- Fasten The Handles To The Concrete Tray BY Drilling Holes On Center And Screwing The Handles
- Sand The Serving Tray On Each Side With 180 and 320 Grit Paper
- Seal The Tray On All Sides, And Seal Twice
- Add Silicone Bumpers To The Bottom of The Concrete Tray


Stunning!
Thank you!!
Hello. In regards to being able to lift your mold consider attaching a plywood base to the underside of the PVC frame once the four pieces are assembled. It could be larger than the perimeter of the assembled framework (cut grip opening s at each end) and can also provide a way to make sure your framework is square with the assistance of a speed square. Just a friendly suggestion from an outside perspective.
Hi Bryan,
Yep! I mentioned this in the materials notes. The reason I was hesitant to do this from the beginning was because I was concerned the concrete would stick to the plywood base, especially if it touched the dowels, even with the acetate between it. I know the foam won’t stick, but if the concrete seeped in between- where the dowels met the plywood, it would be challenging to remove. Plus it requires needing a table saw or good circular saw skills. But, that’s why I did want to mention it. If it doesn’t seep, and you have tools and skills, I would definitely go this route. You are absolutely right!
Hello Ellen. I was implying to attach this as well as having the foam board and acetate, creating a base beneath the two items you used. Sorry for not being clear about this in my first comment to you. Keep up the great work. Until next time, God bless.