Make A DIY Concrete Planter Silicone Mold (Replicate An Object)
How to make a silicone mold for a cement planter from an object you want to copy.
If you’re like me, you’ve probably got an object lying around your home that you’ve been thinking… “that would be such a cute planter!”.
But maybe it’s not suited to be one because it’s glass or metal and doesn’t have any kind of drainage, or maybe it’s a nice wood and you don’t want to ruin it?

Well, you can make your own concrete mold by replicating any object to make it into a cement planter.
It can be a challenge to think about how to make your own silicone mold for a cement planter- or for anything, because you have to think of the positive and negative space in reverse.
Well, I don’t know about you, but my brain doesn’t naturally work that way.
I have to draw these things out if I’m going to understand how to get it all come together. Hopefully I’ve made it easy enough to follow along.
Here’s where I made a silicone sphere mold so I could make copies of round cement planters.
Video For How To Make A Silicone Mold For A Cement Planter
Please click the button to subscribe to my YouTube channel and be notified when I have a new video tutorial!
And for how to make a silicone mold for a larger and wider object, then check out this large concrete mold tutorial.
Silicone is the best material for making a concrete mold if you want to make multiple copies. It’s a durable material that can withstand a lot.
This is the perfect tutorial for learning how to make your own concrete mold if this is the first time you have tried silicone as your concrete casting material.
For this project, I decided to choose an object that’s not going to complicate the process further.
You may want to choose something simple for your first time as well. Isn’t the texture cool?
Please refer to the material’s notes below for what to look for when choosing the object for your future cement planter.
Go here to learn about choosing the best mold type for your project.
And here’s an article explaining about when to use which mixes. And this one for what the difference is between cement and concrete.
Yo may also like this tutorial where I used straws to create texture for a DIY fluted concrete planter.
Some of the links on this page have been provided as a convenience for finding materials. These links may also be affiliate links. As an Amazon Associate I earn from qualifying purchases, at no extra cost to you.
I only recommend products I’ve used and loved, unless otherwise stated. Click here to read my full disclosure policy.
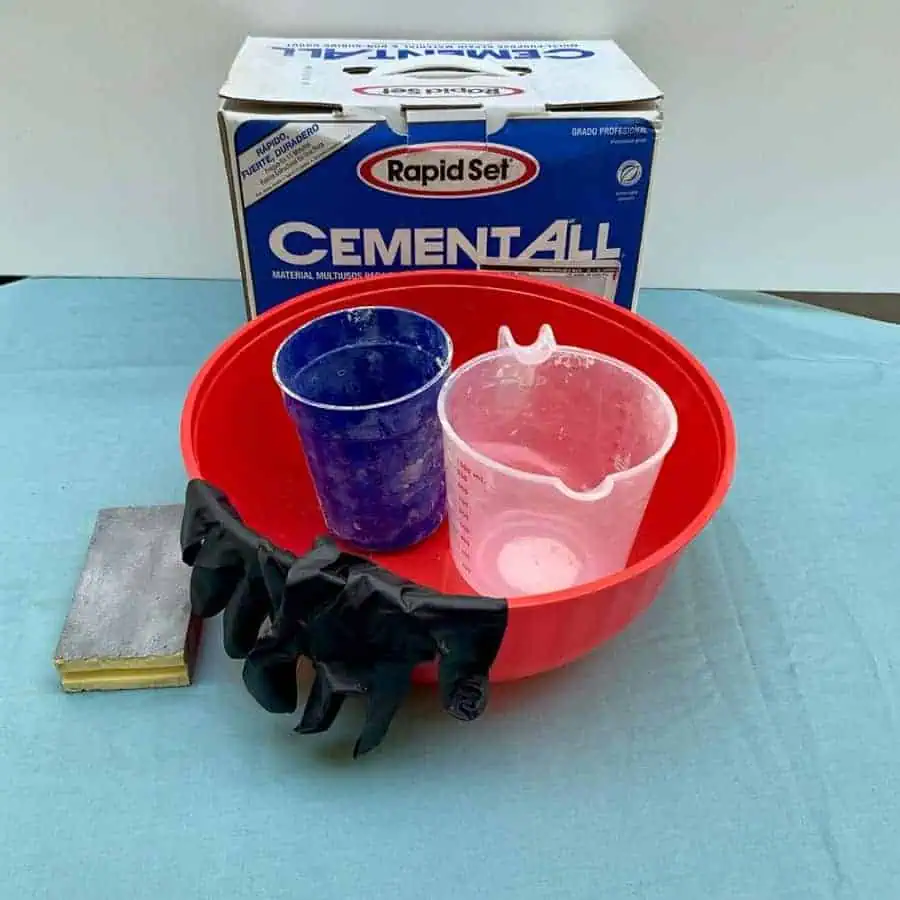
DIY Difficulty Level | Easy-Moderate
Materials For How To Make A Silicone Mold For A Concrete Planter From An Object
Part One- The Silicone Mold
- X-acto or craft knife
- ** Object suitable for replicating
- Hot glue gun
- 2-Part Silicone mold mix (1:1 ratio)
- Large container for mixing
- Drinking straw
- Plasticine clay– or other oil based clay
- Lubricant- any spray oil, or baby or mineral, vaseline etc.
- Rapid Set flow control– recommended
- Craft sticks

Part Two- The Cement Planter
- Cement- rapid setting– since this cement is smooth, it is one of the best concrete/cement products you can use in a mold
- Disposable bowl
- Disposable cup
- Durable nitrile gloves– I like these because they are so durable, you can rinse and reuse and end up costing less in the long run
- Safety glasses
- Safety mask rated for silica dust
**You need a container to hold the mold- see notes below. For the tutorial, we will be making our own.
To make your own box/container to hold the silicone mold, you’ll need:
- Corrugated plastic board
- Hot glue gun
- T-square or ruler
- Packing tape
**Important Material Notes For Part One
There are a few kinds of silicone that can be used for molds. Oomoo Mold Star 25 or 30 for this.
The 25 silicone is a little more flexible, which makes it easier to demold, but the Mold Star 30 will be a little more durable if you are going to be making lots of copies.
For this tutorial, the object that you will be making a replica for will need to have fairly straight sides.
Something round like a ball won’t work for this, nor will something that angles both inward and outward because you won’t be able to demold it.
There are ways to do this, but this tutorial only works for pieces with little angle.
In regard to the container that holds your concrete mold, you will need one that is about a ½” diameter larger around, and on top.
You don’t want it much bigger than this because you’ll be wasting silicone material.
You will want a container/box you can remove or cut into, so plastic is your best option.
If you can’t find a container that fits properly, then you can make one.
I find corrugated plastic the easiest to use for this and it can be found at Michaels and Home Depot.
Also, keep the object you want to make a mold of close to 3 x 3 x 3”.
It can be a little bigger than this, but anything beyond that, you won’t have enough silicone mix for, unless you buy two packages of it.
See Step 2 for the volume calculator.
Part One | How to Make The Silicone Mold
Tutorial Steps For How To Make A Silicone Mold For A Cement Planter
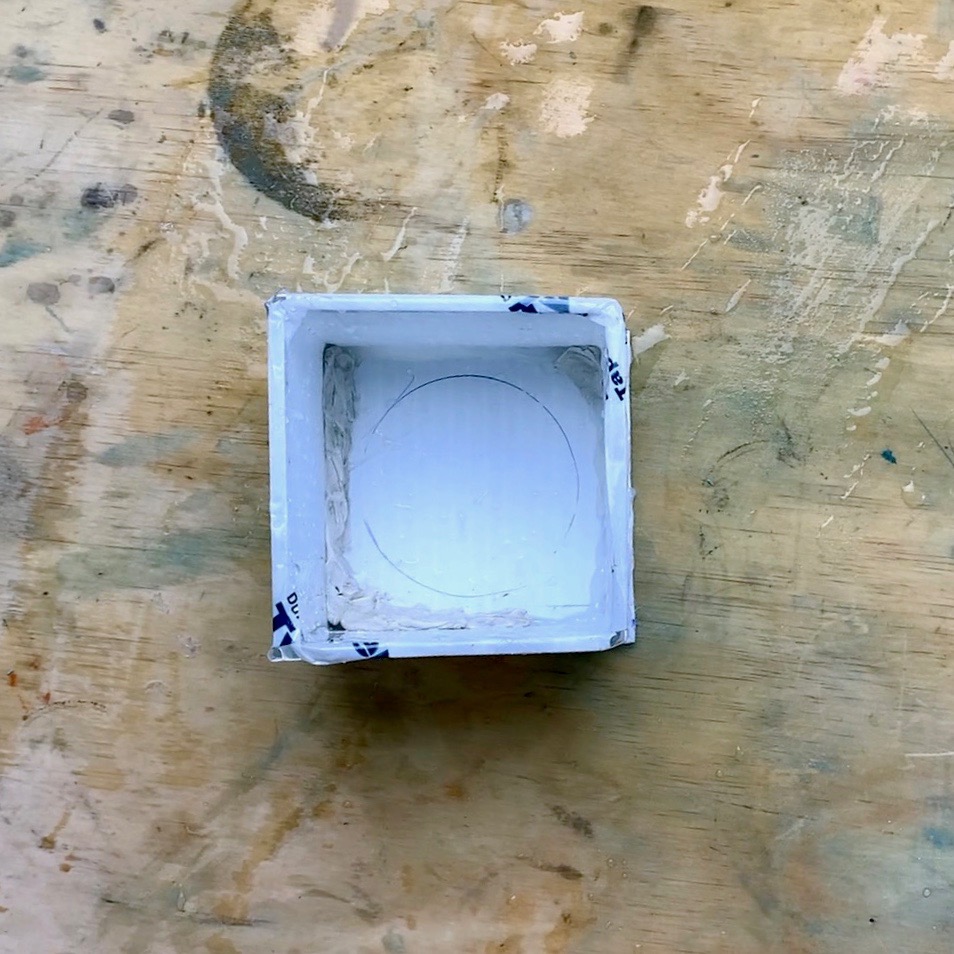
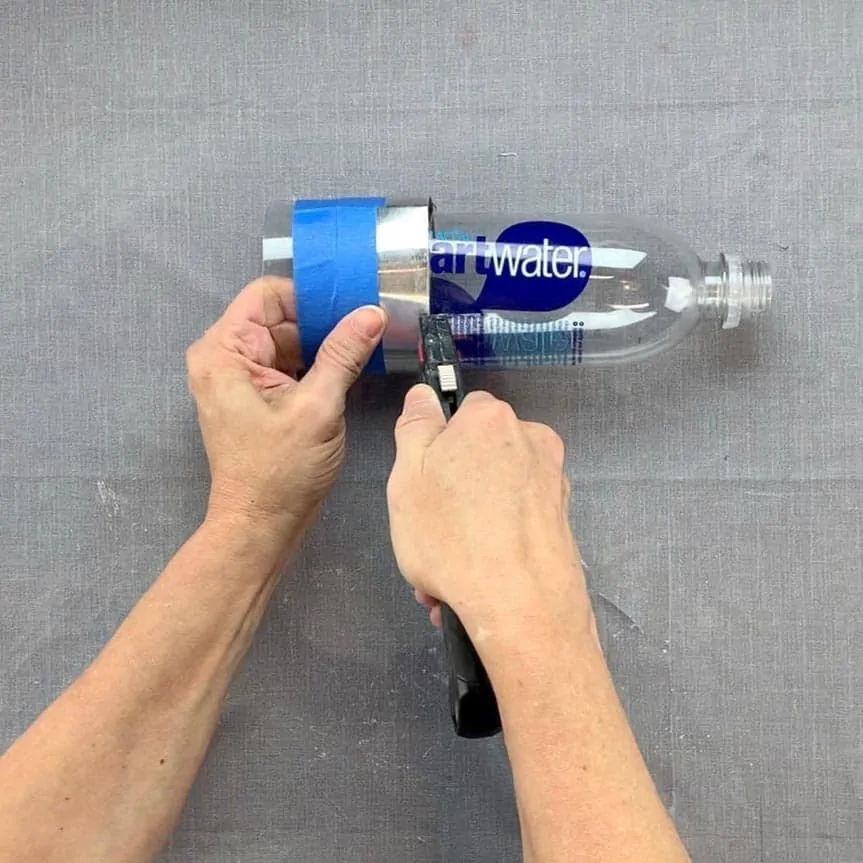
Step 1. Trim The Plastic Board For The Box

*Be sure the orientation of the board has the corrugated lines going up and down so that when the box is standing up, the lines are vertical.
To make the box for the concrete silicone mold, cut the corrugated plastic board to size, using a craft or X-acto knife. The glass I was making a replica of, was 3 x 3 x 2 ½”.
I then added ½” to each side measurement, as well as the top. So with the ½ added, I added up the length of each side, which became 14”. Then I marked each of the sides at 3 ½”.
*Be sure the orientation of the board has the corrugated lines going up and down so that when the box is standing up, the lines are vertical.
This will be important since you are folding the lines for the walls and not cutting them.
Next, cut out the piece of the board and then score the sides where the walls will be folded.
To do this, cut through only the front side of the board, and leave the backside intact.
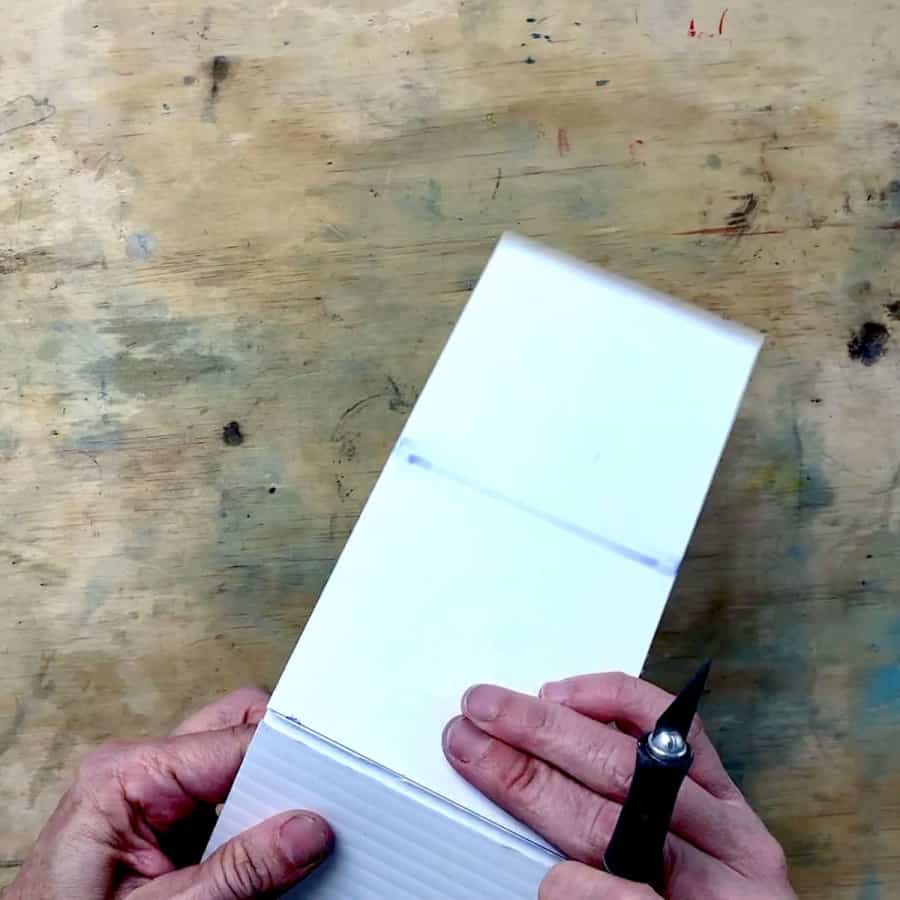

Now, cut a piece of the plastic board for the base and oversize it a bit. I made mine 4 x 4”.
Step 2. Secure The Silicone Mold Box

Fold the sides so you have a box shape and use packing tape to secure the two open sides together.
Also, add tape to both the inside and outside corners for extra support and to help with sealing the container.
In addition, I recommend adding tape to the top edge where the open corrugated spaces are, so silicone doesn’t slip down inside.

Next, trace the object/glass in the center of the base so you know in a future step where you will placing the object.
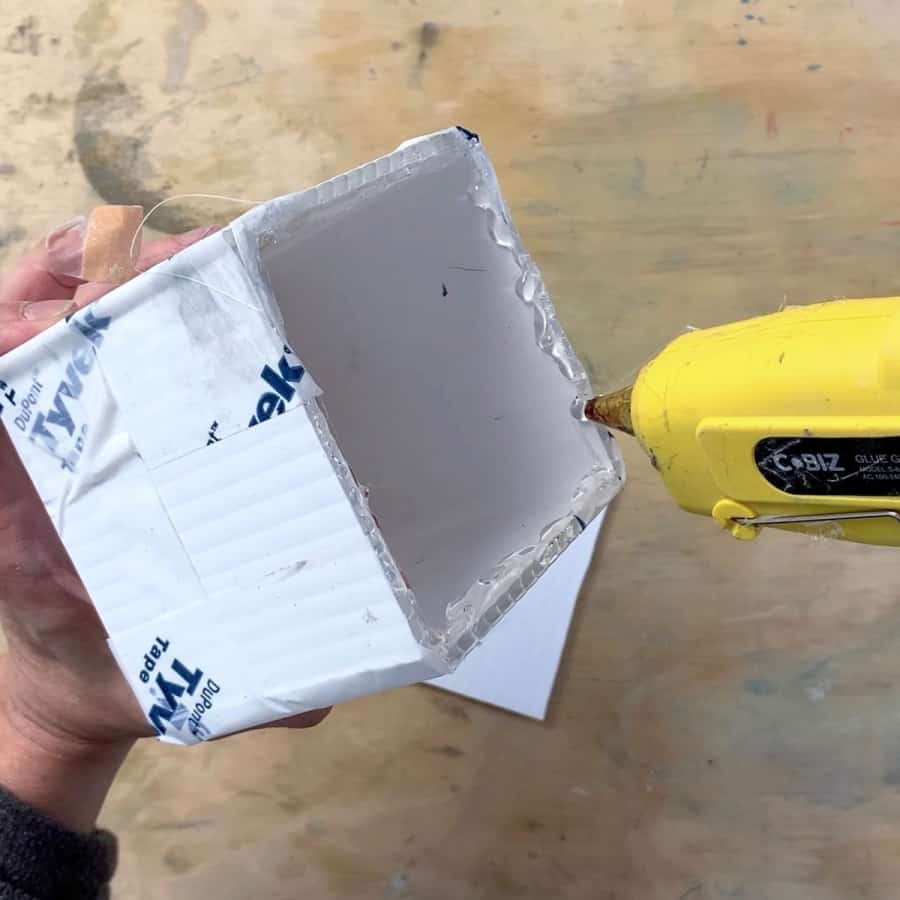

Now go ahead and a glue the sides of the box to the base from the inside of the walls.
Then reinforce the box by gluing the outside edges at the base as well.
At this point, now that you have the outside container, you should check to see how much mold material you will need to fill the container.
If you are using the Oomoo, then go to Smooth-On’s site and use their calculator.
You don’t want to be halfway through your pour just to realize you didn’t have enough mix.
Because at that point, there isn’t much you can do and the silicone will end up being wasted.
Step 3. Prep The Clay For The Drainage Support
Next, take a piece of clay and roll it out to ¼” thick and wide enough to cover the bottom of the container you are making the mold of.
This will help secure the straw in a later step, which you will be using to create the drainage hole.
FYI- The ¼” clay will reduce the inside height of your planter by the same amount.
Once the clay is rolled out, take the glass and place it on top of the clay and trace it.
This will be a little bigger than the inside bottom of the glass but will give you the general shape.
Now take the X-acto and trim just inside this trace line just a bit and it should be close enough to fit inside the container.

Press it down so that it fits firmly and relatively smoothly.
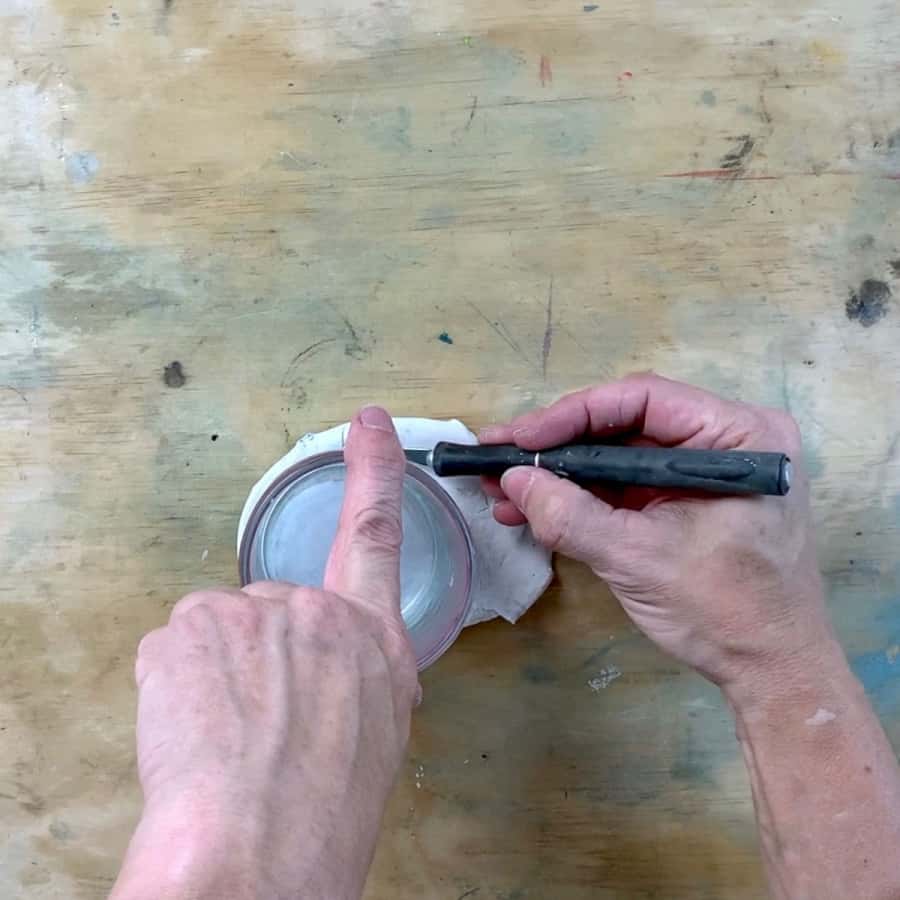
Step 4. Glue The Base To The Box
First, trace the bottom of the container to be replicated onto the center of the base.
Next, use hot glue to secure the base in the container where you traced it.
Be sure to first glue the box sides from the inside, then reinforce it with glue from the outside.
Step 5. Seal The Silicone Mold Box
Take some of the clay and roll it around in your hands so that it’s skinny and long and push it into the bottom of the container where the sides meet the base.
This will help prevent leaks when the silicone is poured in. Make sure to cover all edges and not leave any gaps.
I added some clay to the corners (vertically) as well for good measure.
Be sure you don’t build up the clay too much that you lose more than ¼” between the box sides and the piece you are replicating for the planter.
Once you think you have it sealed, test it for leaks by pouring some water into it.
If it doesn’t leak, or if the leaks are very minor, then you are good. Otherwise, add some more clay where you saw the leaks.
Step 6. Build Up The Sides (if necessary)

If you need thicker sides, then roll out some clay to what the added thickness is that you need.
I added ⅛”. Shape it into a rectangle and roll it and place it inside the glass.

Then use your finger to smooth it around the inside of the container. You can use a little oil to help smooth it.
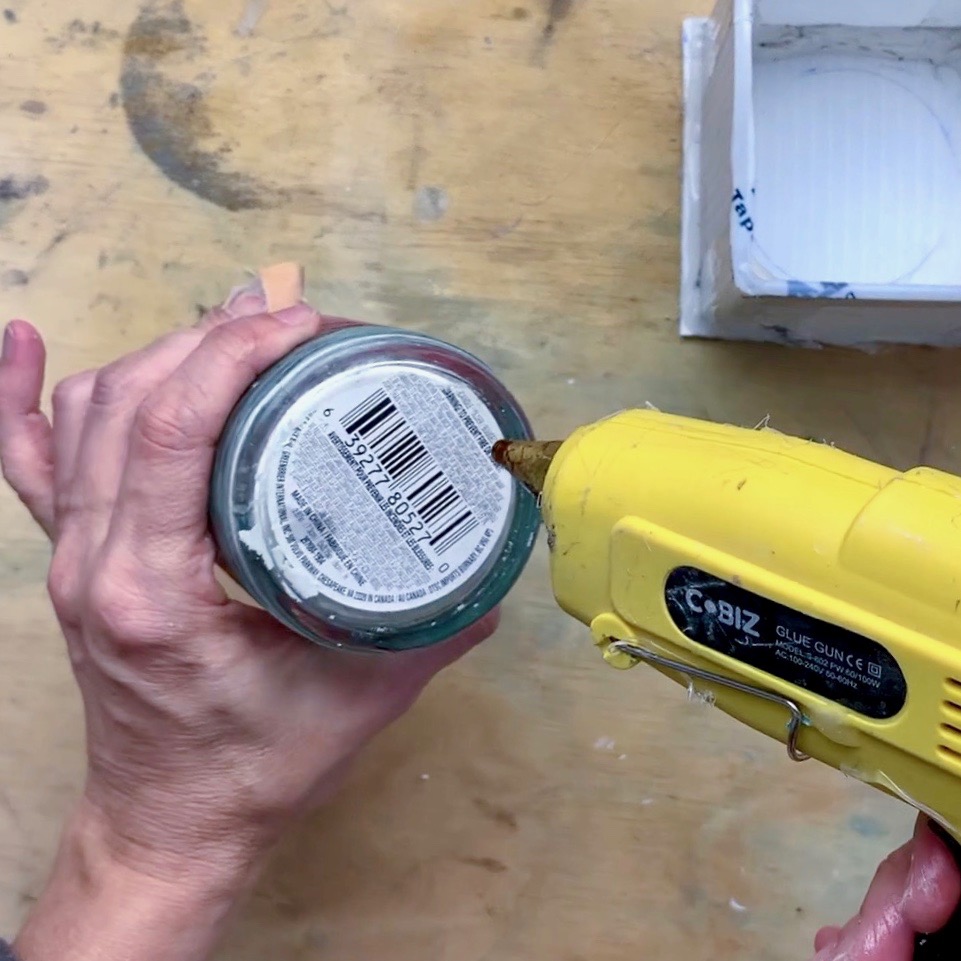
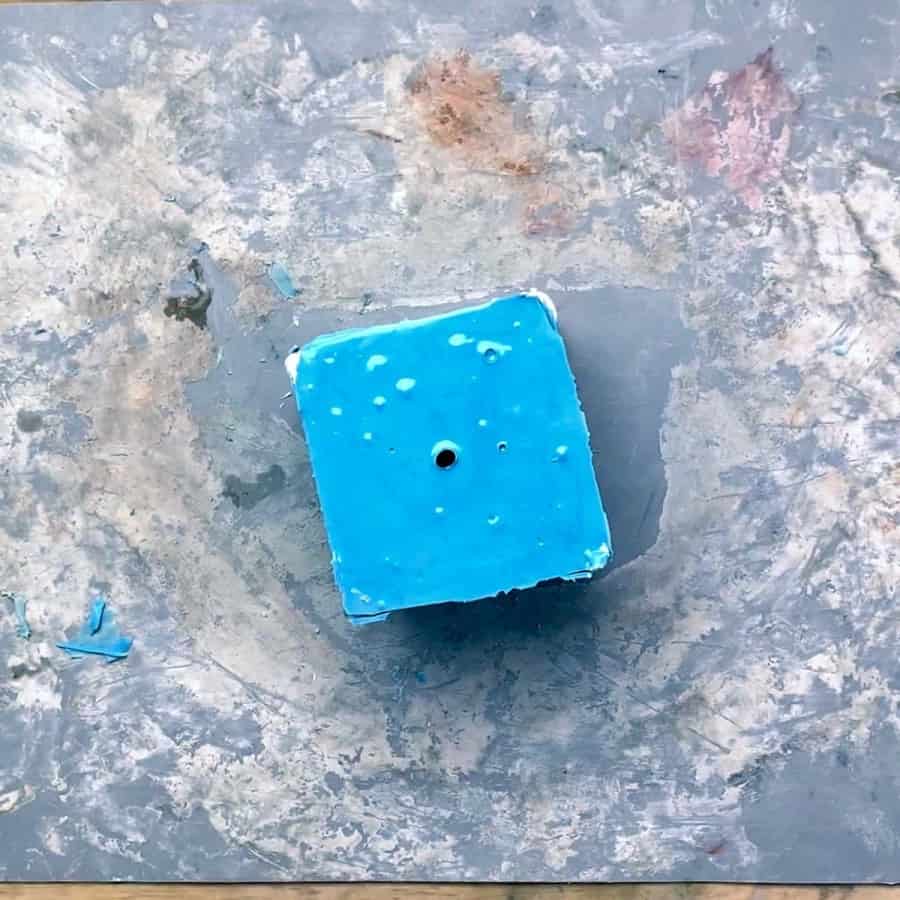
Once it is smooth, add the straw to the center of the bottom by pressing it to the bottom.
Trim the top of the straw so that it’s sticking out only about 1 ½” above the container.
Add a little piece of clay to the top so that silicone doesn’t accidentally get inside.
Now apply a fairly generous amount of oil to the container to help with demolding.
Step 7. Combine The Mold Parts A & B
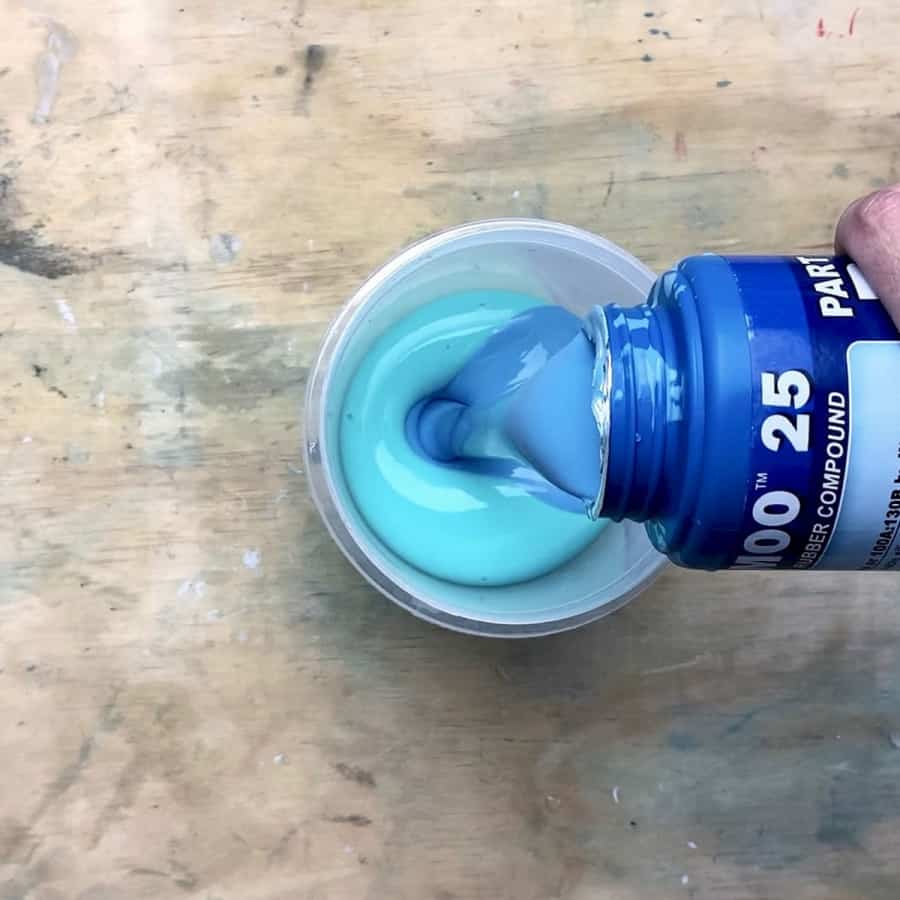
Open your silicone containers and mix part A separately and then Part B separately.
Then pour them into a large container and mix them together.
These need to be mixed well and be sure to scrape the sides of the containers while mixing.
You will know they are fully combined when the two colors are fully blended into one.

I recommend placing a rigid board underneath (like plywood) to help with vibrating.
Now pour the silicone mix into the mold. You should try to pour it in so it goes to the lowest points first.
Fill everything until you reach the top. Vibrate the mold by tapping the sides and shaking and tapping the board underneath.
If you are using the Oomoo 25, then your official cure time is 1 hour and 15 minutes. Mine took closer to 2+ hours.
Final Step (Part One). Demold The Container From The Cement Silicone Mold

Once the silicone has cured, remove the box by cutting through the tape and pulling the sides apart.
Now pull out the straw and push the container out of the mold.
This should come out with not too much trouble if you lubricated it.
You may need a second set of hands- someone to push, while the other pulls.
Part 2 | Make The Cement Planter From Your Handmade Silicone Mold
Step 1. Cast The Cement Planter From The Mold
Now that you have your own DIY cement planter silicone mold, you are ready to cast the planter.
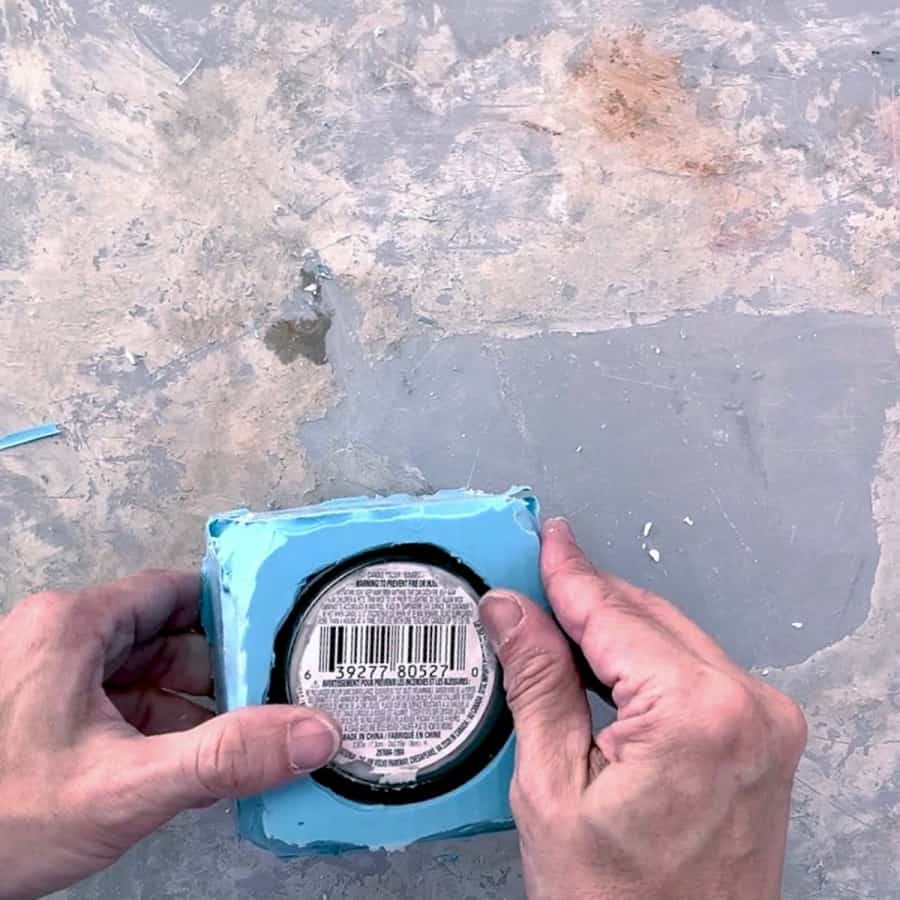
First, plug the drainage hole back up with the straw.

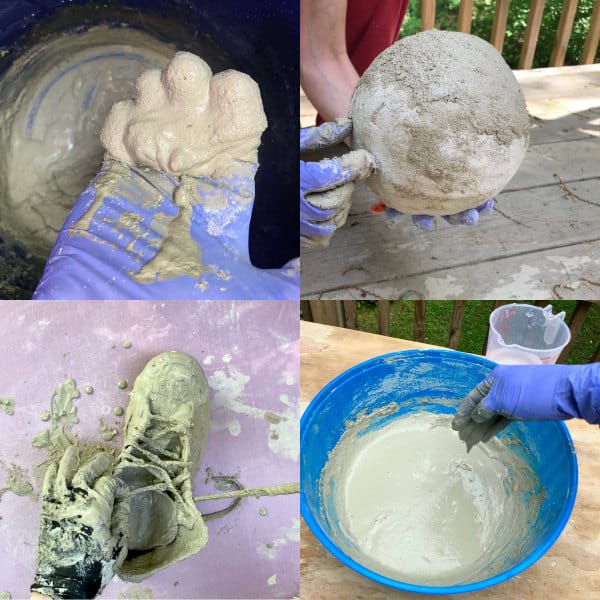
Now mix the cement. For this project, you should use the flow control because when pouring into a silicone mold, you want the cement to be a little bit runny.
Runny normally means more water, which often equates to cracking. To help prevent this, there’s Flow Control.
It will help the mix be more runny, but without you need to add more water to do it.
Add about ¼ of a teaspoon to about 2 cups of water and mix it in well.
You won’t use this much water, but this is the proportion that worked for me.

Now add the water to cement. It should be the consistency of a thin-regular milkshake- fluid enough to pour.
Pour the mixture into the mold at its lowest point and fill it so that it mounds up a bit on top.
Use a craft stick to help push the cement down into the mold.

Next, place the rigid board back underneath and vibrate the mold by shaking and tapping the sides, as well as the board underneath.
The cement should now level out the top. You can also use the crafts stick to scrape off any excess from the top.
Let the cement cure for at least 2 hours.
Step 2. Demold The Silicone Mold For The Cement Planter

Demold the cement from the silicone. Get an old towel or cloth and put it underneath it to help cushion it, then push it out.
Again, you may need a second set of hands. Be gentle while removing the planter and don’t apply too much pressure on it.
Final Step (Part Two). Finish The Edges of The DIY Cement Planter

Sharp edges should be very minimal, and only likely on the bottom. If needed, sand the bottom.
I prefer a #60 grit sanding sponge, but a regular one will work, it just might take a bit longer.
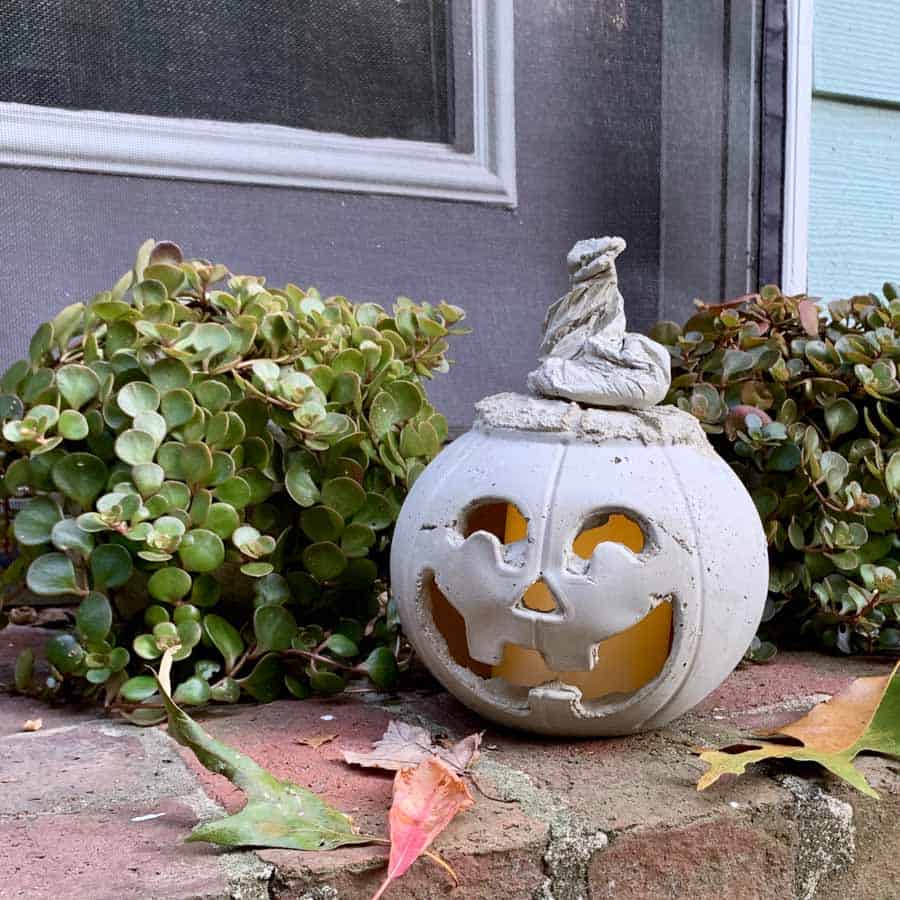
If you like this tutorial, then you may also be interested in this silicone mold planter tutorial where I made one from PVC pipes.
Did you know that silicone’s not the only material you can use for making a concrete planter mold?
You can also use latex rubber. Here’s a tutorial where I used a brush-on latex rubber mold to make a Mini DIY concrete cowboy boot planter.
You can also find more in-depth information for making concrete planters here.


Silicone Mold Textured Planter
How to make a silicone mold for a cement planter. Choose an object, like textured glass, to make a copy of and turn it into a DIY planter.
Materials
- Silicone parts A & B
- Cement
- Corrugated plastic board
Tools
- Please see the full materials list above the tutorial.
Instructions
- Trim The Plastic Board For The Box
- Secure The Silicone Mold Box
- Prep The Clay For The Drainage Support
- Glue The Base To The Box
- Seal The Silicone Mold Box
- Build Up The Sides (If Necessary)
- Combine The Mold Parts A & B Final
- Demold The Container From The Silicone Mold
- Cast The Cement Planter From The Mold
- Demold The Silicone Mold For The Cement Planter
- Finish The Diy Cement Planter’s Edges

Wow! Beautiful project and gorgeous results! I love it !
Hey Ellen, thank you so much for this tutorial- both the video and written instructions were really thorough, clear and helpful! You are easy to learn from and I appreciate the straightforward style you have! Wish I could take this tutorial from you in person, as I think you’d make a great instructor. 🙂
I’m *so* looking forward to trying this out once I’ve got a little extra dough for materials!! Can’t wait! I’ve got a potted plant business and I’m hoping to make my own planters, as those are the most expensive part of my business. As it is now I’ve just been painting unglazed terra cotta, which is totally fun and gives a nice effect… but I want more control over my overall visual style and a sense of cohesion.
Anyway thanks again for all the work you put into this- I’m gonna keep an eye on your website here to guide me along the process. Loved learning from a fellow opinionated and down to earth creative (fingers crossed I get to hear your self proclaimed foul language one day too LOL- its a big part of my vocabulary).
Hope you’re well and keeping those paws busy!
<3 liz
Hi Liz,
Sorry for the slow reply here. Thank you, I’m glad you find my instructions helpful!
That’s so neat you have a potted plant business. Maybe I can learn from you!
Ha! I love that I have a fellow opinionated, down to earth and foul mouthed reader! ? You wouldn’t believe how hard I have to work at editing the swear words out of my videos. ? I’ll edit together a B-roll some day- you’ll see.
Let me know if you have any questions!
Ellen