Rainbow Colored Concrete Candle Holder (Step by Step)
In this tutorial, we’ll be making a lovely DIY concrete candle holder with layers of rainbow colors. Use this colorful concrete home decoration to illuminate your favorite outdoor gathering space.
Here I go again, jumping out of my comfort zone and adding cheery colors to my project with this DIY rainbow-colored concrete candle holder.
Do you know that we are many months into living at our new home and we still don’t have a single piece of artwork hanging up on the wall?
You’d think for someone who was an art student, it wouldn’t feel like I was taking such a risk. Maybe I’m afraid of color commitment? I did manage to paint muted metallic colors on these concrete candles.
Well, maybe this colorful little candle is a baby step. :0}
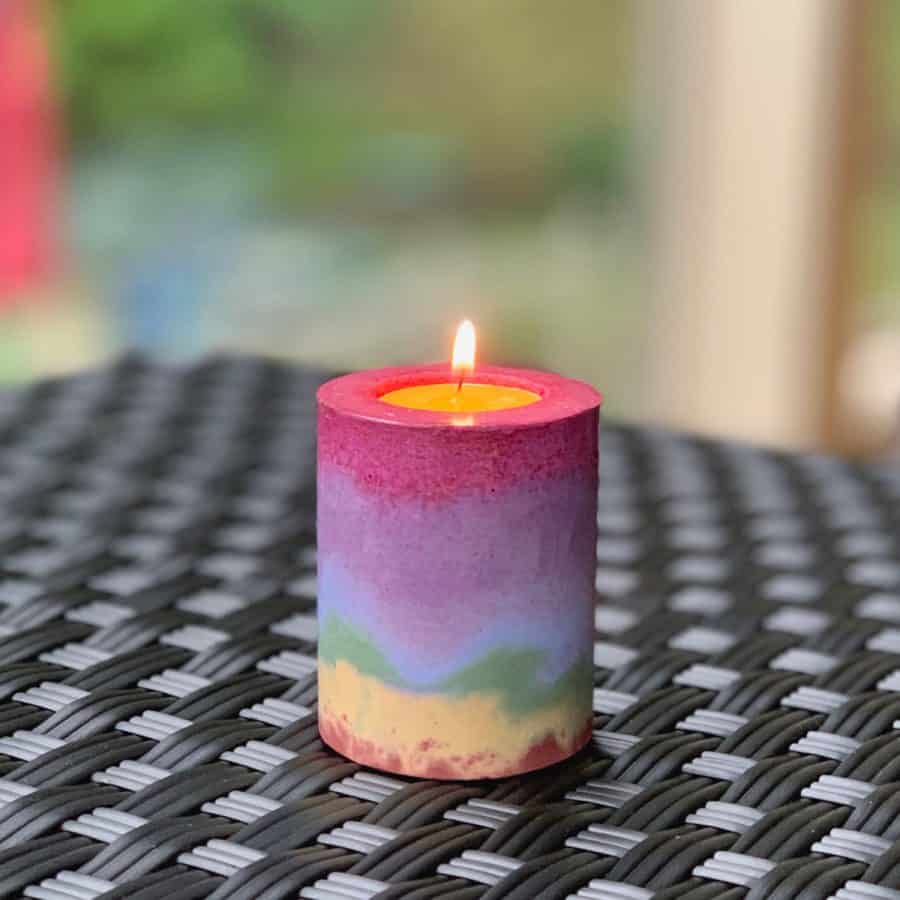
This candleholder was pretty easy to make –don’t let the lengthy tutorial fool you. It’s just that when there are 7 colors to add and you’re making your own mold, it does add a few extra steps.
This article may help if you’re looking for more in-depth about concrete pigments.
But boy, you do save quite a bit of money by using water bottles instead of using those pre-made silicone molds.
This candle has been a joy to use on our screened-in porch. It has a nice outdoorsy feel to. Check out this article for other unique DIY patio ideas.
I love making concrete candle holders and have lots of tutorials for them because they are great for giving as mother’s day gifts and birthdays.
Some of the links on this page have been provided as a convenience for finding materials. These links may also be affiliate links. As an Amazon Associate I earn from qualifying purchases, at no extra cost to you.
I only recommend products I’ve used and loved, unless otherwise stated. Click here to read my full disclosure policy.
DIY Difficulty Level | Easy
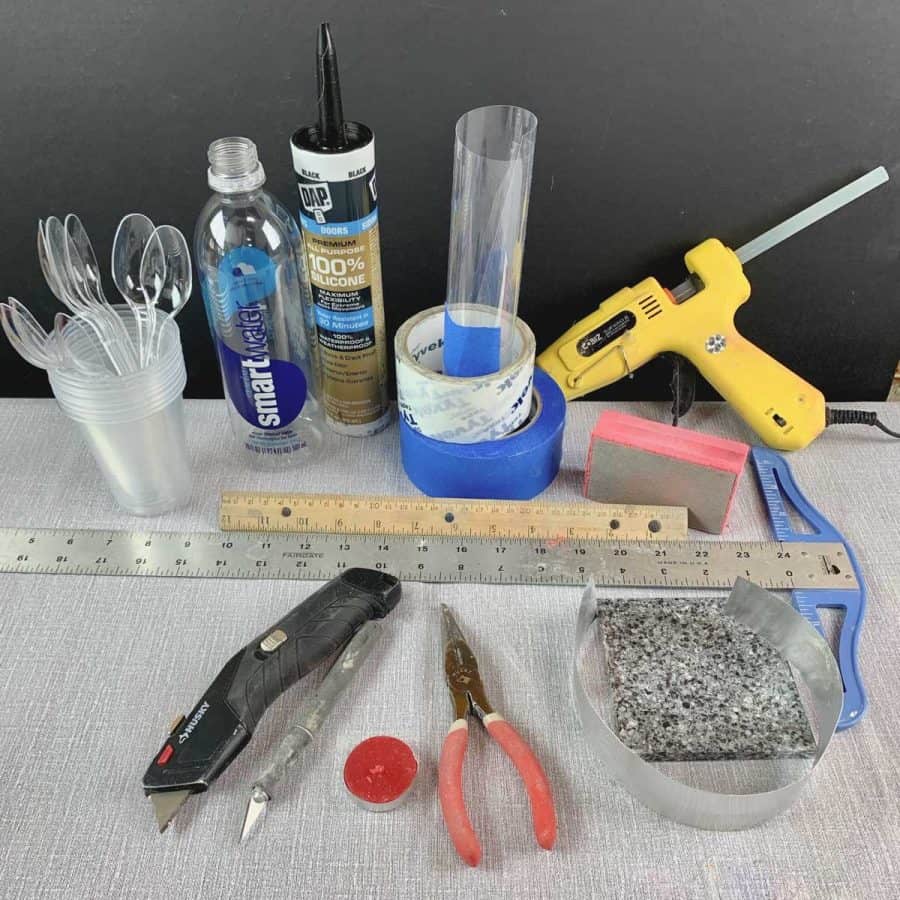
Materials For Making A Rainbow Colored Concrete Candle Holder
Concrete Mix and Sealer
- White cement
- Disposable mixing bowl
- Disposable cup
- Durable nitrile gloves–you can rinse and reuse and end up costing less in the long run
- Safety glasses
- Safety mask–silica rated
- Concrete sealer
- Foam brush
Concrete Candle Holder Mold Materials
- SmartWater bottle 20oz size*
- Disposable plastic cups or dishes for mixing pigments (7)
- Piece of aluminum flashing
- Blue tape
- Ruler
- Packing tape
- Scissors
- Hot glue
- Hot glue gun
- 100% Silicone caulk and caulk gun
- Tea light candle in rainbow colors
- X-acto knife
- Utility knife
- T-square
- Acetate sheet (plastic sheet film)
- Smooth tile or rigid, flat board
- Needle-nose pliers
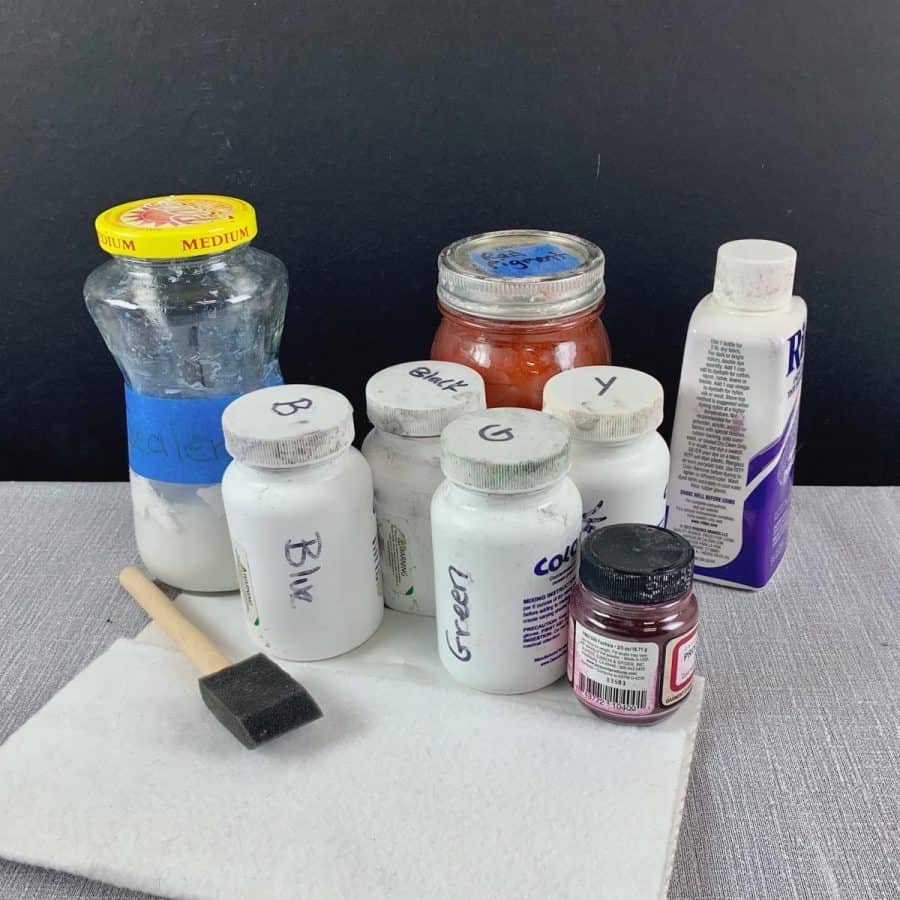
Concrete Pigment Options
- Powdered concrete pigments–multi pack (recommended)*
- Rit dyes
- Acrylic paints–Use this kind, as others may cause cracking
- Cold-water dye
Finishing Materials
- Concrete sealer
- Foam brush
- White felt adhesive
*Materials Note:
The powdered concrete pigments are the easiest to work with and have the most predictable coloring outcome.
And a white mix will yield the brightest color, but an off-white mix will also work. However, it will work better if you make it white. This article explains how to make your off-white colored mix white.
Plastic containers are a good thing to use for concrete candle holder molds. Using something like cardboard is going to leave marks and bits and pieces will get stuck in the concrete.
Plastic will also allow you to skip the need for a release agent, as it has a nice smooth surface.
The reason I specifically list the SmartWater bottle in the materials is that the plastic is fairly thick which gives it enough rigidity that makes it easy to cut. It also has nice straight sides.
Thin plastics will be difficult to trim and tapered bottles won’t result in cylindrical candleholders.
However, you can find other brands with similar characteristics. This is just a common one that you should be able to find at most grocery stores and gas stations.
Rainbow Colored Concrete Candle Holder Tutorial Steps
Before starting the tutorial, it may be helpful to read my article comparing the different concrete mixes and sealers– Cement & Concrete Crafts Tests!
Another important article is Making Cement Crafts Techniques & Tips with info on cement materials, mixture consistencies, demolding, safety and clean up!
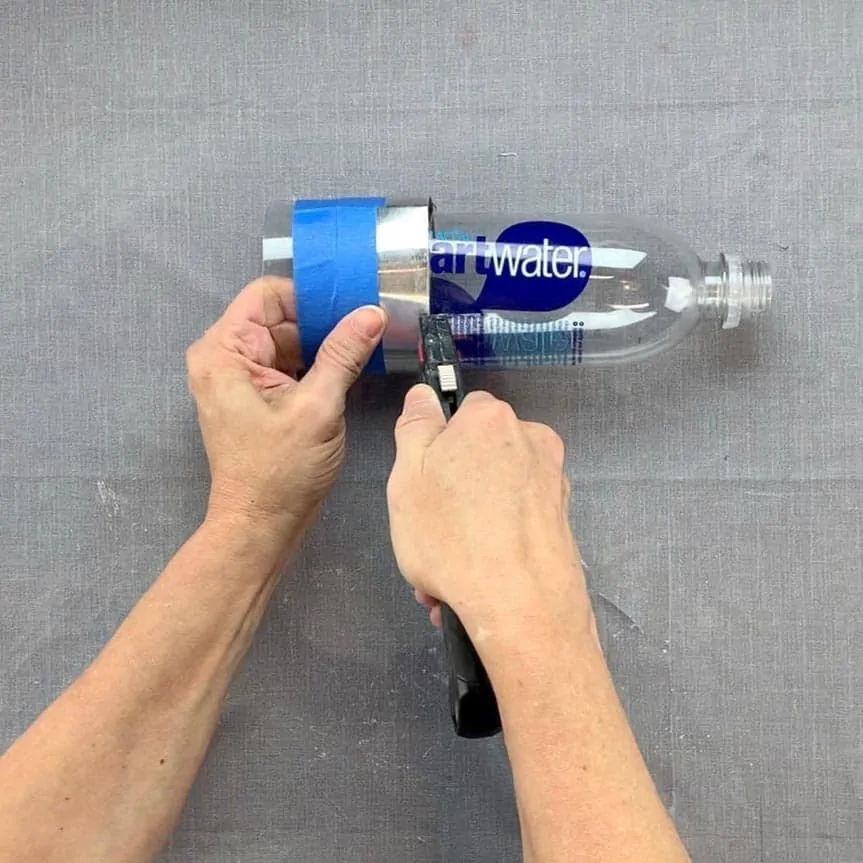
Step 1. Make A Straightedge For The Cylindrical Shape
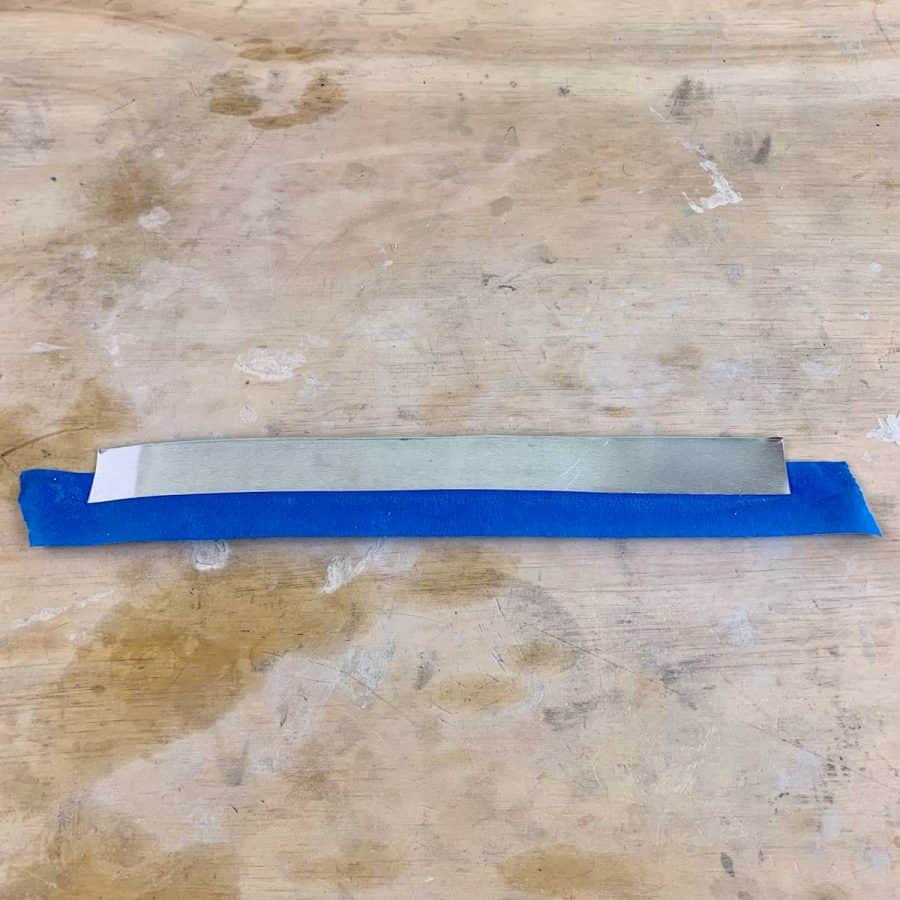
The first step in making the concrete candle holder mold is to cut the water bottle to size.
But to get a straight cut, you’ll first need to make a straightedge. This will get wrapped around a cylinder that you can use as a cutting guide.
The easy way to do this is to take a piece of aluminum flashing that is about 14” long and 2” wide.
It’s important that one of the long edges–the 14” side is the factory cut edge. This is the edge that you’ll cut against.
After trimming the flashing to size, take a piece of blue tape that is about 18” long and run it along the side of the flashing, leaving 2” extra on each end.
You want the edge that you cut to be the side with the tape so that the factory edge is exposed.
Step 2. Cut The Bottle To The Size Of The Candle Holder

Place the bottle on the table and with a ruler, then measure from the table up the bottle 1” and mark this with a permanent marker.
Make two more marks around the bottle that are also 1”. You just want to start the bottle so that the mold begins above the bevel that’s at the bottom.
Next, take the flashing and wrap it around the bottle so that the factory edge lines up with the marked lines. Then press the tape securely onto the bottle.

Use the utility knife with a fresh blade to cut the bottle. Hold the knife squarely against the flashing, so it is very straight, press into the bottle.
Then slice around it, while continuously holding the blade to the flashing.
The concrete candle holder I made is 3 ½”. To make it this height, measure from the table up the bottle 3 ½” and mark this in three locations around the bottle.
Repeat the step for cutting the bottle using the flashing as a guide, but be sure to place the flashing on the area that will be your mold.
This is because if your blade accidentally slips, it will cut the area of the bottle that won’t be your mold.
The flashing will protect the mold instead.
Step 3. Make The Base And The Inner Concrete Mold

Cut a piece of acetate sheet to cover the bottom of the tile and use adhesive spray to glue it to the tile.
The acetate should be a little smaller than the actual tile so that the tape has enough tile surface to stick to.
In the photos, you can see I only taped two sides, but I should have taped all four sides.
I realized this later on and added the first tape in my reach which was blue tape. But you should use packing tape since it is waterproof, not blue tape.

The wax candles (without the aluminum casing) will act as the form for your inner mold. First, pull out the metal table that’s holding the wick inside the candle.
Then place the candle on the acetate and trace it, and then cut the circle out and set it aside.
Now use a T-square and cut another piece of acetate film that is 18” long. The aluminum candle holders come in slightly different sizes.
And so the width of the 18” strip of acetate will be determined by the height of the tealight casing. Mine was ½”.
Take the strip and wrap it around the actual candle. Then use packing tape to tape it together at the seam, both inside and outside.
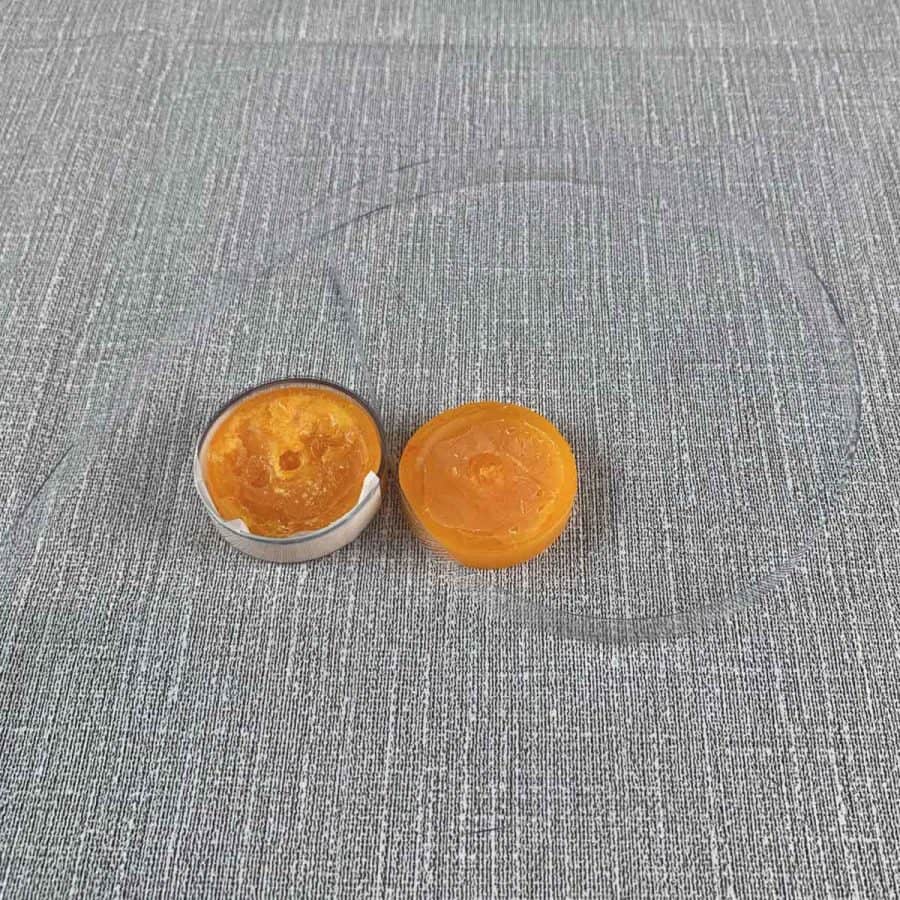
These rainbow colored tealight candles were especially wonky and uneven, compared to the white ones I have bought in the past.
So I needed to make them more even by filling in the low points with hot glue.
This ends up making their removal from the concrete when demolding more of a challenge, but it’s important that they are flat.

So if your candles are uneven, use the glue, heated at a low temp to fill them in to level. You can also use a different candle. I couldn’t find my white ones, or I would have used those.
However, this only works if your white tea light candles are at least as wide in diameter and as high as the colored ones.
Otherwise the colored ones will be too big to fit inside the finished candle.
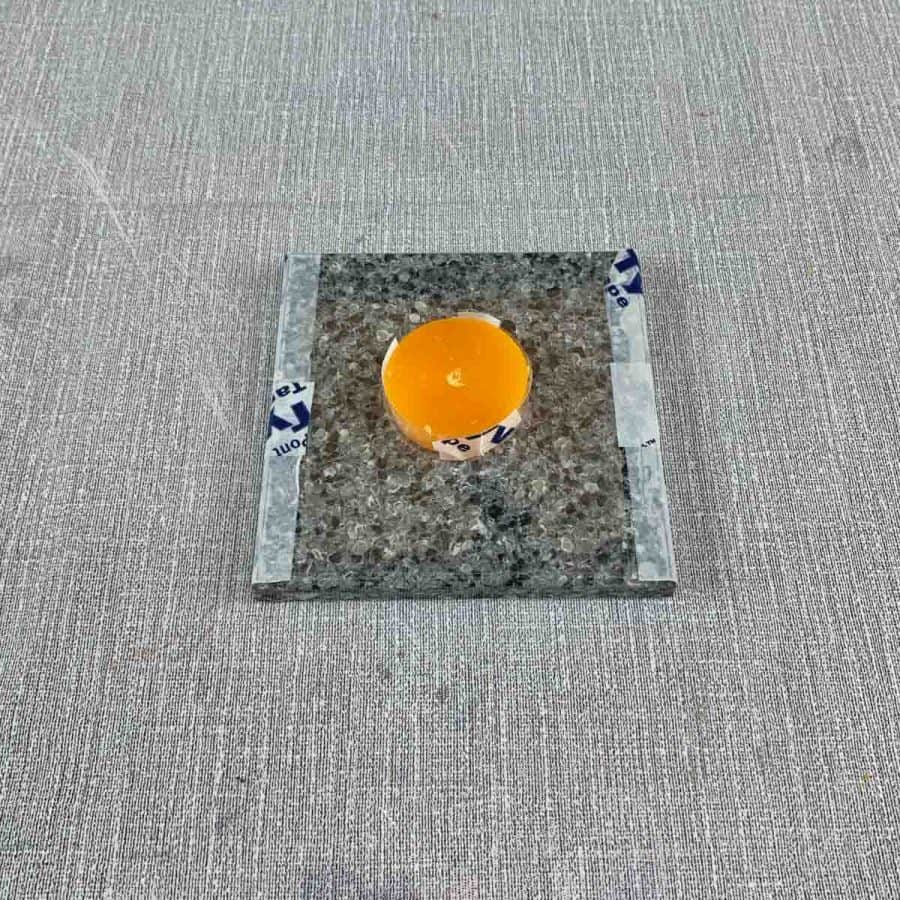
Once the candles are made level, glue the acetate circle to the top of the candle. Then glue the bottom of the candle to the center of the acetate that’s taped to the tile.
Do your best to not get glue outside of the candle so that your lines will be clean on your cured concrete candle holder.
Step 4. Attach The Base And Concrete Candle Holder Mold
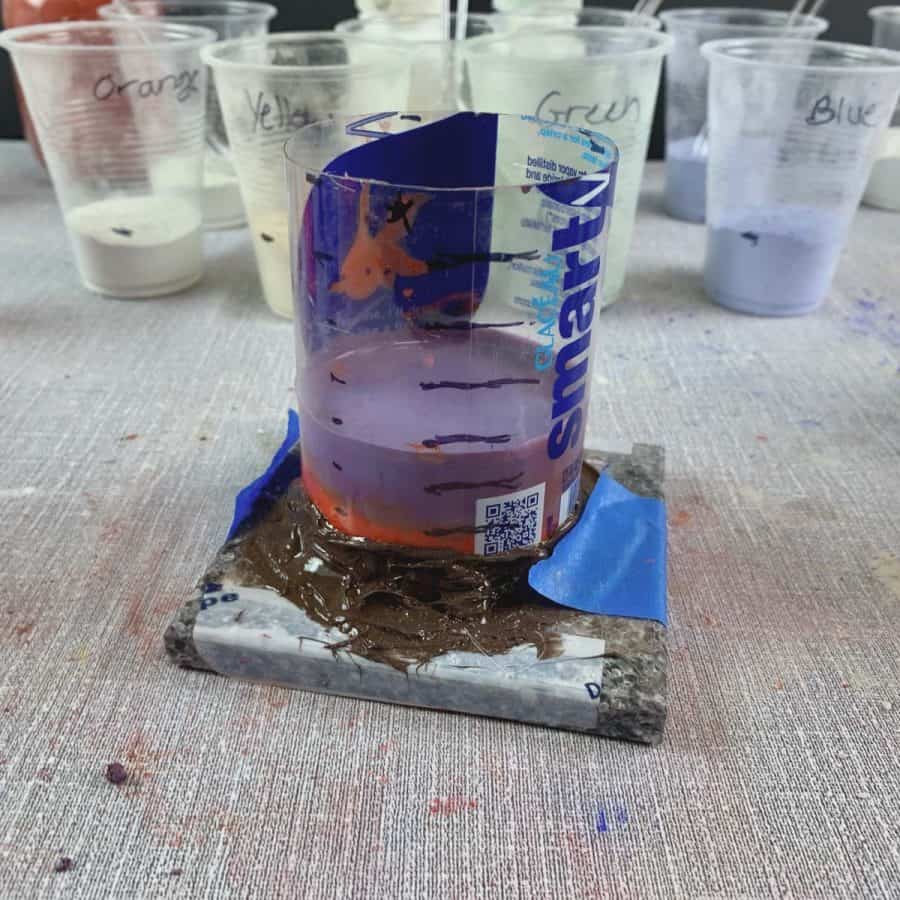
Take the water bottle sleeve and center it over the candle and hold it while tracing the outside of the bottle.

Now add a small dab of hot glue in three spots around the bottle to help secure it because you are going to caulk it into place, instead of gluing it.
The reason for this is because the silicone will make a cleaner outside concrete edge on the candle holder than the glue will.
These dabs of glue will help keep the plastic mold in place while you are caulking it because it can easily slip on the acetate during this process.
Between the hot glue and the traced lines, you have a little bit of backup in case it does slip.
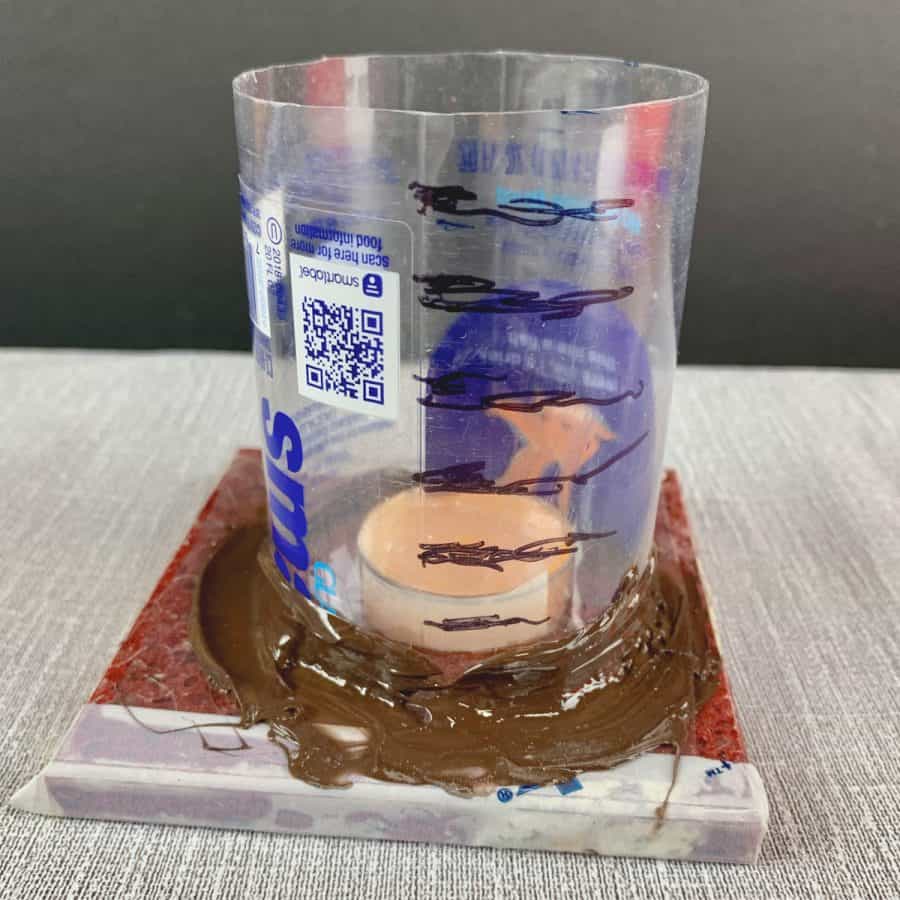
Use the 100% silicone caulk to caulk around the outside of the sleeve mold to secure it to the base. This will take a few hours to dry.
Be sure the caulk is fully dry before moving on to the next step. To test that it’s dry, push on it with your finger, it should feel rubbery and not have any soft spots.
If you are going to make the rainbow candle holder have all 7 colors of the rainbow, then use a permanent marker to make 7 equally spaced lines on the side of the mold so you know approximately where to stop with each color.
I have already basically figured this out for you and have the measurement of the separate mix amounts in the next step, but you still may find this helpful for visual reference. I just eye-balled the marks.
Step 5. Mix The Colors And Cast The Layers Into The Candle Holder Mold
I used mostly the concrete powdered pigments for the candle holder colors, but for purple, I used RIT dye and for pink, I used a cold water dye.
I ended up skipping orange because I was running out of space, but that would have been the acrylic paint. You can read more details about coloring concrete crafts in this article.
If you are using the concrete powdered pigments, then you can get yourself a little more organized ahead of time.
Do this by adding the pigments to the concrete mix first, before mixing any of the water in, as you’ll need to add the water one at a time.
If you are using other types of non-powdered pigments, then you’ll need to mix each color with the concrete and water only as each layer gets added to the candle. However, you will still set up the colors.
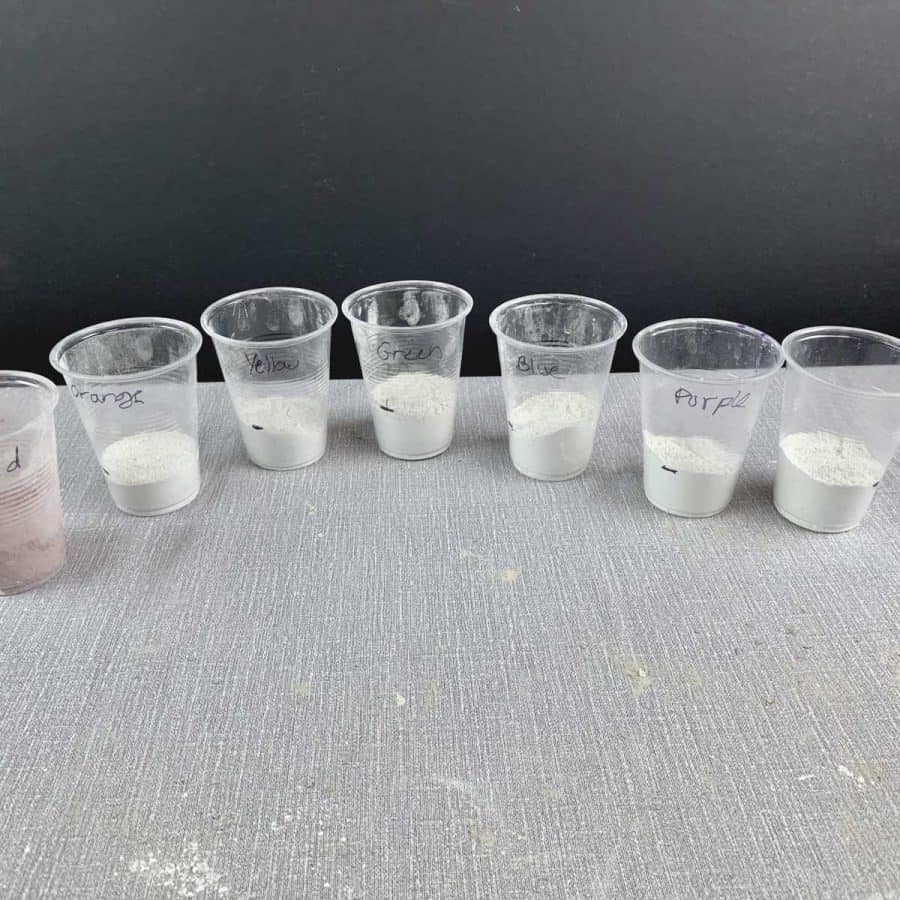
To set up the colors, place them in the order you want the order colors to be layered on the rainbow candle.
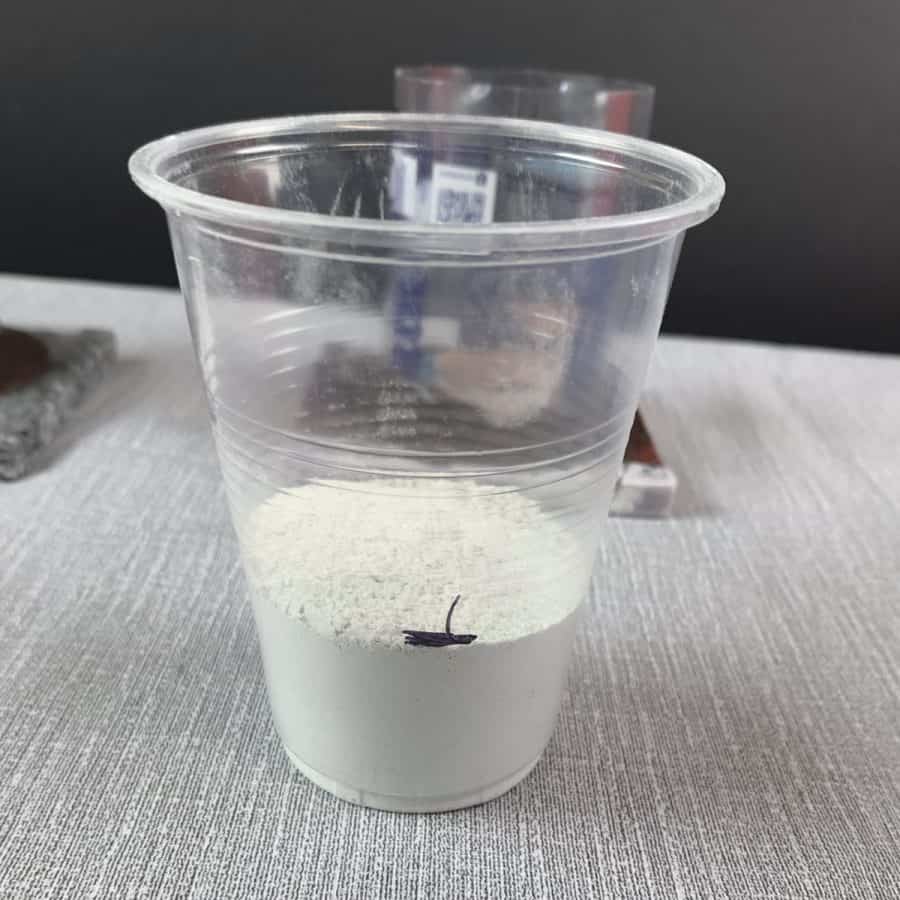
Now add 2 ounces of dry concrete mix to each cup and place a plastic spoon next to each.
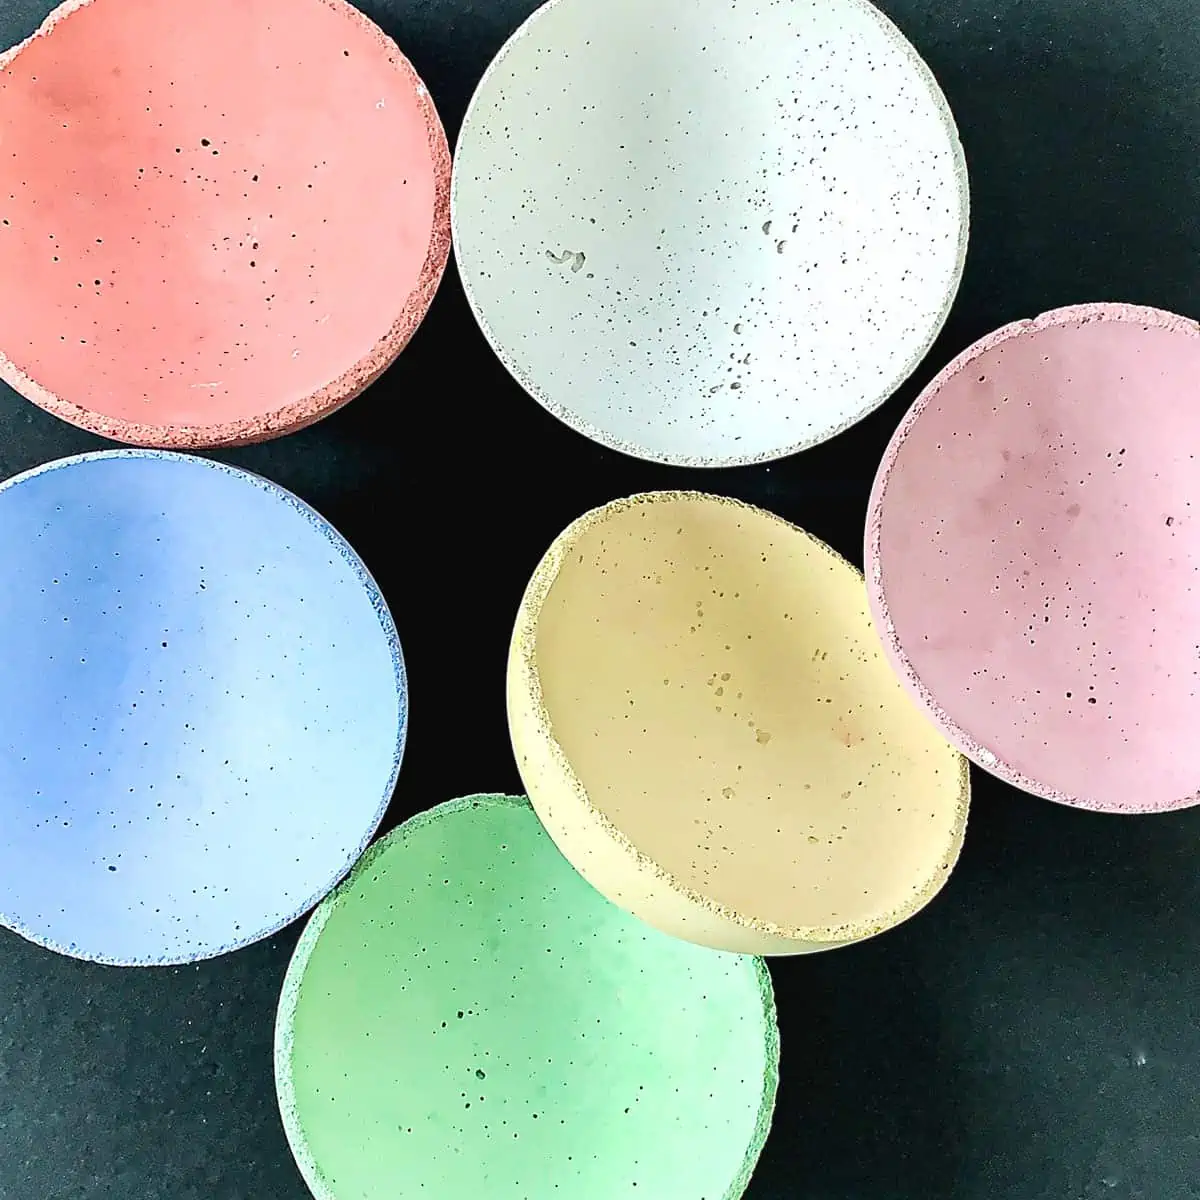
You can see I have my plastic cups labeled and in the official rainbow order. Red; orange; yellow; green; blue; indigo; and violet.
Also, keep in mind that you are casting the candle upside down, so the first color you place in the bottom of the mold is the top of your candle.
I forgot this and ended up working right to left (instead of left to right as intended) to get the pinky/violet at the top like I wanted, and the red at the bottom.
What I should have done, was to order the cups in reverse, with the red on the left.
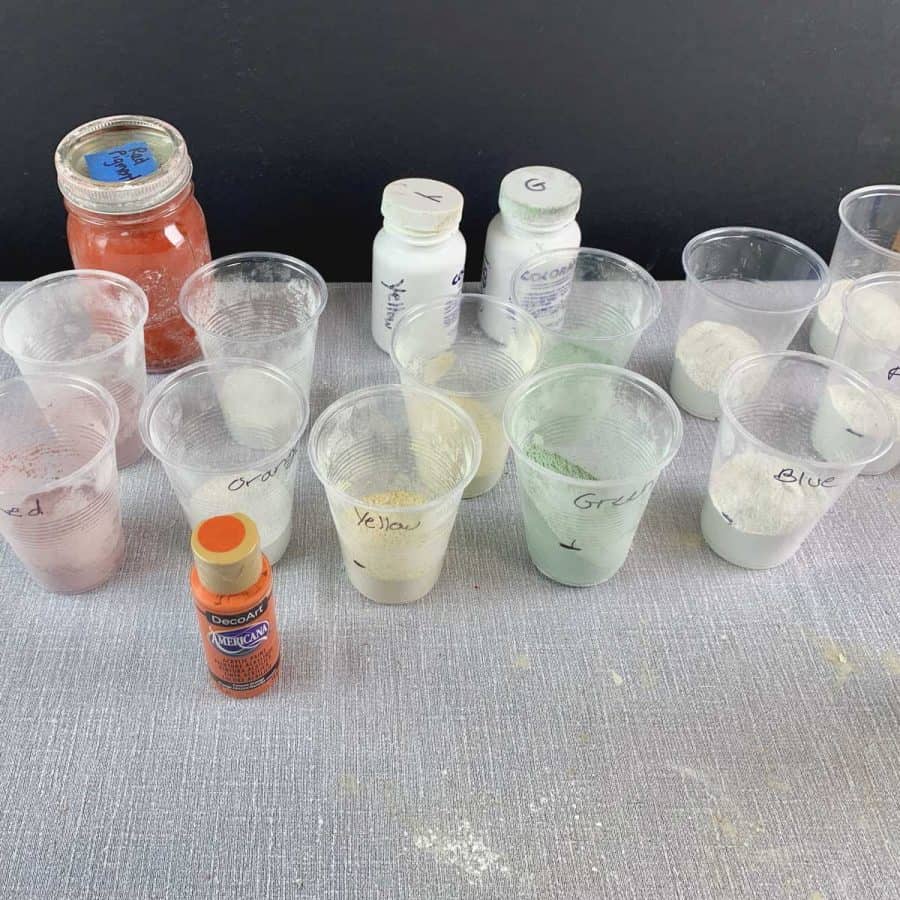
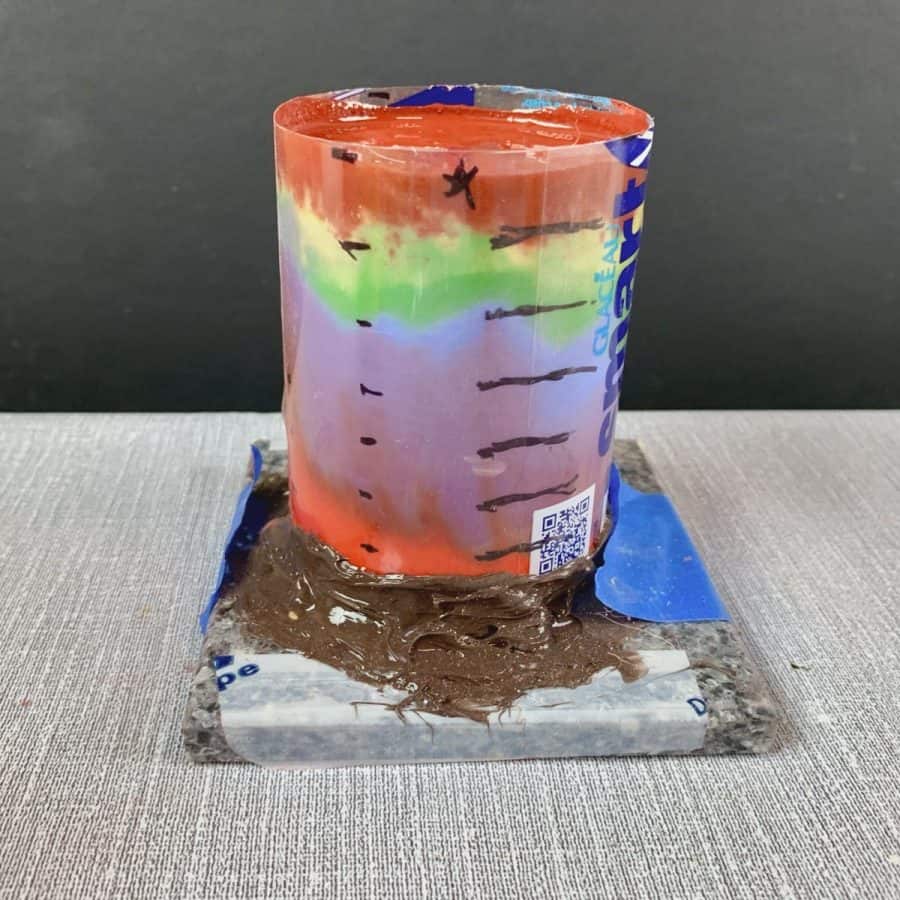
I made my candle holder highly pigmented and hopefully by looking at the photo, you’ll be able to judge the level of color added to my dry mix and how much depth of color that translated to on my cured concrete candle holder.
Hint: Keep an extra cup of non-colored concrete next to you to help in case you add too much water to one. With the extra concrete, you can just quickly add more concrete to fix the consistency.
First, mix together the concrete, pigment and water for the first color.
Mix them well until there are no lumps and then form the mixture into a mud patty-like consistency and place it into the bottom of the concrete candle holder form.
Vibrate this by lifting and tapping the tile on the table and very gently tapping the sides.
You’ll see the air bubbles rising to the surface, and as they slow, you’ll know you have vibrated the cement well enough. Repeat this with the next color.
With each layer, you’ll need to vibrate a little longer. Do this gently though, otherwise, you’ll end up with a marbled look, rather than rainbow layered rings.

The easiest way to control this is to keep the candle holder vertical when vibrating and shaking and tapping on the work surface.
Continue these steps for each layer.
Once you have reached the top, let the candle holder cure for 24 hours.
Step 6. Demold The Concrete Candle Holder
Start by removing the tape on the tile to free the acetate peel the acetate off of the bottom of the concrete candle holder.
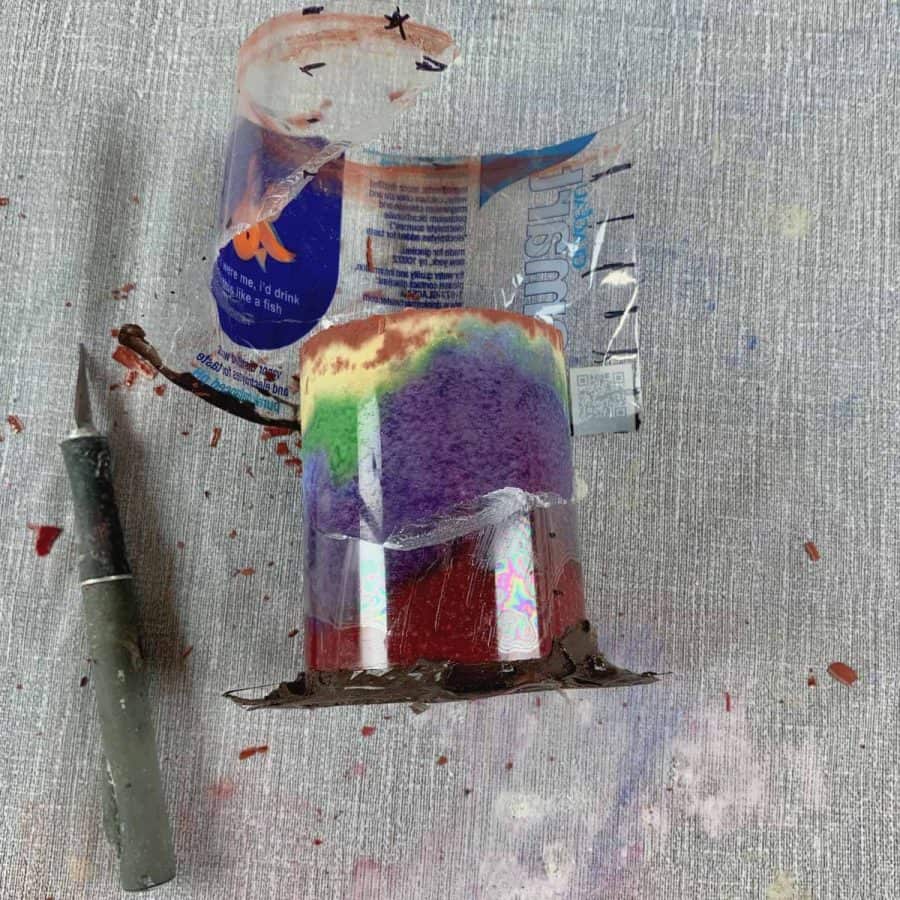
Then use the X-acto knife to start a slit in the water bottle plastic. Take care to not cut the concrete, just cut enough that you can grab ahold of the plastic.
Then pull the plastic downward until it peels off of the concrete.
Now remove the candle from inside the concrete. You may be able to grasp onto the strip of acetate that you wrapped around the candle, using needle-nose pliers to pull it out.
If concrete seeped under the candle then carefully push down on the concrete that is covering the edge so that the acetate is fully exposed and you can pull it out.
Take care when doing this that you don’t scrape the top of the candle. You can also try just gently tapping it at an angle.

Once most of the concrete is away from the acetate if you still can’t grab onto it well enough, take a utility knife and make an X-shaped cut through the center.
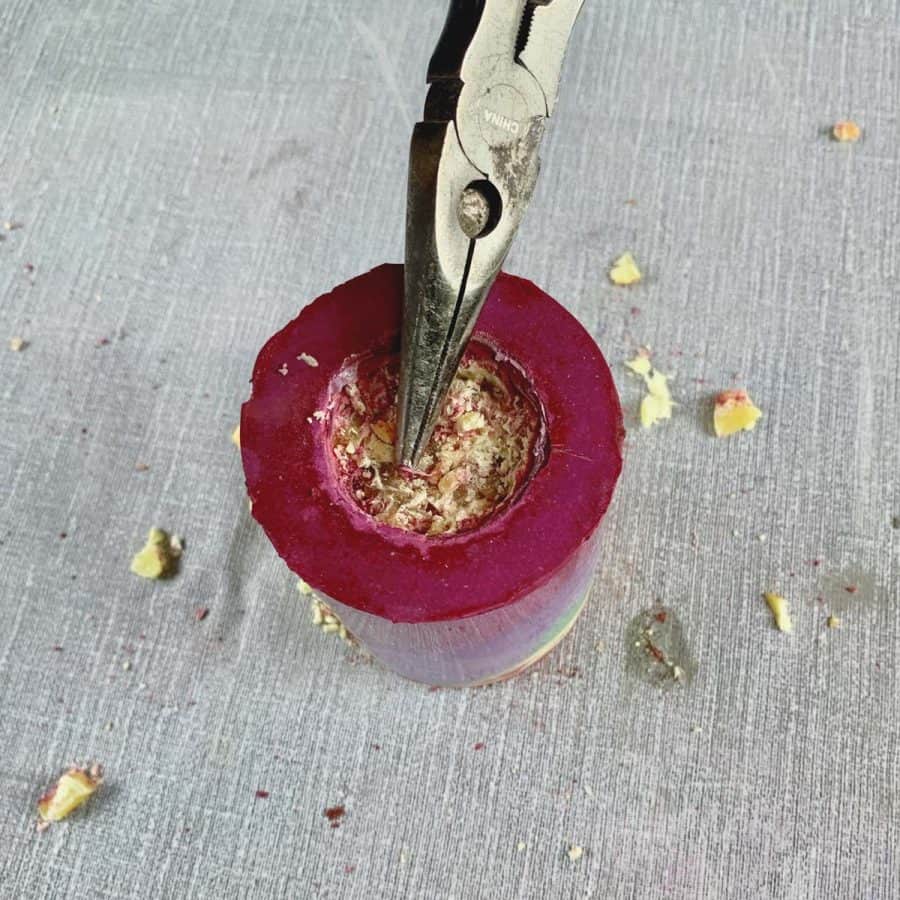

You should be able to pry up the loose wax and then grab the acetate to pull it out.
Like I mentioned in the material notes, the extra glue I needed to use to make this candle level made this more difficult to remove.
In the past, I have made these and getting the candle out was quite easy.
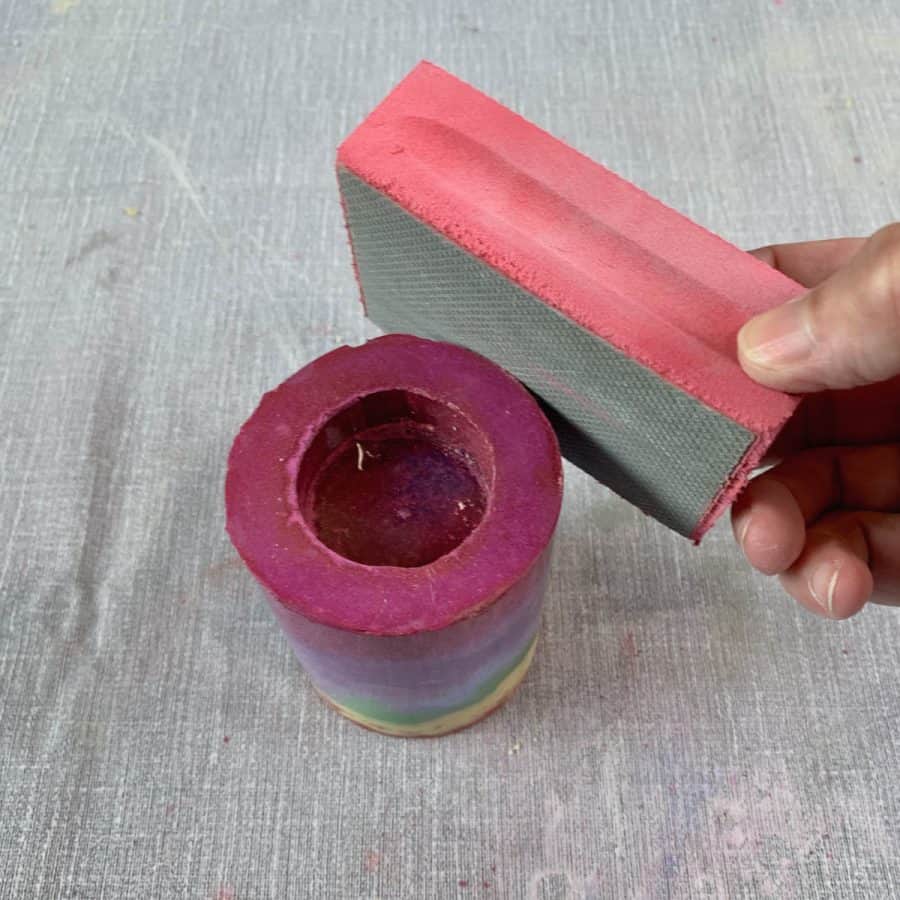
Once the candle insert is free, use the #200 grit diamond sanding sponge to sand any rough edges. Also make sure to sand the bottom to give it a flatter, smoother surface.
For the next step, you’ll seal the concrete candle holder which gets applied to dried concrete.
Since there’s still moisture in the concrete, you’ll need to wait another 24 hours before it can be sealed.
Step 7. Seal The Concrete Candle Holder
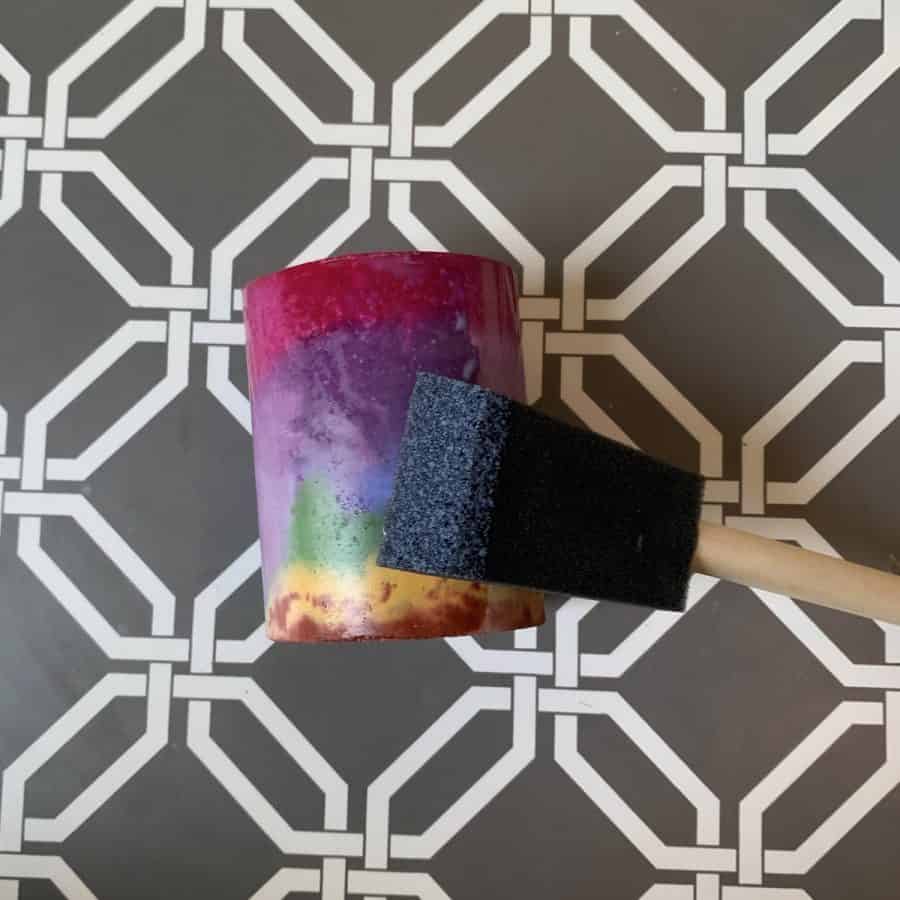
To seal the concrete candle, just pour a little bit of this matte sealer into a cup and use a foam brush to apply the sealer. Be sure to get the top, bottom and inside the tealight hole.
The sealer dries quickly, so before you seal the bottom of the holder, just wait about 5–10 minutes. It should be dry enough then to pick it up to seal the bottom.
Although the candle is inside of the aluminum casing, there is still a little bit of potential that wax could spill on the candle so I recommend sealing at least the top twice.
With this sealer, it’s recommended you wait at least 6 hours before reapplying a second coat.
Step 8. Protect Your Furniture With A Felt Bottom For the Candle

For the final step, take a piece of white felt and cut out a circle that is smaller than the diameter of the candle. Peel off the adhesive backing and stick it to the bottom.
Here’s how the second candle turned out. For this one, I used less pigment for some of the colors, I also added a layer of white in between most of the colors.
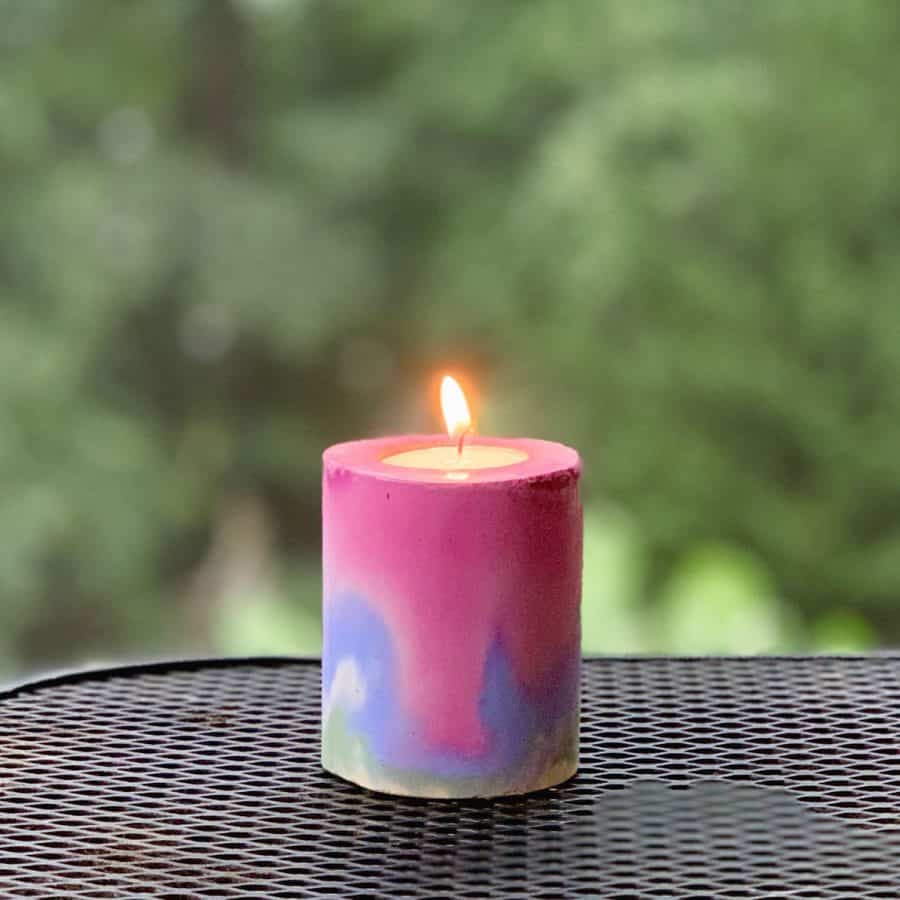
The layer of white wasn’t thick and mostly sat in the center and wasn’t very visible on the edges. I used a spoon to push it to the sides a bit, this is why it has more of a marbled effect.
Want more? Here’s a list of 12 concrete candle holder ideas!
If you love DIY concrete projects for gift-giving, then you may want to take a look at –25 Easy Handmade Gift Ideas With Concrete.
And here’s one where you can make your own candles specifically for Christmas gifts.
Don’t forget to Pin it for later!

Rainbow Colored Concrete Candle Holder
Use concrete pigments to make an amazing concrete candle holder that's colored like a rainbow. A fun DIY cement crafts tutorial.
Materials
- White concrete
- Colored concrete pigments
- Tealight candles
- Silicone caulk
Tools
- Please see the full materials list above the tutorial for details and links.
Instructions
- Make a straightedge to cut the cylindrical shape of the candle holder mold.
- Cut the bottle to the size of the candle holder using a utility knife.
- Make the base on a tile and the inner concrete mold with a candle.
- Attach the base and concrete candle holder mold with silicone caulk.
- Mix the colors into the concrete mix and cast the layers into the candle holder mold, be sure to vibrate the mold.
- Demold the concrete candle holder by removing the acetate and peeling the plastic off the concrete.
- Seal the concrete candle holder with matte sealer and a foam brush.
- Protect your furniture with felt for the candle by cutting a smaller circle and sticking it to the bottom.

You shouldn’t be afraid of colour Ellen – this is gorgeous. I’m so inspired by this 🙂
You’re so sweet! Glad you’re inspired.☺️
Great idea. Sorry, a little confused though. I understand you cut the base of the bottle and attach acetate. Is this to ensure that the candle has a smooth bottom ?
Also, the water bottle is hollow ? How did you fill it so that you could insert a smaller wax candle ? That part wasnt clear to me. could you pls explain – do u hv a video?THANK YOU!
Hi Sam,
Yep, the water bottle is open on both ends, a straight cylinder the exact shape of the finished candle. Take a look at the last pic in Step 2 and the pics in Step 3. You are casting this in reverse (upside-down) so it’s not the bottom of the candle holder you are making smooth, it’s the top- where the tea light goes. The pic in step 3 shows the tealight wrapped in an acetate strip and glued to acetate that’s taped to the tile. This creates the opening for the tea light candle to be inserted when the cement is cured. I may have a video someday. I recorded making a concrete candle a year ago, but it takes so long to create an edited video from the recording that I haven’t done it, but the 2 pics in step three should make it clear. You are looking at an upside down mold. The reason for casting upside down is because any concrete exposed to air will be rough and look messy, so they way to get a nice crisp look is to reverse cast. This works for everything- planters, etc. It’s more steps, but looks much nicer.
This project looks very easy and beautiful. I can’t wait to try it.